Difference between revisions of "Charting How To"
(→Manually Assigning Face) |
m |
||
| (29 intermediate revisions by 3 users not shown) | |||
| Line 1: | Line 1: | ||
| − | + | == Setting Number of Faces to Chart == | |
| + | Ad Manager allows you to define how you want to schedule the Subcontract. You can identify the number of Faces to schedule, and any threshold DEC or GRP values. To input this information, go to the Counts Page on the Subcontract window. This information can also be temporarily overridden from the Counts Page in the Chart window. | ||
| + | [[File:New_Subcontract_Counts.JPG]] | ||
| − | + | To set the total number of Faces to schedule on the Subcontract, put the desired value in the Total field. You can then specify how many of these Faces you want Fixed (Faces that are to remain scheduled for the entire Subcontract) and Preemptable (Faces that can be sold to other clients without compensating this client). All other Faces will be treated by Ad Manager as Movable (Faces that can be sold to other clients, but this client is to be compensated with another Face). | |
| − | + | ||
| − | + | If a DEC (Daily Effective Circulation) or GRP (Gross Rating Point) is to be reached, this can be specified in the Circulation portion of the window. The value can be entered in and either DEC or GRP selected. | |
| − | + | Finally, you can set which characteristic you wish to chart toward, the Face Count (number of Faces) or the Circulation (GRP/DEC). | |
| − | + | == Setting Targeting Requirements == | |
| + | A user can identify any desired conditions (or Face characteristics) that they may want to meet. Similarly, there may be certain conditions attributed to a Face that a user may wish to avoid. Ad Manager allows you to store these criteria with the Subcontract for future reference, or to create/change them during the Assignment process. Note that criteria changed while assigning Faces is not saved with the Subcontract. | ||
| − | If you | + | If you are setting the targeting for a Subcontract, go to the Template page of the Subcontract window. If you are changing or creating criteria to run during the Chart process, go to the Template tab of the Chart window. |
| − | + | To Identify required or preferred categories | |
| + | To Identify excluded or avoided categories | ||
| + | To set other Face properties to be met or excluded | ||
| + | The following is an example template screen. | ||
| − | + | [[File:New_Face_Properties.JPG]] | |
| + | |||
| − | == | + | === Required/Preferred Categories === |
| − | + | ||
| − | [[File: | + | If there is a condition or characteristic you wish to chart or skew towards, this information is entered into the Required/Preferred Categories box on the left side of the screen. To add a new positive skewing condition, click on the New Button ([[File:New_add_button.JPG]]). To modify a skewing condition, highlight the appropriate item and double click or click on the Properties button ([[File:New_properties_button.JPG]]). |
| − | + | A window will appear where you can identify the Group, Advertiser or characteristic you wish to chart towards. You can also identify whether this characteristic must be met (manditory requirement), or whether it is desired. In a pool of available locations, Faces with the desired characteristics will appear at the top of the list. | |
| − | + | To remove a positive skewing condition, highlight the appropriate item and click on the Delete button ([[File:New_delete_button.JPG]]). | |
| − | |||
| − | |||
| − | |||
| − | |||
| − | |||
| − | |||
| − | |||
| − | |||
| − | |||
| − | |||
| − | |||
| − | |||
| − | |||
| − | |||
| − | |||
| − | |||
| − | |||
| − | |||
| − | |||
| − | |||
| − | |||
| − | |||
| − | |||
| − | |||
| − | |||
| − | |||
| − | |||
| − | |||
| − | |||
| − | |||
| − | |||
| − | |||
| − | |||
| − | |||
| − | |||
| − | |||
| − | |||
| − | |||
| − | |||
| − | |||
| − | |||
| − | |||
| − | |||
| − | |||
| − | |||
| − | |||
| − | |||
| − | |||
| − | |||
| − | |||
| − | |||
| − | |||
| − | |||
| − | |||
| − | |||
| − | |||
| − | |||
| − | |||
| − | |||
| − | |||
| − | |||
| − | |||
| − | |||
| − | |||
| − | |||
| − | |||
| − | |||
| − | |||
| − | |||
| − | |||
| − | |||
| − | |||
| − | |||
| − | |||
| − | |||
| − | |||
| − | |||
| − | |||
| − | |||
| − | |||
| − | |||
| − | |||
| − | |||
| − | |||
| − | |||
| − | |||
| + | === Excluded/Avoided Categories === | ||
| − | + | If there is a condition or characteristic you wish to chart or skew away from, this information is entered into the Excluded/Avoided Categories box on the right side of the screen. To add a new negative skewing condition, click on the New Button ([[File:New_add_button.JPG]]). To modify a skewing condition, highlight the appropriate item and double click or click on the Properties button ([[File:New_properties_button.JPG]]). | |
| − | + | A window will appear where you can identify the Group, Advertiser or characteristic you wish to avoid or exclude. You can also identify whether Faces with this characteristic must not appear (manditory requirement), or whether it is desired they not appear. In a pool of available locations, Faces where it is desired the characteristics not appear will be at the bottom of the list. | |
| − | + | To remove a negative skewing condition, highlight the appropriate item and click on the Delete button ([[File:New_delete_button.JPG]]). | |
| − | + | ||
| − | + | ||
| − | + | ||
| − | + | ||
| − | + | ||
| − | + | ||
| − | + | ||
| − | + | ||
| − | + | ||
| − | + | ||
| − | + | ||
| − | + | ||
| − | + | ||
| − | + | ||
| − | + | ||
| − | + | ||
| − | + | ||
| + | === Face Properties === | ||
| − | + | The Other Required Face Properties feature at the bottom of the screen also allows you to filter the Faces to be selected based on other properties. For example, you can use this feature to select only those Faces that are illuminated, facing a certain direction, have a certain DEC value, or are located in a particular city or near a particular store. | |
| − | + | The Other Excluded Face Properties feature at the bottom of the screen also allows you to filter the Faces to be avoided based on other properties. For example, you can use this feature to exclude any Faces that are illuminated, facing a certain direction, have a certain DEC value, or are located in a particular city or near a particular store. | |
| − | + | The suggested order that information should be read in when trying to determine how to set an item up is as follows: | |
| − | + | 1. Is it Mandatory | |
| − | + | 2. Is it Preferred or Avoided | |
| − | + | 3. What Category or Advertiser is it | |
| − | + | 4. Is it a Restricted condition or not | |
| − | + | ||
| − | + | ||
| − | + | ||
| − | + | ||
| − | + | ||
| − | + | ||
| + | For example, " I must have Faces where Movies are not restricted" would show in the top left pane as Movies (under name)-blank (under the restrcition column)-Yes (under Mandatory). | ||
== Manually Assigning Face == | == Manually Assigning Face == | ||
| Line 169: | Line 68: | ||
If there are any warnings generated by the assignments, Ad Manager will provide a listing of them. You can double click any of these warnings for more details. You can choose to "Accept" a warning, in which case Ad Manager will assign the Face. Any Faces that are listed in the Conflicts window when you click on Close will be rejected by Ad Manager and not assigned to the Subcontract. | If there are any warnings generated by the assignments, Ad Manager will provide a listing of them. You can double click any of these warnings for more details. You can choose to "Accept" a warning, in which case Ad Manager will assign the Face. Any Faces that are listed in the Conflicts window when you click on Close will be rejected by Ad Manager and not assigned to the Subcontract. | ||
| − | + | [[File:New_Conflict_Assignment.JPG]] | |
=== Assignment by Face Number === | === Assignment by Face Number === | ||
| Line 185: | Line 84: | ||
Once you have made the necessary changes, click on Assign to schedule the Face. If there are any warnings generated by the Face, Ad Manager will display them, allowing you to Accept the Face, or to Cancel the assignment of the Face. | Once you have made the necessary changes, click on Assign to schedule the Face. If there are any warnings generated by the Face, Ad Manager will display them, allowing you to Accept the Face, or to Cancel the assignment of the Face. | ||
| − | == | + | === Assign Multiple Faces === |
| − | + | ||
| − | To | + | To select multiple Faces, use the CTRL+click or the SHIFT+click, select the Faces you wish to schedule to the selected flight. Once you have selected the desired Faces, click the Accept button ([[File:New_accept_face_button.gif]]). |
| + | Ad Manager will attempt to assign the Faces to the flight, up to the charting requirements that have been specified on the Counts page. If a Face is not available because it generates a conflict, Ad Manager will skip the Face. After you have scheduled the Faces to the flight, the following window will appear, providing you with the status of the Faces you tried to assign. To close this window, click on the Close button. | ||
| + | [[File:New_Assign_Multiple_Face.JPG]] | ||
| − | + | To see a listing of Faces that have been assigned, click on the Assigned button ([[File:New_assigned_button.gif]]), then click on the Find ([[File:New_find_button.JPG]]) button. If you wish to remove a Face scheduled from the Assigned window, highlight it and click the Delete button ([[File:New_delete_button.JPG]]). | |
| − | + | To return to the list of candidate Faces, click on the Candidates button ([[File:New_candidates_button.JPG]]). If ??? appears in the status bar, click Find ([[File:New_find_button.JPG]]) to generate the list of available Faces again. | |
| + | You can monitor your scheduling progress against your established criteria from the Summary Tab. | ||
| + | == Scheduling Faces from the Chart Window == | ||
| + | One of Ad Manager's most powerful features is the ability to establish your criteria and provide the best possible showings for your clients. | ||
| − | + | First, find the appropriate Subcontract to schedule, and click on the Chart ([[File:New_chart_button.JPG]]) button. From the Chart window, choose the desired flight from the dropdown combo box . | |
| + | You can specify the order of the Faces to be displayed/considered for scheduling. From the View menu, select Order. You can identify the order you wish to use from this screen. If you wish to randomize the list within the parameters of your sort selection, click the Randomize button. You can also select which columns of information you wish to display by Customizing Your View. | ||
| − | + | If you wish to have Ad Manager create a listing of available Faces to select from, use Interactive Scheduling. If you wish to have Ad Manager schedule the Faces for you, use Automatic Scheduling. | |
| − | + | ||
| + | === Setting Options for Charting === | ||
| + | Ad Manager allows you to schedule based on the default information that was entered with the Contract and Subcontract, however these can be changed during the scheduling process if desired. In addition, users have the ability to set additional criteria during the scheduling process. | ||
| − | == | + | ==== Modifying Subcontract Default Settings ==== |
| − | + | ||
| − | + | Ad Manager allows you to override targeting requirements, counts and distribution settings set on the Subcontract. To override any item, click on the appropriate page and change the desired information. This will not affect the default values set on the Subcontract, it will only affect the charting for this Subcontract. When an item has been changed, Ad Manager will display [[File:New_overridden_button.JPG]] in the Status bar at the bottom of the window. To clear all changes that you have made to the default settings, click the Reset([[File:New_reset_button.JPG]]) button or go to the Tools menu and select Reset Overriden options. | |
| − | + | ==== Margins, Gaps Tab ==== | |
| − | + | The Options Tab allows the user to use the Allow Availability Date Margin or Require Availibility Gaps to be Multiples of feature. | |
| − | + | [[File:New_Chart_Options.JPG]] | |
| − | + | ==== Allow Availibility Date Margin ==== | |
| + | When Ad Manager is looking for available Faces, it normally finds Faces that are available during the entire time frame of the Subcontract flight being scheduled. However, Ad Manager allows you to find Faces that may be available for a slightly different time period. This can be very useful, especially if you have very few Faces available during a particular time. | ||
| − | + | To find Faces that are available for a date range around the planned start date, you can set the +/- days to a number higher than zero. For example, if you are trying to schedule a Subcontract flight that starts July 1 for 30 days and you set the +/- to be 2 days, Ad Manager will find any Faces that are available anytime between June 29 (ending July 28) and July 3 (ending August 1). | |
| − | + | ||
| + | ==== Require Availibility Gaps to be Multiples of ==== | ||
| + | In a number of cases, you may be charting Contracts several months in advance of their showing. When you do this, you can create time gaps where Faces should not be used. Click here for an example of a gap situation. | ||
| − | If you | + | It is April 1, and you are charting a Contract to go up on July 15 for 28 days. You select location 101, where the only other scheduled Contract is to go up on April 8 for 28 days. If you were to accept this location for your July 15 Contract, everything may appear fine. However, once you chart location 101 on a May 4 Contract for 28 days, and a June 2 Contract for 28 days (available July 1), this location has a 15 day gap which cannot be charted unless you have a 2 week Contract available. This example is illustrated in the table below. |
| − | + | {| class="wikitable" | |
| + | |- | ||
| + | ! !! Apr 1 !! Apr 15 !! May 1 !! May 15 !! Jun 1 !! Jun 15 !! Jul 1 !! Jul 15 !! Aug 1 | ||
| + | |- | ||
| + | | Contract 1 || style="background: green" | Post Apr 8 || style="background: green" | || style="background: green" | || || || || || || | ||
| + | |- | ||
| + | | Contract 2 || || || style="background: green" | Post May 4 || style="background: green" | || || || || || | ||
| + | |- | ||
| + | | Contract 3 || || || || || style="background: green" | Post Jun 2 || style="background: green" | || || || | ||
| + | |- | ||
| + | | Contract 4 || || || || || || || || style="background: green" | Post Jul 16 || style="background: green" | | ||
| + | |} | ||
| − | |||
| − | + | In order to avoid this situation, you can use the Gaps feature. | |
| − | + | ||
| − | + | You can identify multiples of the desired posting period length available. For example, if you selected 28 days as your posting period length, locations that were scheduled to become available 28, 56, 84, or 112 days (etc.) earlier would be considered. The software also allows you to identify the leeway desired. For example, if you were to choose 30 days +/- 3 days, locations that were scheduled to become available 25-31 days, 53-59 days, 81-87 days or 109-115 days (etc.) would be considered. | |
| + | === Take Over Feature === | ||
| + | The Take Over feature allows you to schedule Faces to a Subcontract that would not ordinarily be considered available by Ad Manager. | ||
| − | + | [[File:New_Take_Over.JPG]] | |
| − | + | By default, Ad Manager considers a Face available if it has no scheduling of any kind for the designated time frame. Ad Manager also considers Faces that are only scheduled to Dead Proposals, Proposals or Expired Limited Holds during the designated time frame as available as well. | |
| − | + | The Take Over function allows you to specify what other scheduling conditions you wish to have Ad Manager treat as available. For example, you may want to consider Faces that are scheduled on Preemptable Bonus Subcontracts as available, in addition to the default conditions. | |
| + | ==== Adding a Take Over ==== | ||
| − | + | To add a Take Over item, simply select the desired criteria by clicking on the desired category and selecting the desired item(s). This can be done as one item from one column, or multiple items from multiple columns. For example, if you wish to make all Faces scheduled as Preemptable available, click on "Posting Type" and click on "Preemptable". If you wish to make all Faces that are scheduled as Preemptable Bonus or Preemptable Trade available, click on "Subcontract type" and click on "Bonus" and click on "Trade", and click on "Posting Type" and click on "Preemptable". | |
| − | + | Once you have selected the desired item(s) to create your criteria, click on the Add to List button. The condition you have set will appear in the top half of the window. At this point you can add additional criteria if desired by following the same process. | |
| + | Ad Manager also allows you to consider Faces that are marked as Non-saleable as available. To make Non-Saleable Faces available for scheduling on this Subcontract, click the "Ignore <Non-saleable> property of the Faces" check box. | ||
| + | Any Take Over criteria you set for a Subcontract will be saved so you can continue your scheduling at a later date. If you no longer wish to use certain criteria, you can remove the desired items. | ||
| − | + | ==== Removing a Take Over ==== | |
| − | + | If you no longer wish to include a particular scheduling condition in the Take Over list, highlight it in the top half of the window and click the Remove button. If desired, you can also remove the default condition of Dead Proposal, Proposal and Expired Hold (Limited). | |
| − | + | If you no longer wish to consider Non-Saleable Faces as available for scheduling on this Subcontract, click the "Ignore <Non-saleable> property of the Faces" check box to turn it off. | |
| − | + | If you wish to reset the Take Over conditions back to the default settings, click the Reset button. | |
| − | + | === Overriding the Default Settings === | |
| − | + | If you are tight for space during a particular time frame or want to find Faces that may be acceptable that aren't currently considered available, you can use the Take Over features to generate a larger pool of Faces to select from. | |
| − | + | Ad Manager also allows you to Override the Number of Faces to Chart that was set when the Subcontract was created. You can override other items that have previously been set on the Subcontract as well. If you wish to refine or change the targeting criteria, the Face distributions or the Designs set on the Subcontract, this information can also be modified. Changing these criteria allow you to fine tune a campaign showing. | |
| − | + | If you make any changes to the original settings, the Chart window will display [[File:New_overridden_button.JPG]] in the bottom right corner of the Status bar, indicating that an item has been changed. | |
| + | === Ignoring Conflicts === | ||
| + | Ad Manager automatically checks for a variety of conflicts. However, if you wish to schedule Faces despite the fact that they generate certain types of conflicts, you can do so by going to the Tools menu and selecting Ignore Conflicts. | ||
| − | + | [[File:New_Ignore_Conflicts.JPG]] | |
| − | + | From this screen you can select which conflicts you wish to ignore. To select an item, simply click on it. Ad Manager will not warn you if a Face has this scheduling conflict and will allow you to assign the Face without the Conflicts screen appearing. The Automatic scheduling feature will treat Faces with these conflicts as available and usable on the showing. Once you have made your changes, click OK to continue. Ad Manager will display [[File:New_ignore_conflicts_button.JPG]] in the bottom right corner of the status bar. | |
| − | |||
| − | + | === Assign One Face === | |
| − | + | Double click the Face you wish to assign to the flight. A window will appear that you can use to identify the desired dates, posting type and Design to use. If a conflict exists, will appear in the bottom right corner of the status bar. You can see a list of these conflicts this Face may have generated on the Conflicts Tab. To accept the Face, click the Accept button ([[File:New_accept_face_button.gif]]). If you want to remove a Face from the list of candidate Faces, click the Reject button ([[File:New_reject_face_button.gif]]). | |
| − | |||
| − | |||
| + | === Interactive Scheduling === | ||
| − | + | When you click on the Find button ([[File:New_find_button.JPG]]) in the Chart window, a listing of Candidate (available) Faces will appear in the bottom portion of the window. | |
| − | + | ||
| + | === Automatic Scheduling === | ||
| − | + | Automatic Scheduling takes the same list of available Faces found in the Interactive Scheduling and attempts to add all these Faces to the flight, up to the charting requirements specified on the Counts page of the Subcontract. Ad Manager will attempt to assign Faces to the flight in the order that the Faces have been sorted. If a Face is not available because it generates a conflict, Ad Manager will skip the Face. | |
| − | + | ||
| − | To | + | To use the Automatic Scheduling feature, click the Auto Chart button ([[File:New_auto_chart_button.JPG]]). Once Auto Charting is complete, the following screen will appear. |
| + | [[File:New_Auto_Chart.JPG]] | ||
| + | To see a listing of Faces that have been assigned, click on the Assigned button ([[File:New_assigned_button.gif]]), then click on the Find ([[File:New_find_button.JPG]]) button. If you wish to remove a Face scheduled from the Assigned window, highlight it and click the Delete button ([[File:New_delete_button.JPG]]). | ||
| − | + | You can monitor your scheduling progress against your established criteria from the Summary Tab. | |
| − | |||
| − | |||
| − | + | == Charting with Visual Charting == | |
| + | Visual Charting provides users with a spreadsheet style interface that allows drag and drop charting. Each item can be customized to provide an interface that shows you exactly what information you need to help in your decision making. | ||
| − | + | Once you have [[General#Customize Current View|Customized Your View]] to show your information, you can select your [[Face]] and [[Subcontract]] Data to be displayed. As you highlight each Subcontract shown, a listing of all flights on the highlighted [[Subcontract]] will appear. | |
| − | + | When you click on a flight, Visual Charting will show the time frame for the flight in the Scheduling window in white, making it easy to see what Faces are available, and to act as a guide when assigning the Face. | |
| + | The drag and drop feature allows you to click on a flight, hold down the mouse button, and drag the flight to the desired time frame for the desired Face. You will notice a "ghost" image of the scheduling will appear on the screen, showing where the flight would be placed. As you drag your scheduling around the screen, you will also notice the Face currently being dragged over is highlighted. If you were to release the mouse button, the charting would be recorded for that Face. When you release the mouse button, Ad Manager will attempt to assign the flight to that Face, checking for line of sight conflicts, restrictions and scheduling to make sure the charting can be completed. | ||
| − | + | If you wish to modify charting that is currently on the screen, simply click and hold the mouse button down over the item you wish to modify. You can now drag this scheduling to another start date or location. To make the change, release the mouse button. | |
| − | + | ||
| − | + | If you wish to change the start and/or end date to lengthen or shorten the campaign, move your mouse over the end of the charting bar. The mouse cursor will change to an arrow. Hold down the mouse button and drag the start or end date to the desired day. When you release the mouse button, Ad Manager will make the changes to the scheduling for that Face. | |
| − | + | When using Visual Charting, all changes are automatically made in all areas of the software. Similarly, changes made elsewhere in the system are reflected here as well. | |
| − | + | === Components of Visual Charting Window === | |
| + | This area contains a list of all Faces in the current filter. To populate this with the Face data you desire click on the Face Filter ([[File:New_load_faces_button.JPG]]) at the top of the screen. You will be prompted to select the group of Faces you want to populate this listing with. | ||
| − | + | [[File:New_Load_Faces.JPG]] | |
| − | + | Once you have selected the group of Faces you want to work with the Face Data window in the software will show those Faces . | |
| − | + | [[File:New_Faces.JPG]] | |
| − | + | You can click on column titles to sort by that column, resize columns or move columns. | |
| − | === | + | === Using Visual Charting === |
| + | Visual Charting is the "Spreadsheet" scheduling process. Typically used for media types sold individually it can be used as a visual Open Space summary for both planning and Charting purposes. | ||
| − | + | To access Visual Charting click on the Visual Charting Icon ([[File:New_visual_charting.JPG]]) at the top of the Ad Manager Explorer window or from the menu bar under Tools. You will then see a blank screen similar to the following: | |
| + | [[File:New_Visual_Charting.JPG]] | ||
| + | The screen has 4 components: Face Data, Subcontract Data, Flight Data and the visual representation of the Scheduling Data. | ||
| − | + | ==== Face Data ==== | |
| − | + | This area contains a list of all faces in the current filter. To populate this with the face data you desire click on the Face Filter ([[File:New_load_faces_button.JPG]]) at the top of the screen. You will be prompted to select the group of faces you want to populate this listing with. | |
| − | + | [[File:New_Faces.JPG]] | |
| − | === | + | ==== Subcontract Data ==== |
| − | + | This area contains a list of all subcontracts in the current filter. To populate this with the subcontract data you desire click on the Subcontract Filter ([[File:New_load_subcontracts_button.JPG]]) at the top of the screen. You will be prompted to select the group of subcontracts you want to populate this listing with. | |
| − | + | [[File:New_Subcontracts.JPG]] | |
| − | + | ||
| − | + | ==== Flight Data ==== | |
| + | This area contains a list of all subcontracts in the current filter. | ||
| + | ==== Scheduling Data ==== | ||
| − | + | This area contains a list of all subcontracts in the current filter. | |
| − | + | ==== Changing the Time Frame ==== | |
| − | + | This area contains a list of all subcontracts in the current filter. | |
| + | [[File:New_Scheduling.JPG]] | ||
| − | |||
| − | + | === Customizing Your View in Visual Charting === | |
| + | Each Subcontract/Flight shown in the scheduling data window is shown in a specific color to represent a unique combination of Contract Status, Subcontract Type and Posting Type. Ad Manager comes with specific defaults for different combinations of selection criteria and colors. From the View Menu at the top of the screen you can select : | ||
| − | + | -Labels | |
| + | -Shading | ||
| + | -Legend | ||
| − | + | Labels | |
| − | + | Each item in the Visual Charting screen can show the advertiser name, the brand, the subcontract design name, the contract number, or it can display without these labels. To turn it off simply go to the View Menu at the top of the screen and click on the Label menu item. This action will turn on or off the chosen labels depending upon its current status (on or off). | |
| + | ==== Legend ==== | ||
| − | + | Each Subcontract/flight shown in the Scheduling Data window is shown in a specific color that represents a unique combination of Contract Status, Subcontract Type and Posting Type. To determine the current settings turn on the legend by going to the View Menu at the top of the screen and click on the Legend menu item and it will turn on or off the legend depending upon its current status (on or off). | |
| − | + | ||
| − | + | ====Shading ==== | |
| − | + | To customize the legend (and the window display) Select the View menu option at the top of the screen and click on the Shading menu item. When you clicking on this menu item and click on the Schemes icon ([[File:New_schemes_button.JPG]]) the following screen of legend information will be displayed: | |
| − | + | [[File:New_Shading.JPG]] | |
| − | + | Ad Manager comes with 6 system defaults that can be modified by the user and stored as a new default. From this menu you can save a new shading option (the one currently in use) under a name of your choice, switch to a different option or delete a previously saved custom shading. | |
| + | Before you decide to customize a view, determine which items you wish to see displayed on the screen in different colors. Select the System Default Scheme with the appropriate number of colors. | ||
| + | ====Hiding Specific items==== | ||
| + | You have the ability to choose whether to hide the display of the items for each shading element. If you wish to hide an item, click the "Hide" check box. | ||
| − | + | ==== Order of Priority ==== | |
| − | + | Ad Manager's Visual Charting function displays all Subcontract/flights using the first set of selection criteria that the specific Subcontract/flight/face status meets. Criteria at the top of the list (legend) taking priority. In other words, if the criteria/status is met in the first item on the list the flight for that location is shown in that designated color. | |
| − | + | Other than the first criteria you will note the legend states "none of the above and" to indicate the face has not met any previous criteria. For this reason a user may want a number of different color schemes when looking at the information for different purposes. For example if a user needs to find already posted faces that are designated as movable they could create a view that shows this at the top of the list to make this easy. | |
| − | + | ==== Changing the Criteria ==== | |
| + | To change the colors or selection criteria for any option simply click on that option from the list, click on the specific item on the legend you wish to modify and click on the properties icon ([[File:New_properties_button.JPG]]) in the top right corner of the window. Once a specific item is selected you will be shown the following window: | ||
| − | + | [[File:New_Change_Colour.JPG]] | |
| + | |||
| + | Each color represents a specific combination of selection criteria. The window contains a summary of the selection criteria currently in use. To remove a specific item currently in use, click on the item (highlight it) and select the Remove button. Clear will clear all items currently in the criteria list. Similarly you can place criteria in the Exclude Postings box. Adding and removing items works the same for either window. | ||
| + | To add an item, select the desired Contract Status, Subcontract Type, Posting Type combination that you want to display. You do not have to select an item from each list; if you want to see all Posting Types, you can select "Doesn't Matter". For different examples of criteria, click here. | ||
| − | + | {| class="wikitable" | |
| + | |- | ||
| + | ! Desired Criteria !! Contract Status !! Subcontract Type !! Posting Type | ||
| + | |- | ||
| + | | All Sold Locations || Doesn't Matter || Sold || Doesn't Matter | ||
| + | |- | ||
| + | | All Proposals || Proposal || Doesn't Matter || Doesn't Matter | ||
| + | |- | ||
| + | | All Holds (both Limited and Unlimited). Each line is a separate "Include" || Limited Hold || Doesn't Matter || Doesn't Matter | ||
| + | |- | ||
| + | | || Limited Hold (Expired) || Doesn't Matter || Doesn't Matter | ||
| + | |- | ||
| + | | || Unlimited Hold || Doesn't Matter || Doesn't Matter | ||
| + | |- | ||
| + | | All Contracted, Preemptable Locations || Contracted || Doesn't Matter || Preemptable | ||
| + | |- | ||
| + | | All Contracted Sold Locations that are Movable || Contracted || Sold || Movable | ||
| + | |} | ||
| − | + | ||
| − | + | Once you have selected the combination of criteria that meets your needs click on the Include button and the criteria will be added to the list. The Exclude button does the same for faces that meet the criteria you wish to exclude. | |
| − | + | ==== Changing the Color ==== | |
| − | + | To change the colors for any option simply click on that option from the list, click on the specific item on the legend you wish to modify and click on the properties icon ([[File:New_properties_button.JPG]]) in the top right corner of the window. | |
| − | + | To change the color click on the color box at the top left of the screen. You will be shown a color palette to select from. When you select a new color the color displayed will automatically change. They system automatically defaults to a light shading pattern. | |
| + | ==== Saving Your Settings ==== | ||
| − | + | After you have finished customizing a criteria and a color, hit the OK button. Select a different item on the list, and repeat this process for each criteria. If you need to add a new criteria and there are no more items to modify, select the New icon ([[File:New_add_button.JPG]]). | |
| − | + | ||
| + | Once you have customized the criteria and colors, you have the ability to Save your settings for use at a later time. To save your settings, click on the Schemes button ([[File:New_schemes_button.JPG]]), and select Save As. From here you can name your settings and select OK. Your settings will now appear on the list. | ||
| + | == Comparing Your Progress to Your Scheduling Requirements == | ||
| + | Throughout the course of your scheduling, you may want to see how you are progressing compared to what was actually sold to the client. The Summary Tab provides you with the information necessary to ensure you meet your client's requirements. | ||
| − | + | [[File:New_Summary_Tab.JPG]] | |
| − | + | In the top half of this window, Ad Manager shows information about the number of Faces and circulation (DEC or GRP) sold versus scheduled. At a quick glance you can determine whether you have reached your desired threshold values. | |
| − | + | The bottom half of the window shows you the distribution of Faces compared to your Area distribution and any [[Glossary#Custom Classification|Custom Classification]] distributions. To select the distribution criteria to view, click on the dropdown combo box and select the desired item. Ad Manager will list the criteria you've established on the Subcontract (if any) and compare it to the distribution of the scheduled Faces. | |
| − | == | + | === Subcontract Data === |
| − | + | ||
| − | + | This area contains a list of all subcontracts in the current filter. To populate this with the subcontract data you desire click on the Subcontract Filter ([[File:New_load_subcontracts_button.JPG]]) at the top of the screen. You will be prompted to select the group of subcontracts you want to populate this listing with. | |
| − | + | [[File:New_Load_Subcontracts.JPG]] | |
| + | Once you have selected the group of subcontracts you want to work with the Subcontract Data window in the software will show those Faces. | ||
| + | [[File:New_Subcontracts.JPG]] | ||
| − | + | You can click on column titles to sort by that column, resize columns or move columns. | |
| − | + | ||
| − | + | Click on the Subcontract you wish to chart and all flights for that Subcontract will be displayed in the Flight window. | |
| − | + | === Flight Data === | |
| − | + | This area contains a list of all Subcontracts in the current filter. It is automatically populated with all flights associated with the Subcontract selected in the Subcontract window to the left of it. The following example shows a Subcontract with one flight only. | |
| − | + | [[File:New_Flight.JPG]] | |
| − | + | You can click on column titles to sort by that column, resize columns or move columns. | |
| − | + | === Scheduling Data === | |
| − | + | This area contains a visual representation of all subcontracts/flights scheduled to each Face on the left side of the screen. Each subcontract/flight is shown with its scheduled start and end dates. It is possible that each Face on the subcontract/flight could have been assigned different dates from the contract or even each other. The timeline displayed can also be changed to be any length between days and months. | |
| − | + | [[File:New_Scheduling.JPG]] | |
| − | + | Each item is shown in custom colors with the short code name of each advertiser. For more information on any specific flight simply leave your mouse over the flight shown and additional information will appear in a separate information box as shown below: | |
| − | + | [[File:New_Flight_additional_info.JPG]] | |
| − | + | Moving your mouse will make the information box disappear. | |
| − | + | To add or move scheduling to a Face please refer to [[Charting How To#Charting with Visual Charting|Charting With Visual Charting]]. | |
| − | + | == Viewing Current Conflict Information == | |
| + | To view a list of Faces on a Contract or Subcontract that have Conflicts, go to the desired Contract or Subcontract and click on the Tools menu and select Conflicts. A window will appear, allowing you to identify which conflict items you wish to scan this Contract or Subcontract for. Once you have selected the items to check for, and clicked OK, Ad Manager will check each of the Face assignments for these conflicts. | ||
| − | + | If any conflicts exist, Ad Manager will display a window listing all Face assignments that have conflicts. To see more information about the conflict, double click the Face and click the Conflicts Page. Ad Manager will provide you information explaining the conflict that has been found. Once you are aware of the conflict, you can decide whether it requires any action, and can proceed accordingly. | |
| − | + | Once you have finished reviewing all the conflicts, close the Conflicting Postings window by clicking the "X" in the top right corner of the window. For an explanation of what each conflict means, see [[General#View Conflicts|View Conflicts]]. | |
| − | |||
| − | |||
| − | + | == Modifying a Charted Faces Information == | |
| + | After a Face is charted, there may be situations where you need to reschedule the dates for a Face. To reschedule the dates on a Face, you can either modify the information from the Subcontract or from the Face. | ||
| − | + | To reschedule from the Subcontract, find the Subcontract where the Face you wish to reschedule is assigned. Go to the Assigned Page and highlight the Face(s) to change. Click on the Tools menu and select Update or right click on a selected item and choose Update. In the screen that opens, activate the Duration checkbox by clicking in it and enter in the new dates for the assignment. Then click OK. If you wish to reschedule from the Face, find the desired Face and click on the Posting Schedules Page. Highlight the item to reschedule from the list, right click and choose Update. Click on the Tools menu and select Update or right click on a selected item and choose Update. | |
| − | + | [[File:New_Update_Schedule.JPG]] | |
| − | + | In the screen that opens, activate the Duration checkbox by clicking in it and enter in the new dates for the assignment. Then click OK. Ad Manager will check for any potential conflicts. If there are any Faces Ad Manager cannot reschedule, it will inform you there are Faces that generate conflicts. If you wish to see the list, click Yes, and if you wish to continue without rescheduling these Faces, click No. | |
| − | + | If you click Yes, the following screen will appear: | |
| + | [[File:New_Conflicts.JPG]] | ||
| − | + | From this screen you can double click any Face, go to the Conflicts Page of the Posting window that opens, and view the details regarding the conflict generated. If you wish to override the warning and reschedule the Face, click Accept. If you don't wish to reschedule the Face, click Cancel. Any Face that remains on the Conflicts window when you click Close will not be rescheduled. | |
| − | |||
| − | |||
| − | + | == Releasing Faces == | |
| + | Releasing Faces From a Subcontract | ||
| + | If you wish to release (remove) Faces from a flight, you must go to the Chart Window and click on the Assigned page. From this page you can select the flight (or all flights) you are interested in releasing a Face from. | ||
| − | + | Once you have found the desired Face, you may release it from the showing if it has not yet been posted. To release a Face, highlight it and click the Delete ([[File:New_delete_button.JPG]]) button. This will release the Face from the showing. | |
| − | + | ||
| − | + | You can select multiple Faces by holding down the SHIFT or CTRL key while clicking the desired Faces. | |
| − | + | === Releasing Scheduling From the Face === | |
| − | + | ||
| − | + | ||
| − | + | ||
| + | Ad Manager also allows you to release scheduling from the Face. This is particularly useful if you are retiring a Face and want to remove all future scheduling. Find the Face to remove scheduling for, and click on the Posting Schedules Page. Using CTRL+click or SHIFT+click, highlight the Face scheduling assignment(s) to remove . Right click and click Delete or click the Delete ([[File:New_delete_button.JPG]]) button in the Posting Schedules pane. This removes the scheduling, provided the Face has not been posted. | ||
| + | == Review Information for an Assignment == | ||
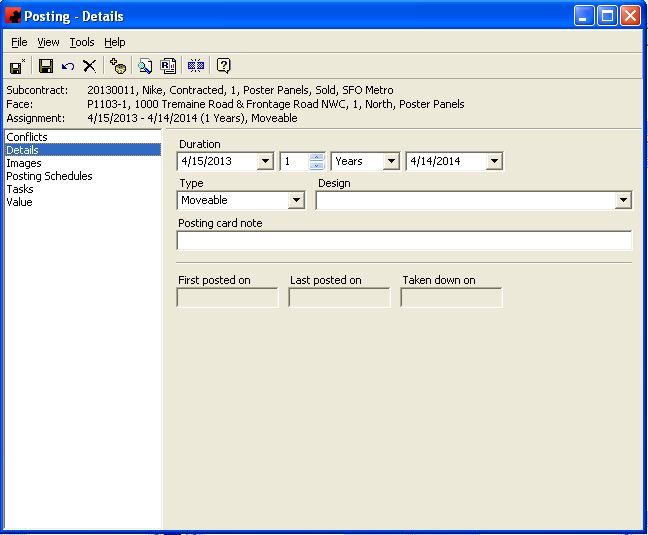
| + | If you want to find out more information about a particular scheduling assignment, you can do so by highlighting it on the Assigned Page of the desired Subcontract and clicking the Properties button ([[File:New_properties_button.JPG]]). Ad Manager will display a window from which you can review and, if necessary, change information. | ||
| − | + | [[File:New_Posting_Details.JPG]] | |
| − | + | If you wish to change information about this assignment, make the appropriate change(s) and click the Save button([[File:New_save_button.JPG]]). | |
| − | + | In addition to seeing the assignment information, you can also see if there are any conflicts involving this assignment by clicking on the Conflicts Page. | |
| − | + | To see all Posting Tasks associated with this assignment, click on the Tasks Page. | |
| − | |||
| − | + | == Rotate Lists == | |
| − | === | + | === Steps to Undertake a Rotate === |
| + | === Rotary Assignment Worksheet === | ||
| + | === Manual Assigning in a Rotate === | ||
| − | + | == Selecting Designs == | |
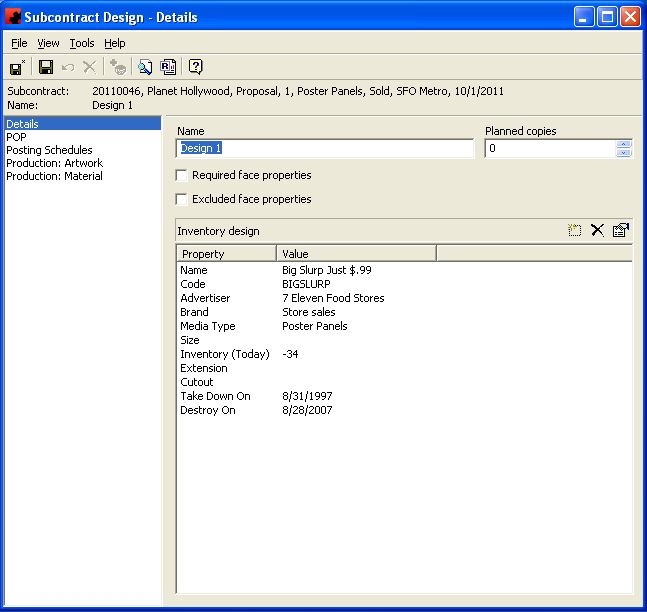
| + | Ad Manager allows you to select Designs to be placed on each Subcontract. Once this is done, Designs may be assigned to individual Faces. Ad Manager provides you with 2 levels of Designs, a Subcontract Design and an Inventory Design. | ||
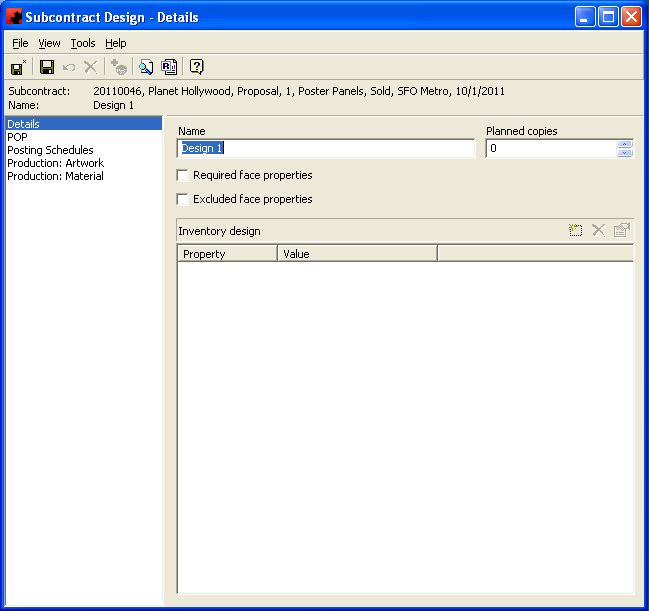
| − | + | The Subcontract Design allows you to enter in any name you wish to use to identify the Design. If you don't know the name of the Design, you can simply enter Design1, Design2, etc. to allow you to undertake Design Assignment. If you do not plan to use the Design Inventory features of Ad Manager, you can go in at any time and change these Design names to be more descriptive once you know what Designs are to be used. These Designs are printed on the default Posting Cards/Instructions. | |
| − | + | The Inventory Design allows you to track the number of each Design received, where it is stored and how many of each have been used and what remains available for future use. The Inventory Design can be linked at any time to a Subcontract Design to allow you to track Design inventories without having to change the Subcontract Design name. If you wish to change the name for the Subcontract Design to match the Inventory Design, highlight the appropriate Designs and go to Tools - Rename Using Inventory Design Name. | |
| − | + | === Adding Designs to a Subcontract === | |
| − | === | + | |
| − | + | To add a Design to a Subcontract, you first must select the desired Subcontract, and go to the Designs page. If you are adding Designs from the Chart window, go to the Designs tab. When you are on this screen, you can add Designs to the Subcontract by clicking the New ([[File:New_add_button.JPG]]) button. A window will appear allowing you to enter the Subcontract Design name and the maximum number of this Design you would like to use on this Subcontract. | |
| − | + | [[File:New_Add_Design.JPG]] | |
| − | + | ||
| − | + | === Linking Designs === | |
| − | + | ||
| − | + | ||
| − | + | ||
| − | + | If you wish to track the inventory of Designs, you can link the Subcontract Design to a particular Design in the Designs Database. This can be done while adding a Subcontract Design, or by highlighting the appropriate Design on the Designs Page and double clicking or by clicking the Properties ([[File:New_properties_button.JPG]]) button. | |
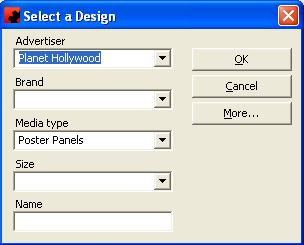
| + | To link a Design, click the Inventory Design New button([[File:New_add_button.JPG]]). Use the Select a Design window to obtain a listing of Designs to select from. | ||
| − | + | [[File:New_Select_Design.JPG]] | |
| − | + | ||
| − | + | The desired Inventory Design can be filtered using the Advertiser, Brand, Media Type, Size and by Name. After you click OK, a list of Designs meeting this criteria will appear, allowing you to select the correct one. If only one Design meets your search criteria, it will automatically fill in the information in the Inventory Design box. | |
| − | The | + | |
| + | [[File:New_Link_Design.JPG]] | ||
| + | If no Designs are found, it is possible that your search criteria has excluded the Design you are looking for, or it has not yet been entered, or has been entered into the Designs database incorrectly. If you do not wish to link to the Designs Database for Design inventory tracking, you do not need to Link to the Inventory Design. | ||
| − | + | === Design Filters === | |
| − | + | Ad Manager allows you to specify what conditions a Face must meet in order to place this Design on it. For example, you may want a particular Design to be only on Faces that are facing West, or that are illuminated. Similarly, you may want to avoid putting a particular Design on certain Faces. For example, Faces that are inappropriate for alcohol or have a low DEC. It is not mandatory to fill this information in, it just provides you with more flexibility and power in assigning Designs. | |
| − | + | The Required Face Properties check box allows you to specify all criteria that a Face must meet in order to be scheduled with this Design. Fill in the appropriate information, and click OK when finished. The Required Face Properties check box will have a check mark, indicating a filter has been set. | |
| − | + | The Excluded Face Properties check box allows you to specify all criteria that a Face must not have in order to be scheduled with this Design. Fill in the appropriate information, and click OK when finished. The Excluded Face Properties check box will have a check mark, indicating a filter has been set. | |
| − | + | These filters are only considered by Ad Manager when assigning Designs randomly (through the Tools-Assign Designs menu item from the Assigned Page of the Subcontract). For more information on assigning Designs randomly, see [[Contract How To#Assigning Multiple Designs|Assigning Multiple Designs]]. | |
| − | Ad Manager | + | == Scheduling Design Changes on a Face == |
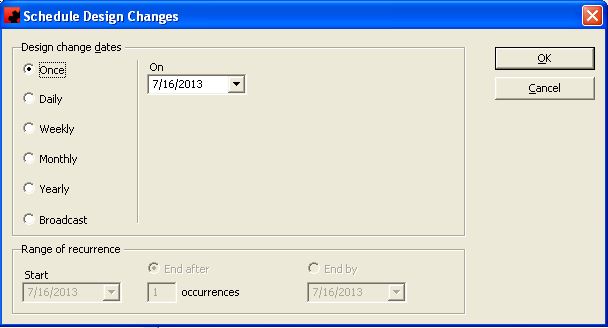
| + | Ad Manager allows users to schedule Design changes for Faces during the life of the Subcontract. You can schedule Design changes for a Face on a Subcontract as frequently as daily. After you create Design changes, you will notice that the same Face will now appear on the Assigned Page more than once. For each Design change created, the Face will be listed a corresponding number of times (known as the Face assignment), showing the date range for each of the Design changes created. You can assign the desired Design to the appropriate date range by highlighting the Face assignment and [[Contract How To#Adding a Design to a Face|assigning a Design to the Face]]. | ||
| − | + | To schedule a Design change, select the affected Face(s) using CTRL+click and SHIFT+click, and then right click and select Design Change (or [[File:New_design_change_button.JPG]] on the toolbar). Ad Manager will then display the following screen. | |
| − | + | [[File:New_Design_Change.JPG]] | |
| − | + | === Scheduling a Design Change on a Specific Date === | |
| − | + | To specify a specific date for a Design change, click "On a Specific Date" and Ad Manager will create a new Face assignment for that date when you Click OK. | |
| − | + | === Scheduling Design Changes at Specific Intervals === | |
| + | To schedule Design changes for a Face on a recurring schedule, select "At regular intervals". You can specify how frequently you wish to change Designs between the Starting On date entered and the end of the Subcontract. Click OK to accept the creation of new Face assignments during this time frame. | ||
| − | == | + | === Scheduling Design Changes at the Beginning of Selected Flights === |
| − | + | ||
| − | + | ||
| − | + | ||
| − | + | ||
| − | + | ||
| − | + | ||
| − | + | ||
| − | + | ||
| − | + | ||
| − | + | ||
| − | + | ||
| − | + | ||
| − | + | ||
| − | + | ||
| − | + | ||
| − | + | ||
| − | == | + | |
| − | + | ||
| − | + | ||
| − | + | ||
| − | + | To schedule Design changes to occur at the start of selected flights on the Subcontract, click on "At the beginning of selected flights". To add flights where you wish to change copy, click the New button([[File:New_add_button.JPG]]). To remove a flight from this list, click the Delete button ([[File:New_delete_button.JPG]]). To review the flight details, click the Properties button ([[File:New_properties_button.JPG]]). Click OK to save the Face assignments. | |
Latest revision as of 14:31, 30 November 2015
Setting Number of Faces to Chart
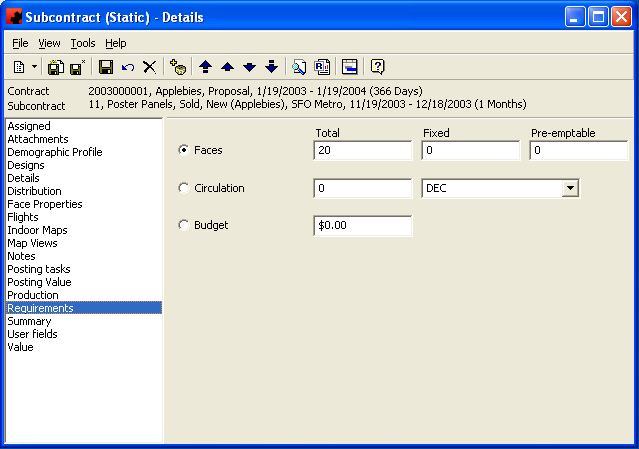
Ad Manager allows you to define how you want to schedule the Subcontract. You can identify the number of Faces to schedule, and any threshold DEC or GRP values. To input this information, go to the Counts Page on the Subcontract window. This information can also be temporarily overridden from the Counts Page in the Chart window.
To set the total number of Faces to schedule on the Subcontract, put the desired value in the Total field. You can then specify how many of these Faces you want Fixed (Faces that are to remain scheduled for the entire Subcontract) and Preemptable (Faces that can be sold to other clients without compensating this client). All other Faces will be treated by Ad Manager as Movable (Faces that can be sold to other clients, but this client is to be compensated with another Face).
If a DEC (Daily Effective Circulation) or GRP (Gross Rating Point) is to be reached, this can be specified in the Circulation portion of the window. The value can be entered in and either DEC or GRP selected.
Finally, you can set which characteristic you wish to chart toward, the Face Count (number of Faces) or the Circulation (GRP/DEC).
Setting Targeting Requirements
A user can identify any desired conditions (or Face characteristics) that they may want to meet. Similarly, there may be certain conditions attributed to a Face that a user may wish to avoid. Ad Manager allows you to store these criteria with the Subcontract for future reference, or to create/change them during the Assignment process. Note that criteria changed while assigning Faces is not saved with the Subcontract.
If you are setting the targeting for a Subcontract, go to the Template page of the Subcontract window. If you are changing or creating criteria to run during the Chart process, go to the Template tab of the Chart window.
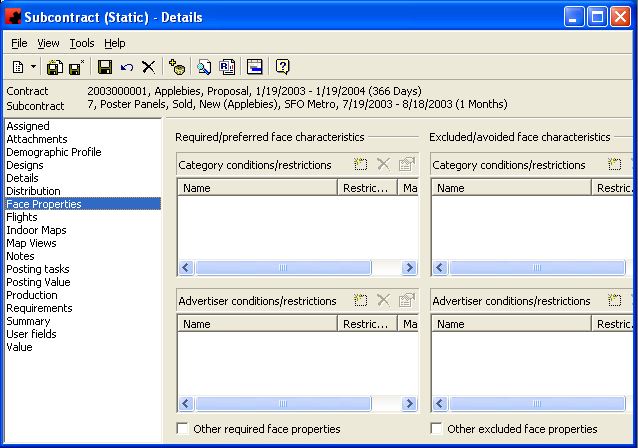
To Identify required or preferred categories To Identify excluded or avoided categories To set other Face properties to be met or excluded The following is an example template screen.
Required/Preferred Categories
If there is a condition or characteristic you wish to chart or skew towards, this information is entered into the Required/Preferred Categories box on the left side of the screen. To add a new positive skewing condition, click on the New Button (). To modify a skewing condition, highlight the appropriate item and double click or click on the Properties button (
).
A window will appear where you can identify the Group, Advertiser or characteristic you wish to chart towards. You can also identify whether this characteristic must be met (manditory requirement), or whether it is desired. In a pool of available locations, Faces with the desired characteristics will appear at the top of the list.
To remove a positive skewing condition, highlight the appropriate item and click on the Delete button ().
Excluded/Avoided Categories
If there is a condition or characteristic you wish to chart or skew away from, this information is entered into the Excluded/Avoided Categories box on the right side of the screen. To add a new negative skewing condition, click on the New Button (). To modify a skewing condition, highlight the appropriate item and double click or click on the Properties button (
).
A window will appear where you can identify the Group, Advertiser or characteristic you wish to avoid or exclude. You can also identify whether Faces with this characteristic must not appear (manditory requirement), or whether it is desired they not appear. In a pool of available locations, Faces where it is desired the characteristics not appear will be at the bottom of the list.
To remove a negative skewing condition, highlight the appropriate item and click on the Delete button ().
Face Properties
The Other Required Face Properties feature at the bottom of the screen also allows you to filter the Faces to be selected based on other properties. For example, you can use this feature to select only those Faces that are illuminated, facing a certain direction, have a certain DEC value, or are located in a particular city or near a particular store.
The Other Excluded Face Properties feature at the bottom of the screen also allows you to filter the Faces to be avoided based on other properties. For example, you can use this feature to exclude any Faces that are illuminated, facing a certain direction, have a certain DEC value, or are located in a particular city or near a particular store.
The suggested order that information should be read in when trying to determine how to set an item up is as follows:
1. Is it Mandatory 2. Is it Preferred or Avoided 3. What Category or Advertiser is it 4. Is it a Restricted condition or not
For example, " I must have Faces where Movies are not restricted" would show in the top left pane as Movies (under name)-blank (under the restrcition column)-Yes (under Mandatory).
Manually Assigning Face
There are multiple ways to assign Faces to a showing in Ad Manager. Two manual methods are drag and drop assignment and assignment by Face number.
Drag and Drop Assignment
With drag and drop assignment, you can open a view or create a Finder listing Faces that meet your criteria. In order to undertake a Drag and Drop Assignment, you must be able to see your list of Faces AND the Assigned Page of your Subcontract (this can usually be achieved by resizing both windows and placing them side by side).
If necessary, select the flight on the Subcontract to assign the Face(s) to. Ad Manager will assign Faces to the dates of the selected Flight, or for the entire Subcontract. Using CTRL+click and SHIFT+click, highlight the desired Faces as appropriate. After you select the last Face, hold the mouse button down and drag the cursor over to the Assigned Page. The cursor will change to a box with a (+) sign, indicating you can release the left mouse button.
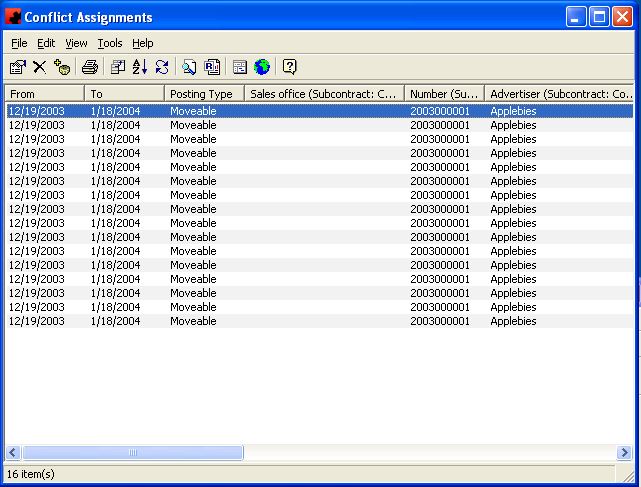
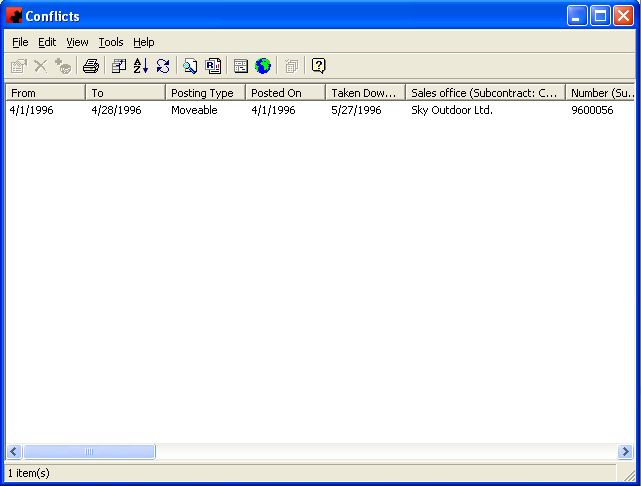
If there are any warnings generated by the assignments, Ad Manager will provide a listing of them. You can double click any of these warnings for more details. You can choose to "Accept" a warning, in which case Ad Manager will assign the Face. Any Faces that are listed in the Conflicts window when you click on Close will be rejected by Ad Manager and not assigned to the Subcontract.
Assignment by Face Number
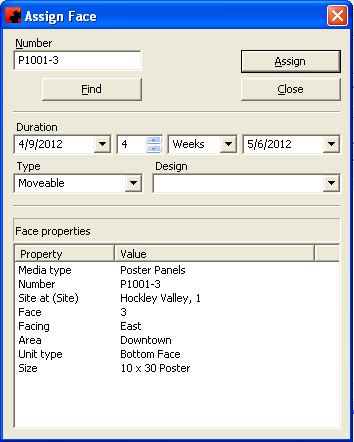
To assign Faces by Face number, go to the Assigned Page of the Subcontract and click on the New button (). A window will appear where you can type in the Face number to assign to this Subcontract. Hit the Tab or Enter key on your keyboard if you wish to see more information about the Face in the Face Properties portion of the screen prior to selecting it.
If you don't know the Face number, click the Find button to set a filter that will retrieve a list of candidate Faces that meet your filtering criteria. Double click the desired Face from this list.
Once you have selected a Face, you can identify the dates that you wish to schedule it for, along with the Posting Type (from the Details dropdown combo box) and the Design to assign.
If you do not wish to proceed with assigning this Face, you can type in a new Face number, click Find again, or click on Close to abort the manual assignment of a Face.
Once you have made the necessary changes, click on Assign to schedule the Face. If there are any warnings generated by the Face, Ad Manager will display them, allowing you to Accept the Face, or to Cancel the assignment of the Face.
Assign Multiple Faces
To select multiple Faces, use the CTRL+click or the SHIFT+click, select the Faces you wish to schedule to the selected flight. Once you have selected the desired Faces, click the Accept button (![]() ).
).
Ad Manager will attempt to assign the Faces to the flight, up to the charting requirements that have been specified on the Counts page. If a Face is not available because it generates a conflict, Ad Manager will skip the Face. After you have scheduled the Faces to the flight, the following window will appear, providing you with the status of the Faces you tried to assign. To close this window, click on the Close button.
To see a listing of Faces that have been assigned, click on the Assigned button (![]() ), then click on the Find (
), then click on the Find () button. If you wish to remove a Face scheduled from the Assigned window, highlight it and click the Delete button (
).
To return to the list of candidate Faces, click on the Candidates button (). If ??? appears in the status bar, click Find (
) to generate the list of available Faces again.
You can monitor your scheduling progress against your established criteria from the Summary Tab.
Scheduling Faces from the Chart Window
One of Ad Manager's most powerful features is the ability to establish your criteria and provide the best possible showings for your clients.
First, find the appropriate Subcontract to schedule, and click on the Chart () button. From the Chart window, choose the desired flight from the dropdown combo box .
You can specify the order of the Faces to be displayed/considered for scheduling. From the View menu, select Order. You can identify the order you wish to use from this screen. If you wish to randomize the list within the parameters of your sort selection, click the Randomize button. You can also select which columns of information you wish to display by Customizing Your View.
If you wish to have Ad Manager create a listing of available Faces to select from, use Interactive Scheduling. If you wish to have Ad Manager schedule the Faces for you, use Automatic Scheduling.
Setting Options for Charting
Ad Manager allows you to schedule based on the default information that was entered with the Contract and Subcontract, however these can be changed during the scheduling process if desired. In addition, users have the ability to set additional criteria during the scheduling process.
Modifying Subcontract Default Settings
Ad Manager allows you to override targeting requirements, counts and distribution settings set on the Subcontract. To override any item, click on the appropriate page and change the desired information. This will not affect the default values set on the Subcontract, it will only affect the charting for this Subcontract. When an item has been changed, Ad Manager will display in the Status bar at the bottom of the window. To clear all changes that you have made to the default settings, click the Reset(
) button or go to the Tools menu and select Reset Overriden options.
Margins, Gaps Tab
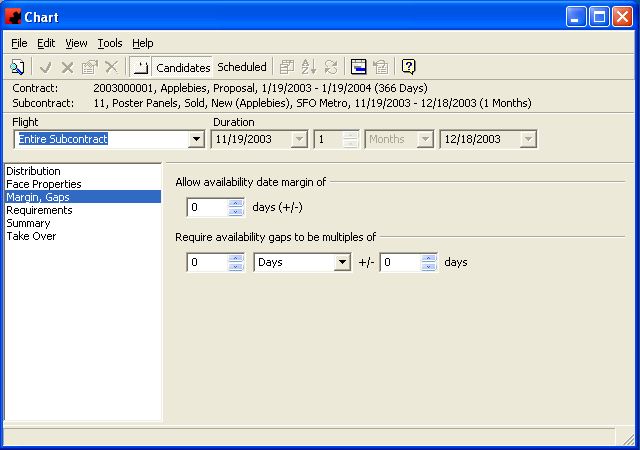
The Options Tab allows the user to use the Allow Availability Date Margin or Require Availibility Gaps to be Multiples of feature.
Allow Availibility Date Margin
When Ad Manager is looking for available Faces, it normally finds Faces that are available during the entire time frame of the Subcontract flight being scheduled. However, Ad Manager allows you to find Faces that may be available for a slightly different time period. This can be very useful, especially if you have very few Faces available during a particular time.
To find Faces that are available for a date range around the planned start date, you can set the +/- days to a number higher than zero. For example, if you are trying to schedule a Subcontract flight that starts July 1 for 30 days and you set the +/- to be 2 days, Ad Manager will find any Faces that are available anytime between June 29 (ending July 28) and July 3 (ending August 1).
Require Availibility Gaps to be Multiples of
In a number of cases, you may be charting Contracts several months in advance of their showing. When you do this, you can create time gaps where Faces should not be used. Click here for an example of a gap situation.
It is April 1, and you are charting a Contract to go up on July 15 for 28 days. You select location 101, where the only other scheduled Contract is to go up on April 8 for 28 days. If you were to accept this location for your July 15 Contract, everything may appear fine. However, once you chart location 101 on a May 4 Contract for 28 days, and a June 2 Contract for 28 days (available July 1), this location has a 15 day gap which cannot be charted unless you have a 2 week Contract available. This example is illustrated in the table below.
| Apr 1 | Apr 15 | May 1 | May 15 | Jun 1 | Jun 15 | Jul 1 | Jul 15 | Aug 1 | |
|---|---|---|---|---|---|---|---|---|---|
| Contract 1 | Post Apr 8 | ||||||||
| Contract 2 | Post May 4 | ||||||||
| Contract 3 | Post Jun 2 | ||||||||
| Contract 4 | Post Jul 16 |
In order to avoid this situation, you can use the Gaps feature.
You can identify multiples of the desired posting period length available. For example, if you selected 28 days as your posting period length, locations that were scheduled to become available 28, 56, 84, or 112 days (etc.) earlier would be considered. The software also allows you to identify the leeway desired. For example, if you were to choose 30 days +/- 3 days, locations that were scheduled to become available 25-31 days, 53-59 days, 81-87 days or 109-115 days (etc.) would be considered.
Take Over Feature
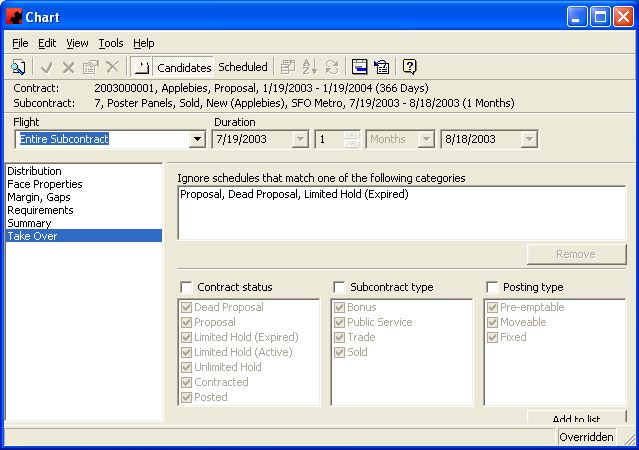
The Take Over feature allows you to schedule Faces to a Subcontract that would not ordinarily be considered available by Ad Manager.
By default, Ad Manager considers a Face available if it has no scheduling of any kind for the designated time frame. Ad Manager also considers Faces that are only scheduled to Dead Proposals, Proposals or Expired Limited Holds during the designated time frame as available as well.
The Take Over function allows you to specify what other scheduling conditions you wish to have Ad Manager treat as available. For example, you may want to consider Faces that are scheduled on Preemptable Bonus Subcontracts as available, in addition to the default conditions.
Adding a Take Over
To add a Take Over item, simply select the desired criteria by clicking on the desired category and selecting the desired item(s). This can be done as one item from one column, or multiple items from multiple columns. For example, if you wish to make all Faces scheduled as Preemptable available, click on "Posting Type" and click on "Preemptable". If you wish to make all Faces that are scheduled as Preemptable Bonus or Preemptable Trade available, click on "Subcontract type" and click on "Bonus" and click on "Trade", and click on "Posting Type" and click on "Preemptable".
Once you have selected the desired item(s) to create your criteria, click on the Add to List button. The condition you have set will appear in the top half of the window. At this point you can add additional criteria if desired by following the same process.
Ad Manager also allows you to consider Faces that are marked as Non-saleable as available. To make Non-Saleable Faces available for scheduling on this Subcontract, click the "Ignore <Non-saleable> property of the Faces" check box.
Any Take Over criteria you set for a Subcontract will be saved so you can continue your scheduling at a later date. If you no longer wish to use certain criteria, you can remove the desired items.
Removing a Take Over
If you no longer wish to include a particular scheduling condition in the Take Over list, highlight it in the top half of the window and click the Remove button. If desired, you can also remove the default condition of Dead Proposal, Proposal and Expired Hold (Limited).
If you no longer wish to consider Non-Saleable Faces as available for scheduling on this Subcontract, click the "Ignore <Non-saleable> property of the Faces" check box to turn it off.
If you wish to reset the Take Over conditions back to the default settings, click the Reset button.
Overriding the Default Settings
If you are tight for space during a particular time frame or want to find Faces that may be acceptable that aren't currently considered available, you can use the Take Over features to generate a larger pool of Faces to select from.
Ad Manager also allows you to Override the Number of Faces to Chart that was set when the Subcontract was created. You can override other items that have previously been set on the Subcontract as well. If you wish to refine or change the targeting criteria, the Face distributions or the Designs set on the Subcontract, this information can also be modified. Changing these criteria allow you to fine tune a campaign showing.
If you make any changes to the original settings, the Chart window will display in the bottom right corner of the Status bar, indicating that an item has been changed.
Ignoring Conflicts
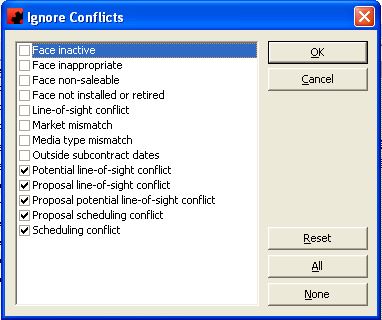
Ad Manager automatically checks for a variety of conflicts. However, if you wish to schedule Faces despite the fact that they generate certain types of conflicts, you can do so by going to the Tools menu and selecting Ignore Conflicts.
From this screen you can select which conflicts you wish to ignore. To select an item, simply click on it. Ad Manager will not warn you if a Face has this scheduling conflict and will allow you to assign the Face without the Conflicts screen appearing. The Automatic scheduling feature will treat Faces with these conflicts as available and usable on the showing. Once you have made your changes, click OK to continue. Ad Manager will display in the bottom right corner of the status bar.
Assign One Face
Double click the Face you wish to assign to the flight. A window will appear that you can use to identify the desired dates, posting type and Design to use. If a conflict exists, will appear in the bottom right corner of the status bar. You can see a list of these conflicts this Face may have generated on the Conflicts Tab. To accept the Face, click the Accept button (![]() ). If you want to remove a Face from the list of candidate Faces, click the Reject button (
). If you want to remove a Face from the list of candidate Faces, click the Reject button (![]() ).
).
Interactive Scheduling
When you click on the Find button () in the Chart window, a listing of Candidate (available) Faces will appear in the bottom portion of the window.
Automatic Scheduling
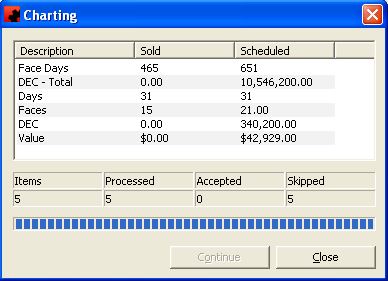
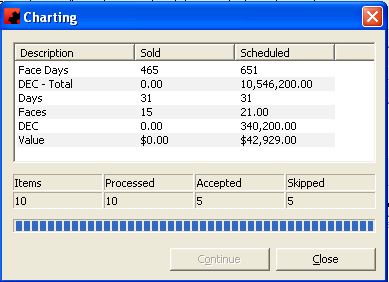
Automatic Scheduling takes the same list of available Faces found in the Interactive Scheduling and attempts to add all these Faces to the flight, up to the charting requirements specified on the Counts page of the Subcontract. Ad Manager will attempt to assign Faces to the flight in the order that the Faces have been sorted. If a Face is not available because it generates a conflict, Ad Manager will skip the Face.
To use the Automatic Scheduling feature, click the Auto Chart button (). Once Auto Charting is complete, the following screen will appear.
To see a listing of Faces that have been assigned, click on the Assigned button (![]() ), then click on the Find (
), then click on the Find () button. If you wish to remove a Face scheduled from the Assigned window, highlight it and click the Delete button (
).
You can monitor your scheduling progress against your established criteria from the Summary Tab.
Charting with Visual Charting
Visual Charting provides users with a spreadsheet style interface that allows drag and drop charting. Each item can be customized to provide an interface that shows you exactly what information you need to help in your decision making.
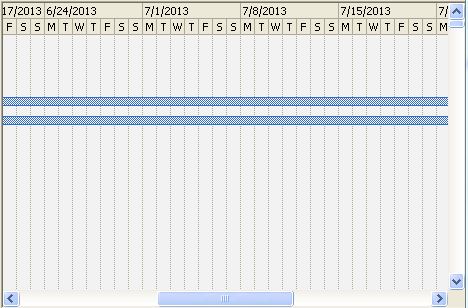
Once you have Customized Your View to show your information, you can select your Face and Subcontract Data to be displayed. As you highlight each Subcontract shown, a listing of all flights on the highlighted Subcontract will appear.
When you click on a flight, Visual Charting will show the time frame for the flight in the Scheduling window in white, making it easy to see what Faces are available, and to act as a guide when assigning the Face.
The drag and drop feature allows you to click on a flight, hold down the mouse button, and drag the flight to the desired time frame for the desired Face. You will notice a "ghost" image of the scheduling will appear on the screen, showing where the flight would be placed. As you drag your scheduling around the screen, you will also notice the Face currently being dragged over is highlighted. If you were to release the mouse button, the charting would be recorded for that Face. When you release the mouse button, Ad Manager will attempt to assign the flight to that Face, checking for line of sight conflicts, restrictions and scheduling to make sure the charting can be completed.
If you wish to modify charting that is currently on the screen, simply click and hold the mouse button down over the item you wish to modify. You can now drag this scheduling to another start date or location. To make the change, release the mouse button.
If you wish to change the start and/or end date to lengthen or shorten the campaign, move your mouse over the end of the charting bar. The mouse cursor will change to an arrow. Hold down the mouse button and drag the start or end date to the desired day. When you release the mouse button, Ad Manager will make the changes to the scheduling for that Face.
When using Visual Charting, all changes are automatically made in all areas of the software. Similarly, changes made elsewhere in the system are reflected here as well.
Components of Visual Charting Window
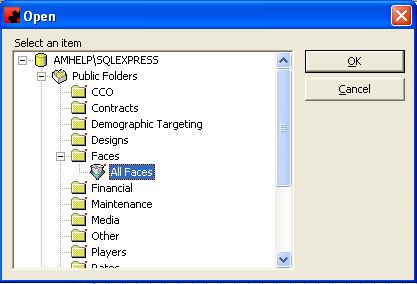
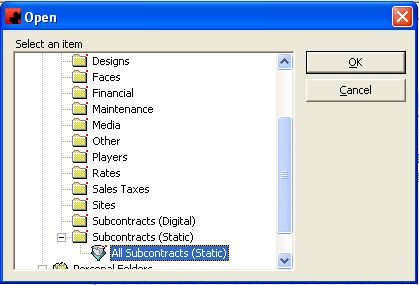
This area contains a list of all Faces in the current filter. To populate this with the Face data you desire click on the Face Filter () at the top of the screen. You will be prompted to select the group of Faces you want to populate this listing with.
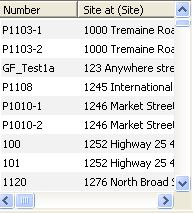
Once you have selected the group of Faces you want to work with the Face Data window in the software will show those Faces .
You can click on column titles to sort by that column, resize columns or move columns.
Using Visual Charting
Visual Charting is the "Spreadsheet" scheduling process. Typically used for media types sold individually it can be used as a visual Open Space summary for both planning and Charting purposes.
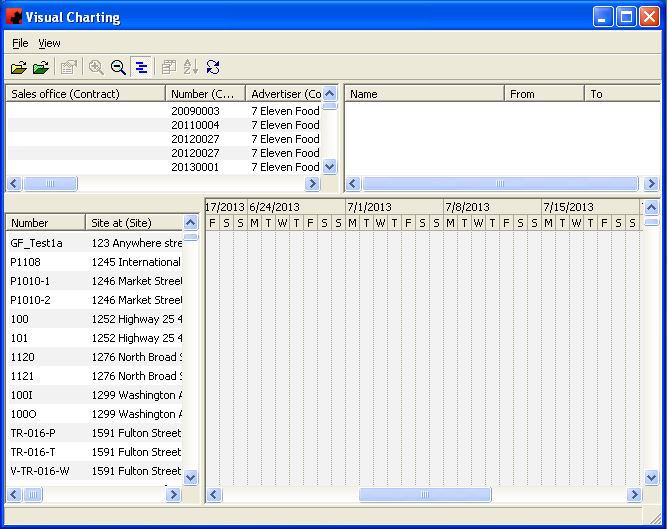
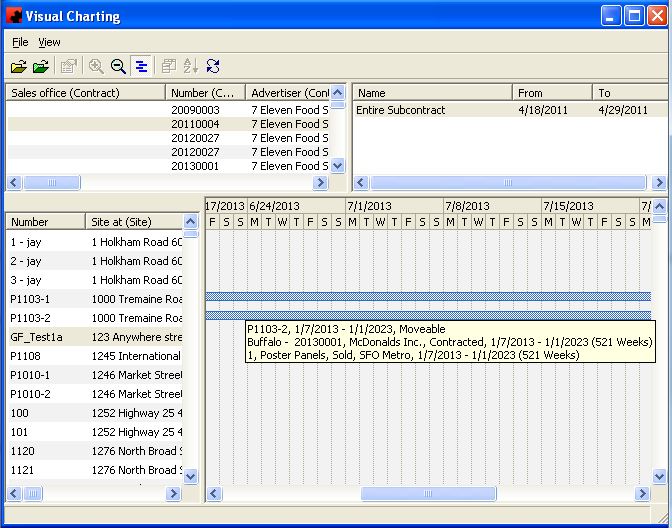
To access Visual Charting click on the Visual Charting Icon () at the top of the Ad Manager Explorer window or from the menu bar under Tools. You will then see a blank screen similar to the following:
The screen has 4 components: Face Data, Subcontract Data, Flight Data and the visual representation of the Scheduling Data.
Face Data
This area contains a list of all faces in the current filter. To populate this with the face data you desire click on the Face Filter () at the top of the screen. You will be prompted to select the group of faces you want to populate this listing with.
Subcontract Data
This area contains a list of all subcontracts in the current filter. To populate this with the subcontract data you desire click on the Subcontract Filter () at the top of the screen. You will be prompted to select the group of subcontracts you want to populate this listing with.
Flight Data
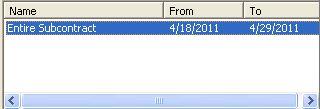
This area contains a list of all subcontracts in the current filter.
Scheduling Data
This area contains a list of all subcontracts in the current filter.
Changing the Time Frame
This area contains a list of all subcontracts in the current filter.
Customizing Your View in Visual Charting
Each Subcontract/Flight shown in the scheduling data window is shown in a specific color to represent a unique combination of Contract Status, Subcontract Type and Posting Type. Ad Manager comes with specific defaults for different combinations of selection criteria and colors. From the View Menu at the top of the screen you can select :
-Labels
-Shading
-Legend
Labels
Each item in the Visual Charting screen can show the advertiser name, the brand, the subcontract design name, the contract number, or it can display without these labels. To turn it off simply go to the View Menu at the top of the screen and click on the Label menu item. This action will turn on or off the chosen labels depending upon its current status (on or off).
Legend
Each Subcontract/flight shown in the Scheduling Data window is shown in a specific color that represents a unique combination of Contract Status, Subcontract Type and Posting Type. To determine the current settings turn on the legend by going to the View Menu at the top of the screen and click on the Legend menu item and it will turn on or off the legend depending upon its current status (on or off).
Shading
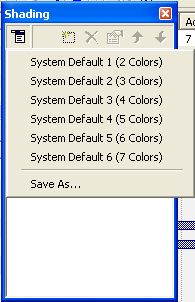
To customize the legend (and the window display) Select the View menu option at the top of the screen and click on the Shading menu item. When you clicking on this menu item and click on the Schemes icon () the following screen of legend information will be displayed:
Ad Manager comes with 6 system defaults that can be modified by the user and stored as a new default. From this menu you can save a new shading option (the one currently in use) under a name of your choice, switch to a different option or delete a previously saved custom shading.
Before you decide to customize a view, determine which items you wish to see displayed on the screen in different colors. Select the System Default Scheme with the appropriate number of colors.
Hiding Specific items
You have the ability to choose whether to hide the display of the items for each shading element. If you wish to hide an item, click the "Hide" check box.
Order of Priority
Ad Manager's Visual Charting function displays all Subcontract/flights using the first set of selection criteria that the specific Subcontract/flight/face status meets. Criteria at the top of the list (legend) taking priority. In other words, if the criteria/status is met in the first item on the list the flight for that location is shown in that designated color.
Other than the first criteria you will note the legend states "none of the above and" to indicate the face has not met any previous criteria. For this reason a user may want a number of different color schemes when looking at the information for different purposes. For example if a user needs to find already posted faces that are designated as movable they could create a view that shows this at the top of the list to make this easy.
Changing the Criteria
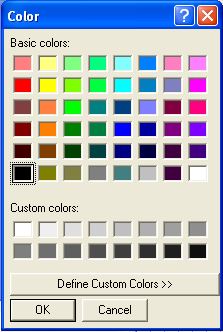
To change the colors or selection criteria for any option simply click on that option from the list, click on the specific item on the legend you wish to modify and click on the properties icon () in the top right corner of the window. Once a specific item is selected you will be shown the following window:
Each color represents a specific combination of selection criteria. The window contains a summary of the selection criteria currently in use. To remove a specific item currently in use, click on the item (highlight it) and select the Remove button. Clear will clear all items currently in the criteria list. Similarly you can place criteria in the Exclude Postings box. Adding and removing items works the same for either window.
To add an item, select the desired Contract Status, Subcontract Type, Posting Type combination that you want to display. You do not have to select an item from each list; if you want to see all Posting Types, you can select "Doesn't Matter". For different examples of criteria, click here.
| Desired Criteria | Contract Status | Subcontract Type | Posting Type |
|---|---|---|---|
| All Sold Locations | Doesn't Matter | Sold | Doesn't Matter |
| All Proposals | Proposal | Doesn't Matter | Doesn't Matter |
| All Holds (both Limited and Unlimited). Each line is a separate "Include" | Limited Hold | Doesn't Matter | Doesn't Matter |
| Limited Hold (Expired) | Doesn't Matter | Doesn't Matter | |
| Unlimited Hold | Doesn't Matter | Doesn't Matter | |
| All Contracted, Preemptable Locations | Contracted | Doesn't Matter | Preemptable |
| All Contracted Sold Locations that are Movable | Contracted | Sold | Movable |
Once you have selected the combination of criteria that meets your needs click on the Include button and the criteria will be added to the list. The Exclude button does the same for faces that meet the criteria you wish to exclude.
Changing the Color
To change the colors for any option simply click on that option from the list, click on the specific item on the legend you wish to modify and click on the properties icon () in the top right corner of the window.
To change the color click on the color box at the top left of the screen. You will be shown a color palette to select from. When you select a new color the color displayed will automatically change. They system automatically defaults to a light shading pattern.
Saving Your Settings
After you have finished customizing a criteria and a color, hit the OK button. Select a different item on the list, and repeat this process for each criteria. If you need to add a new criteria and there are no more items to modify, select the New icon ().
Once you have customized the criteria and colors, you have the ability to Save your settings for use at a later time. To save your settings, click on the Schemes button (), and select Save As. From here you can name your settings and select OK. Your settings will now appear on the list.
Comparing Your Progress to Your Scheduling Requirements
Throughout the course of your scheduling, you may want to see how you are progressing compared to what was actually sold to the client. The Summary Tab provides you with the information necessary to ensure you meet your client's requirements.
In the top half of this window, Ad Manager shows information about the number of Faces and circulation (DEC or GRP) sold versus scheduled. At a quick glance you can determine whether you have reached your desired threshold values.
The bottom half of the window shows you the distribution of Faces compared to your Area distribution and any Custom Classification distributions. To select the distribution criteria to view, click on the dropdown combo box and select the desired item. Ad Manager will list the criteria you've established on the Subcontract (if any) and compare it to the distribution of the scheduled Faces.
Subcontract Data
This area contains a list of all subcontracts in the current filter. To populate this with the subcontract data you desire click on the Subcontract Filter () at the top of the screen. You will be prompted to select the group of subcontracts you want to populate this listing with.
Once you have selected the group of subcontracts you want to work with the Subcontract Data window in the software will show those Faces.
You can click on column titles to sort by that column, resize columns or move columns.
Click on the Subcontract you wish to chart and all flights for that Subcontract will be displayed in the Flight window.
Flight Data
This area contains a list of all Subcontracts in the current filter. It is automatically populated with all flights associated with the Subcontract selected in the Subcontract window to the left of it. The following example shows a Subcontract with one flight only.
You can click on column titles to sort by that column, resize columns or move columns.
Scheduling Data
This area contains a visual representation of all subcontracts/flights scheduled to each Face on the left side of the screen. Each subcontract/flight is shown with its scheduled start and end dates. It is possible that each Face on the subcontract/flight could have been assigned different dates from the contract or even each other. The timeline displayed can also be changed to be any length between days and months.
Each item is shown in custom colors with the short code name of each advertiser. For more information on any specific flight simply leave your mouse over the flight shown and additional information will appear in a separate information box as shown below:
Moving your mouse will make the information box disappear.
To add or move scheduling to a Face please refer to Charting With Visual Charting.
Viewing Current Conflict Information
To view a list of Faces on a Contract or Subcontract that have Conflicts, go to the desired Contract or Subcontract and click on the Tools menu and select Conflicts. A window will appear, allowing you to identify which conflict items you wish to scan this Contract or Subcontract for. Once you have selected the items to check for, and clicked OK, Ad Manager will check each of the Face assignments for these conflicts.
If any conflicts exist, Ad Manager will display a window listing all Face assignments that have conflicts. To see more information about the conflict, double click the Face and click the Conflicts Page. Ad Manager will provide you information explaining the conflict that has been found. Once you are aware of the conflict, you can decide whether it requires any action, and can proceed accordingly.
Once you have finished reviewing all the conflicts, close the Conflicting Postings window by clicking the "X" in the top right corner of the window. For an explanation of what each conflict means, see View Conflicts.
Modifying a Charted Faces Information
After a Face is charted, there may be situations where you need to reschedule the dates for a Face. To reschedule the dates on a Face, you can either modify the information from the Subcontract or from the Face.
To reschedule from the Subcontract, find the Subcontract where the Face you wish to reschedule is assigned. Go to the Assigned Page and highlight the Face(s) to change. Click on the Tools menu and select Update or right click on a selected item and choose Update. In the screen that opens, activate the Duration checkbox by clicking in it and enter in the new dates for the assignment. Then click OK. If you wish to reschedule from the Face, find the desired Face and click on the Posting Schedules Page. Highlight the item to reschedule from the list, right click and choose Update. Click on the Tools menu and select Update or right click on a selected item and choose Update.
In the screen that opens, activate the Duration checkbox by clicking in it and enter in the new dates for the assignment. Then click OK. Ad Manager will check for any potential conflicts. If there are any Faces Ad Manager cannot reschedule, it will inform you there are Faces that generate conflicts. If you wish to see the list, click Yes, and if you wish to continue without rescheduling these Faces, click No.
If you click Yes, the following screen will appear:
From this screen you can double click any Face, go to the Conflicts Page of the Posting window that opens, and view the details regarding the conflict generated. If you wish to override the warning and reschedule the Face, click Accept. If you don't wish to reschedule the Face, click Cancel. Any Face that remains on the Conflicts window when you click Close will not be rescheduled.
Releasing Faces
Releasing Faces From a Subcontract
If you wish to release (remove) Faces from a flight, you must go to the Chart Window and click on the Assigned page. From this page you can select the flight (or all flights) you are interested in releasing a Face from.
Once you have found the desired Face, you may release it from the showing if it has not yet been posted. To release a Face, highlight it and click the Delete () button. This will release the Face from the showing.
You can select multiple Faces by holding down the SHIFT or CTRL key while clicking the desired Faces.
Releasing Scheduling From the Face
Ad Manager also allows you to release scheduling from the Face. This is particularly useful if you are retiring a Face and want to remove all future scheduling. Find the Face to remove scheduling for, and click on the Posting Schedules Page. Using CTRL+click or SHIFT+click, highlight the Face scheduling assignment(s) to remove . Right click and click Delete or click the Delete () button in the Posting Schedules pane. This removes the scheduling, provided the Face has not been posted.
Review Information for an Assignment
If you want to find out more information about a particular scheduling assignment, you can do so by highlighting it on the Assigned Page of the desired Subcontract and clicking the Properties button (). Ad Manager will display a window from which you can review and, if necessary, change information.
If you wish to change information about this assignment, make the appropriate change(s) and click the Save button().
In addition to seeing the assignment information, you can also see if there are any conflicts involving this assignment by clicking on the Conflicts Page.
To see all Posting Tasks associated with this assignment, click on the Tasks Page.
Rotate Lists
Steps to Undertake a Rotate
Rotary Assignment Worksheet
Manual Assigning in a Rotate
Selecting Designs
Ad Manager allows you to select Designs to be placed on each Subcontract. Once this is done, Designs may be assigned to individual Faces. Ad Manager provides you with 2 levels of Designs, a Subcontract Design and an Inventory Design.
The Subcontract Design allows you to enter in any name you wish to use to identify the Design. If you don't know the name of the Design, you can simply enter Design1, Design2, etc. to allow you to undertake Design Assignment. If you do not plan to use the Design Inventory features of Ad Manager, you can go in at any time and change these Design names to be more descriptive once you know what Designs are to be used. These Designs are printed on the default Posting Cards/Instructions.
The Inventory Design allows you to track the number of each Design received, where it is stored and how many of each have been used and what remains available for future use. The Inventory Design can be linked at any time to a Subcontract Design to allow you to track Design inventories without having to change the Subcontract Design name. If you wish to change the name for the Subcontract Design to match the Inventory Design, highlight the appropriate Designs and go to Tools - Rename Using Inventory Design Name.
Adding Designs to a Subcontract
To add a Design to a Subcontract, you first must select the desired Subcontract, and go to the Designs page. If you are adding Designs from the Chart window, go to the Designs tab. When you are on this screen, you can add Designs to the Subcontract by clicking the New () button. A window will appear allowing you to enter the Subcontract Design name and the maximum number of this Design you would like to use on this Subcontract.
Linking Designs
If you wish to track the inventory of Designs, you can link the Subcontract Design to a particular Design in the Designs Database. This can be done while adding a Subcontract Design, or by highlighting the appropriate Design on the Designs Page and double clicking or by clicking the Properties () button.
To link a Design, click the Inventory Design New button(). Use the Select a Design window to obtain a listing of Designs to select from.
The desired Inventory Design can be filtered using the Advertiser, Brand, Media Type, Size and by Name. After you click OK, a list of Designs meeting this criteria will appear, allowing you to select the correct one. If only one Design meets your search criteria, it will automatically fill in the information in the Inventory Design box.
If no Designs are found, it is possible that your search criteria has excluded the Design you are looking for, or it has not yet been entered, or has been entered into the Designs database incorrectly. If you do not wish to link to the Designs Database for Design inventory tracking, you do not need to Link to the Inventory Design.
Design Filters
Ad Manager allows you to specify what conditions a Face must meet in order to place this Design on it. For example, you may want a particular Design to be only on Faces that are facing West, or that are illuminated. Similarly, you may want to avoid putting a particular Design on certain Faces. For example, Faces that are inappropriate for alcohol or have a low DEC. It is not mandatory to fill this information in, it just provides you with more flexibility and power in assigning Designs.
The Required Face Properties check box allows you to specify all criteria that a Face must meet in order to be scheduled with this Design. Fill in the appropriate information, and click OK when finished. The Required Face Properties check box will have a check mark, indicating a filter has been set.
The Excluded Face Properties check box allows you to specify all criteria that a Face must not have in order to be scheduled with this Design. Fill in the appropriate information, and click OK when finished. The Excluded Face Properties check box will have a check mark, indicating a filter has been set.
These filters are only considered by Ad Manager when assigning Designs randomly (through the Tools-Assign Designs menu item from the Assigned Page of the Subcontract). For more information on assigning Designs randomly, see Assigning Multiple Designs.
Scheduling Design Changes on a Face
Ad Manager allows users to schedule Design changes for Faces during the life of the Subcontract. You can schedule Design changes for a Face on a Subcontract as frequently as daily. After you create Design changes, you will notice that the same Face will now appear on the Assigned Page more than once. For each Design change created, the Face will be listed a corresponding number of times (known as the Face assignment), showing the date range for each of the Design changes created. You can assign the desired Design to the appropriate date range by highlighting the Face assignment and assigning a Design to the Face.
To schedule a Design change, select the affected Face(s) using CTRL+click and SHIFT+click, and then right click and select Design Change (or on the toolbar). Ad Manager will then display the following screen.
Scheduling a Design Change on a Specific Date
To specify a specific date for a Design change, click "On a Specific Date" and Ad Manager will create a new Face assignment for that date when you Click OK.
Scheduling Design Changes at Specific Intervals
To schedule Design changes for a Face on a recurring schedule, select "At regular intervals". You can specify how frequently you wish to change Designs between the Starting On date entered and the end of the Subcontract. Click OK to accept the creation of new Face assignments during this time frame.
Scheduling Design Changes at the Beginning of Selected Flights
To schedule Design changes to occur at the start of selected flights on the Subcontract, click on "At the beginning of selected flights". To add flights where you wish to change copy, click the New button(). To remove a flight from this list, click the Delete button (
). To review the flight details, click the Properties button (
). Click OK to save the Face assignments.
