General
Contents |
Welcome
Welcome to the Ad Manager® Suite of Products. Our software has been specifically designed to assist outdoor advertising operators with all aspects of their organizations. Everybody now has access to the information they need, quickly and easily, from one source. Ad Manager® was developed in close association with a number of outdoor advertising plant operators in 1985 and has been continuously maintained and upgraded so that the current version contains all the main features used by chartists as well as a large number of special features incorporated at the request of specific users. Ad Manager is comprised of 6 different modules; Inventory Management, Advanced Mapping, Maintenance, Multimedia, Digital Media and Financial. Each module provides specialized assistance to assist in various functions within your organization. All of these modules can be used in conjunction with the Internet through eAd Manager. When the databases are kept up-to-date, it enables the user to perform their daily routines in a fraction of the time once spent to perform the same functions manually. Ad Manager should be viewed as more than just a tool to assist in the day to day operations of your plant; it has been designed to help everybody in an organization. Ad Manager can never replace the valuable experience of the user, but instead helps the user achieve more. In order to get the most benefit out of the purchase of this software, please take the time to read this manual and go through simple example sessions prior to actually using the system.
Providing and Restricting Access
Ad Manager allows its users to set up user names and passwords to control access to the software. This is a very valuable and important feature for several reasons. By setting up user names, you can ensure that only authorized staff have access to the software and its powerful features.
Each user may have different areas of responsibility. You may want to limit staff to be able to access only those areas of the software that they require. Restricting access to other portions of the software can aid in ensuring only those people responsible for a function have access to it.
Each user will have their own "work environment". Users may prefer seeing information in a particular sort order, or filter their information to only see certain structures or contracts. Each user may also have a preferred printer they want to print to.
Each user can set up predefined views. These views can be public (seen by all users), or private (available only to them)
If a user makes changes to the scheduling of a contract, or if they schedule a face to a contract that may cause problems (e.g. line of sight issues, restricted from that location or not available during that time frame), the software will record which user made these changes. This allows you to follow an electronic paper trail, and follow up with the appropriate person as to why this change was made.
As you can see, Ad Manager's security feature allows you greater control over your working environment, ensuring a more efficient and successful use of our software.
For information on how to set up security for a user, go to the Security Roles page.
Backing Up Data
The only sure way to keep your data safe is to back it up. Often. Use a rotating schedule and store your backup tapes off site. The off-site location can be as simple as bringing the tapes home. Do an incremental backup daily, copying all files to tape. Ideally, you should use a different tape for each day, but some people use one tape for all their daily backups. This way, you never lose more than a day's work. At the end of each week, do a complete backup. Use three tapes, alternating them so that you use tape one the first week, tape two the second week, tape three the third week, and then start again with tape one for the fourth week. Even if one tape goes bad, you still will have access to most of your data.
This way if you accidentally delete a file or directory, you are 24 hours away from a complete recovery. When you don't have the time to lose even 24 hours' worth of work, you can reset your backup schedule so that you not only back up at the end of the day, but at lunchtime as well.
As you plan your own backup schedule, try to determine just how many hours of data you can afford to lose without causing major problems. For many people, a 24 hour schedule is enough. Others may need a four hour schedule. Some data may be irreplaceable.
Storage is cheap. Missed deadlines and redoing work may not be.
Backup software can be purchased off the shelf, or you can use the backup routines already in use on your network server. We would also recommend that you test the backup software by backing up data and trying to retrieve it. If your backup software does not work properly, it is best to find out before you really need to use it.
SQL Server backups
Microsoft SQL does come with the ability to back up your databases. This is done through a program provided as part of the installation tools called SQL Server Management Studio. While each version of SQL can be slightly different in the way backups are created, the general steps are below. We recommend undertaking an internet search for specific instructions on how to back up your data for the version of SQL you have.
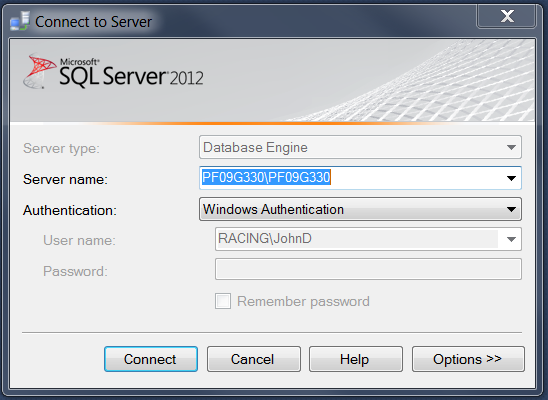
The first step is to log into SQL Server Management Studio. This can be done by going to your Start menu and looking for the folder containing the version of SQL you are on. Launch SQL Server Management Studio. At this point, you will be prompted to log into the database.
Please check the name of the server you use when logging in to Ad Manager and make sure it matches the name presented on this login page. If you have windows authentication or mixed mode authentication set up, you most likely can click Connect to get into Management Studio. If you only have SQL Server authentication set up, you will need your username and password to log in. Please note that certain users may not have privileges to create backups.
Once you are in SQL Server Management Studio, open the Databases folder. Once this has expanded, you should see a database that matches the database name you access when logging into Ad Manager. If you are using Ad Manager or a later version of Charting Pro, you will also see a second database with the same name, followed by "_bin". If you do not see the databases, then you may be accessing the wrong SQL Server.
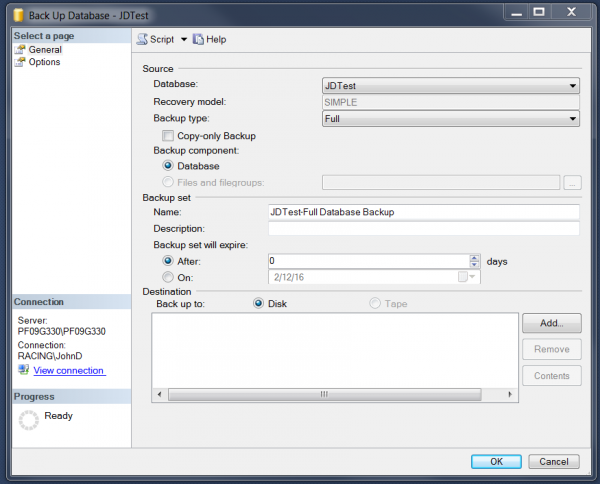
Right click on the either of these databases and look for Tasks-Backup. A window will appear allowing you to create your backup. If a filename appears in the Destination section at the bottom, click Remove. Check the other settings on this page against the recommended settings found during your search. You should have the database set to the name of the database you selected, and the backup type should be full.
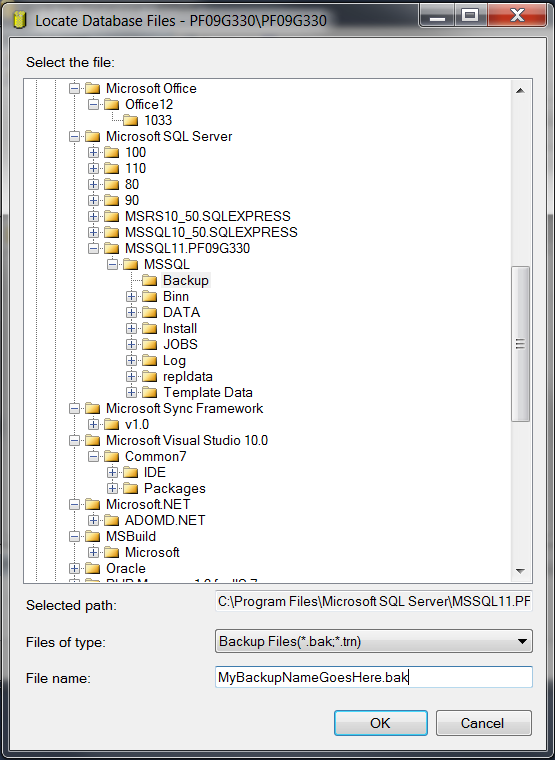
Once you have checked these settings, click Add in Destination. At this point you will be asked for a location to save the backup and the name of the file. Click the ellipsis (...) in order to specify a directory and a name. Highlight the folder you want the backup placed in and enter the name at the bottom under file name. Be sure to put a .bak at the end of the file name to make it easier to find later.
Once you have specified where to backup your data, click OK, then OK again, and double check your settings. It is suggested that you also go to the Options tab and select "Overwrite all existing backup sets" before proceeding. When you are ready, click OK. SQL will back up your database and notify you when the backup is completed.
Once you have backed up the first database, go to the second Ad Manager database and repeat the procedure. Be sure to use a different name for this file, otherwise you will overwrite the file you created for the other database.
At this point, you can check the directory you saved these files in and make sure the 2 .bak files are present. You can now leave them where they are, copy them to offsite storage or follow any other procedures suggested.
Entering the Software
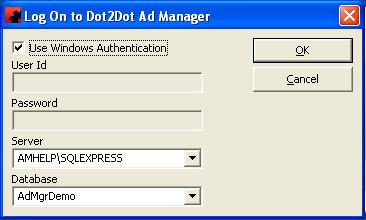
In order to use Ad Manager, you must be on a computer that meets the minimum system requirements. Next, you must have proper access to Ad Manager from your machine. If you are on a network, this means setting up the local machine to access the software from your network. It also means you must install specific components on your machine. If you are unsure of how to do this, contact our Technical Support staff. Once you are properly set up, simply double click on the Ad Manager for Windows icon on your screen. Ad Manager will ask you for your User ID, Password and Server information. The server information will be available from your network administrator. Please note the User ID and password are case sensitive.
If you have been set up to use your Windows logon for Ad Manager, you must check the Use Windows Authentication box on the Ad Manager Logon Information screen, enter the Server name, and the Database name, then click ok. Once this is entered, the main Ad Manager screen will appear. Ad Manager will remember the User ID and Server information from the last person to logon to the computer. If you are the only person accessing Ad Manager from the machine, you simply need to enter only the password, as the remaining information will already be filled in. If you are using Windows Authentication to logon, you simple click on OK.
Importing Your License
Periodically, the license for Ad Manager will require updating. When this occurs, Dot2Dot will issue and send a new license for your company. Once this license file has been received, it should be saved on a common area of the network where all users that use Ad Manager will have access to.
To update your license, the user on each machine will need to go Ad Manager. Make sure you are not in the middle of doing something else as the license update procedures will log you out of Ad Manager as soon as the license is updated. Go to TOOLS - LICENSE - UPDATE LICENSE and select the file provided. You will receive a confirmation that you've updated the license and be logged out immediately.
If you are notified that the license file is invalid or does not match, re-import the corresponding dongle file by going to TOOLS - LICENSE - UPDATE SERIAL NUMBER and select the dongle file. You will be logged out of Ad Manager and, when you log back in, repeat the process to import the license file. If you continue to have trouble, please contact the Dot2Dot support team.
When you log back in again, you will have the new license. If you wish to confirm the new license settings, go to HELP-ABOUT.
Upgrading Ad Manager Versions
Please do not follow these procedures without the assistance of a SQL administrator. This process requires a basic knowledge of SQL.
Download the newest version of the Ad Manager Client by contacting a Dot2Dot representative
The feature sheet of what is included in the upgrade can also be downloaded from here as well.
Place the Ad Manager installer in a share folder on the server.
Make sure no users are in the database.
Complete a SQL binary backup of your database.
Uninstall Ad Manager from the server, using Control Panel - Add/Remove Programs.
Install the new version of Ad Manager on the server.
Launch the DatabaseMaker utility located in the Ad Manager Tools Software directory.
A wizard will take you through the various steps of upgrading. Be sure to use a login account that has SQL administrator privileges and is a user of the database. The most common reason for the upgrade failing is incorrect credentials.
Once logged in, the database upgrade will go through a number of steps and finally present you with a successfully completed screen.
We recommend that you do a post upgrade SQL binary backup of the new/upgraded database as well. Do not overwrite the original backup. Create a new backup.
The database is now ready to use.
Double-click on the AdMgr.msi file and install the new version of the software on the server.
Launch Ad Manager on the server to test connectivity.
Import your Ad Manager Licence and close Ad Manager.
On each of the workstations, manually uninstall the existing Ad Manager client using Control Panel - Add/Remove Programs.
Point to the new Ad Manager client installer in the share folder on your server and install Ad Manager on each workstation.
PLEASE CONTACT A DOT2DOT SUPPORT REPRESENTATIVE FOR ASSISTANCE IN AUTOMATING THIS PROCESS IF YOU ARE UPGRADING A LARGE VOLUME OF WORKSTATIONS.
Customize Current View
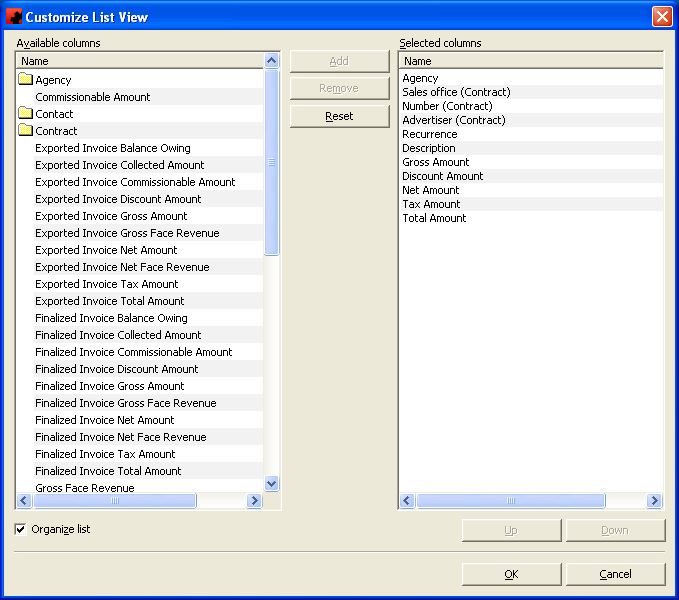
Ad Manager allows users to customize screens throughout the software to provide each user with the ability to see the information that they need most often. However, the "Customize Current View" option is machine-driven therefore, if the user logs into a different machine, the view will not be the same. If everyone who uses the system needs to have the same customized views, they must be individually set up on all the machines. To customize any list in Ad Manager, right click in the list and choose "Customize Current View". The following screen will appear.
To select information to include on your screen, you can either Add columns or Delete columns from the view. To add a column to your view, select the New () button. A list of available columns will appear; from this list, click on the desired item to add it. To remove one or more columns from your view, highlight them by holding the CTRL or SHIFT key down while clicking on them in the list and select the Delete (
) button. This will remove the column from your view. You can add it back to the view at a future time if you wish.
The order that information appears on your screens will be in the order shown in "Column". To move items up or down the list, highlight them (to move multiple items, use CTRL or SHIFT while clicking) and use the Move Up (
) or Move Down (
) button as appropriate.
To reset to the default view, select the Reset button.
Updating Information on Multiple Items
Ad Manager provides the ability to update information for multiple items (Faces, Sites, Contracts, Subcontracts, Designs, Advertisers, etc.) quickly and easily. For example, if there are several Subcontracts that need to be changed to sold, this can be done through the Update window one time, instead of having to change each Subcontract individually.
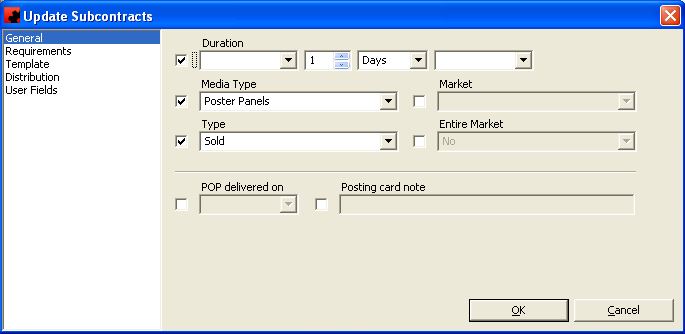
In the Ad Manager Explorer window or in a Filter, highlight all the Subcontracts you wish to update with the same information. You can highlight multiple Subcontracts by holding either the SHIFT key down (for all items in a range) or the CTRL key down (for specific items) while clicking with the mouse. Once all the desired items have been selected, go to TOOLS-UPDATE.
The screen that will appear allows users to set values for fields related to the items selected. By entering a value into one of these fields, Ad Manager will change each of the selected items to have that value in that field. To select a field, you must first activate it by putting a checkmark next to the field name. If you do not wish to update a field, make sure you "uncheck" the checkbox prior to running the tool.
Please Note: If you activate a field and leave it blank, the current values will be deleted and left blank for all selected items.
To run the tool, simply click OK.
View Conflicts
Ad Manager allows you to view all the conflicts that have been generated by a Contract, Subcontract, Site or Face quickly and easily. You can specify which criteria you consider to be a conflict.
To view a listing of all conflicts generated on all Subcontracts of a specific Contract, go to the Contract and click on the Tools menu and select Contract Conflicts. You can also view conflicts generated among certain Contracts. From a finder or list view of Contracts, highlight the Contracts among which you wish to check for conflicts. Go to Tools and select Contract Conflicts.
To view a listing of all conflicts generated on a Subcontract, you can either go to the Contract's Subcontract page, highlight all the Subcontracts and click on the Tools menu selecting Subcontract Conflicts. or go to the desired Subcontract and click on the Tools menu and select Subcontract Conflicts. You can also view conflicts generated among certain Subcontracts. From a finder or list view of Subcontracts, highlight the Subcontracts among which you wish to check for conflicts. Go to Tools and select Subcontract Conflicts.
To view a listing of all conflicts generated on all Faces of a specific Site, go to the Site and click on the Tools menu and select Site Conflicts. You can also view conflicts generated among certain Sites. From a finder or list view of Sites, highlight the Sites among which you wish to check for conflicts. Go to Tools and select Site Conflicts.
To view a listing of all conflicts generated on a Face, you can either go to the Site's Faces page, highlight all the Faces and click on the Tools menu selecting Face Conflicts, or go to the desired Face and click on the Tools menu and select Face Conflicts. You can also view conflicts generated among certain Faces. From a finder or list view of Faces, highlight the Faces among which you wish to check for conflicts. Go to Tools and select Face Conflicts.
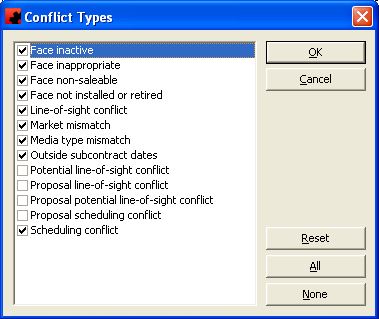
When you choose to see conflicts for an item, the following screen will appear.
From this screen you can select which items you wish to consider a conflict issue to review. To select an item, click on it and a check mark will appear. To unselect a checked item, click on it and the check mark will disappear. To reset the Conflict Types screen to the original settings, click Reset. When you have selected all the items to review, click OK and Ad Manager will list all items that have generated conflicts.
When you double click on an item, Ad Manager will display the details, and you can review the conflicts generated. Ad Manager will not resolve the conflicts for you; it will only bring them to your attention.
Understanding Conflict Warnings
Face Inactive - This conflict type looks for Faces that are inactive for any portion throughout the life of the Contract or Subcontract.
Face Inappropriate - This conflict type searches for Faces that do not match the criteria of the Contract/Subcontract. Examples include Faces that do not meet the area distribution, Faces that do not meet the Conditions/Restrictions specified, etc.
Face Non-saleable - The conflict type searches for Faces assigned to the Contract/Subcontract that are designated as non-saleable on the Face - Details Screen.
Face Not Installed or Retired - This conflict type looks for Faces that have not been installed by the start of the Contract/Subcontract and for Faces that have been retired prior to the start date or at some date during the duration of the Contract/Subcontract. The installation date and the retirement date are located on the Face - Details Tab. By not entering these dates into Ad Manager, you leave room for errors such as assigning your clients' campaigns Faces that have not been built yet or that have been permanently removed.
Line-of-Sight Conflict - This conflict type looks for Faces in line-of-sight with each other that are assigned to conflicting advertisers or categories.
Market Mismatch - This conflict type looks for Faces that are not part of the market specified by the Subcontract.
Media Type Mismatch - This conflict type searches for Faces that are not the media type specified on the Subcontract.
Outside Subcontract Dates - This conflict type looks for Faces that are assigned for a time frame that does not match the Subcontract dates. For example, assignments that are scheduled to begin before the Subcontract starts, or after the Subcontract ends.
Potential Line-of-Sight Conflict - This conflict type searches for Faces in line-of-sight with each other that could be displaying conflicting advertisers or categories if one is not taken down or covered immediately after the end of the Posting Schedule and before the other Face's Posting Schedule is completed.
Proposal Line-of-Sight Conflict - This particular conflict type looks for Faces in line-of-sight with each other that are displaying conflicting advertisers or categories where one or more or these Faces are scheduled to Proposals.
Proposal Potential Line-of-Sight Conflict - This conflict type looks for Faces in line-of-sight with each other that could be displaying conflicting advertisers or categories if one is not taken down or covered immediately after the end of the Posting Schedule and before the other Face's Posting Schedule begins and where one or more of these Faces are scheduled to Proposals.
Proposal Scheduling Conflict - This conflict type searches for Posting Schedule that are assigned to Proposals for the same time frame they are scheduled to Contracted, Holds, or expired Holds.
Scheduling Conflict - This conflict type searches for Faces that are assigned to more than one Posting Schedule with overlapping time intervals.
