Difference between revisions of "Setting up Billposter App"
m (→Installing or Upgrading Billposter App) |
|||
| (4 intermediate revisions by one user not shown) | |||
| Line 1: | Line 1: | ||
| − | The Ad Manager Billposter app can be set up on an Android device using the instructions below. | + | The Ad Manager Billposter app can be set up on an Android device using the instructions below. |
| − | '''If you are installing an upgrade to your existing version of the app, please do a sync to ensure the latest data has been transferred from the device to Ad Manager and then uninstall the old version first.''' | + | For instructions on how to set up users in Ad Manager that can log in, see [[Setting_up_Web_access| Setting Up Web Access]] |
| + | |||
| + | For instructions on how to use the Billposter app, [[Using_Billposter_App|click here]]. | ||
| + | |||
| + | The settings that can be changed can be [[Billposter_App_Settings|found here]]. | ||
| + | |||
| + | ==Installing or Upgrading Billposter App== | ||
| + | |||
| + | '''If you are installing an upgrade to your existing version of the app, please do a sync to ensure the latest data has been transferred from the device to Ad Manager and then uninstall the old version first.''' | ||
| + | |||
| + | If you are installing version 1.1 or later with company specific settings, remove any previous versions that may have been installed. When updating from an older version the settings will not be affected. | ||
* You will need to set up the [[How_to_Configure_a_Web_Ad_Manager_Server| Ad Manager Web Server]] | * You will need to set up the [[How_to_Configure_a_Web_Ad_Manager_Server| Ad Manager Web Server]] | ||
| − | * You will need an Android device (Version 4.0 (Ice Cream Sandwich) or later) with wi-fi capability and a camera | + | * You will need an Android device (Version 4.0 (Ice Cream Sandwich) or later for billposter app version 1.1.3 or earlier, or Version 4.4 (KitKat) for billposter app version 1.1.4 or later) with wi-fi capability and a camera |
* Go to your Android device and access the home screen | * Go to your Android device and access the home screen | ||
* Under Apps, Find Settings | * Under Apps, Find Settings | ||
| Line 14: | Line 24: | ||
* Enter an account name. This is a descriptive name that you want to use for reference purposes. Then click Next. | * Enter an account name. This is a descriptive name that you want to use for reference purposes. Then click Next. | ||
| − | [[File:AccountName.png]] | + | [[File:AccountName.png|600px]] |
* Enter the address of the Billposter App server. If you see an message at the bottom “Failed to connect to server”, check to make sure you have entered the information exactly as shown. If you have, please contact your system administrator. | * Enter the address of the Billposter App server. If you see an message at the bottom “Failed to connect to server”, check to make sure you have entered the information exactly as shown. If you have, please contact your system administrator. | ||
| − | [[File:ServerName.png]] | + | [[File:ServerName.png|600px]] |
| − | * Enter your login credentials. enter the supplied user Id on the first line (User Id) and supplied password on the second line (password), exactly as written, as this is case sensitive and click Next. If you see a message “Failed to log you in”, make sure you have entered this information correctly. Click Next again. If you have, please contact your system administrator. | + | * Enter your login credentials. enter the supplied user Id on the first line (User Id) and supplied password on the second line (password), exactly as written, as this is case sensitive and click Next. If you see a message “Failed to log you in”, make sure you have entered this information correctly. Click Next again. If you get a message stating "There are no billposters at this connection", ensure you have [[Setting_up_Web_access|set up the web roles]] and [[Configuring_Billposter_App_in_Ad_Manager|configured Ad Manager to include billposter logins]]. If you continue to have issues, please contact your system administrator. |
| − | [[File:LoginName.png]] | + | |
| + | [[File:LoginName.png|600px]] | ||
* At this point, you will be shown a screen where you can select a billposter. The first billposter on the list is shown by default. To change the billposter, click on the billposter name shown. | * At this point, you will be shown a screen where you can select a billposter. The first billposter on the list is shown by default. To change the billposter, click on the billposter name shown. | ||
| − | [[File:Billposter1.png]] | + | |
| + | [[File:Billposter1.png|600px]] | ||
* From the list, select your name. | * From the list, select your name. | ||
| − | [[File:BillposterSelection.png]] | + | |
| + | [[File:BillposterSelection.png|600px]] | ||
* Once you have selected your name, click Finish. | * Once you have selected your name, click Finish. | ||
| − | [[File:Billposter2.png]] | + | [[File:Billposter2.png|600px]] |
At this point you can [[Billposter_App_Settings|modify the settings for the app on this device]]. When you go back to the app, you can start downloading your instruction lists. | At this point you can [[Billposter_App_Settings|modify the settings for the app on this device]]. When you go back to the app, you can start downloading your instruction lists. | ||
* You will see a blank screen. In the top right corner is a refresh button. This will load your posting tasks. | * You will see a blank screen. In the top right corner is a refresh button. This will load your posting tasks. | ||
| − | [[File:Sync.png]] | + | |
| + | [[File:Sync.png|600px]] | ||
Latest revision as of 14:02, 11 April 2018
The Ad Manager Billposter app can be set up on an Android device using the instructions below.
For instructions on how to set up users in Ad Manager that can log in, see Setting Up Web Access
For instructions on how to use the Billposter app, click here.
The settings that can be changed can be found here.
Installing or Upgrading Billposter App
If you are installing an upgrade to your existing version of the app, please do a sync to ensure the latest data has been transferred from the device to Ad Manager and then uninstall the old version first.
If you are installing version 1.1 or later with company specific settings, remove any previous versions that may have been installed. When updating from an older version the settings will not be affected.
- You will need to set up the Ad Manager Web Server
- You will need an Android device (Version 4.0 (Ice Cream Sandwich) or later for billposter app version 1.1.3 or earlier, or Version 4.4 (KitKat) for billposter app version 1.1.4 or later) with wi-fi capability and a camera
- Go to your Android device and access the home screen
- Under Apps, Find Settings
- Under Settings, go to Security.
- Under Security turn off Unknown sources: allow installation of apps that may cause harm.
- Click on the Billposter app icon
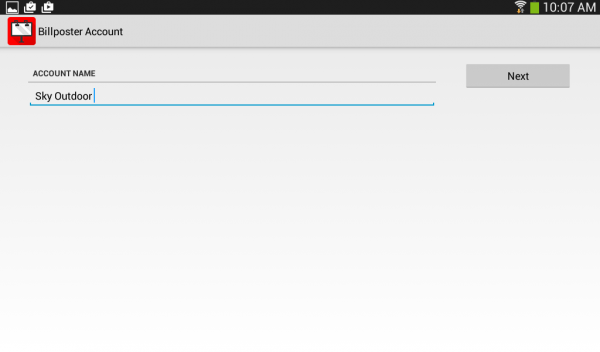
- Enter an account name. This is a descriptive name that you want to use for reference purposes. Then click Next.
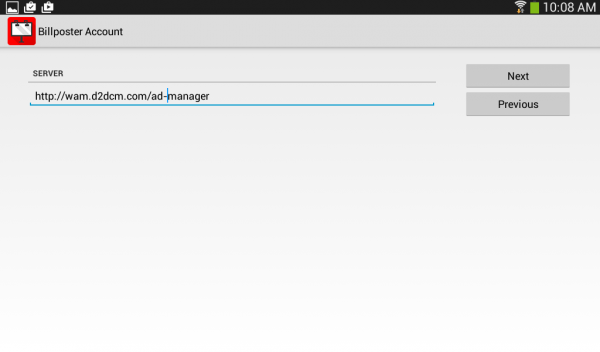
- Enter the address of the Billposter App server. If you see an message at the bottom “Failed to connect to server”, check to make sure you have entered the information exactly as shown. If you have, please contact your system administrator.
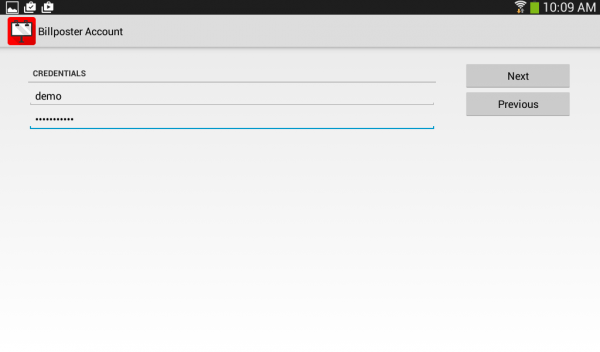
- Enter your login credentials. enter the supplied user Id on the first line (User Id) and supplied password on the second line (password), exactly as written, as this is case sensitive and click Next. If you see a message “Failed to log you in”, make sure you have entered this information correctly. Click Next again. If you get a message stating "There are no billposters at this connection", ensure you have set up the web roles and configured Ad Manager to include billposter logins. If you continue to have issues, please contact your system administrator.
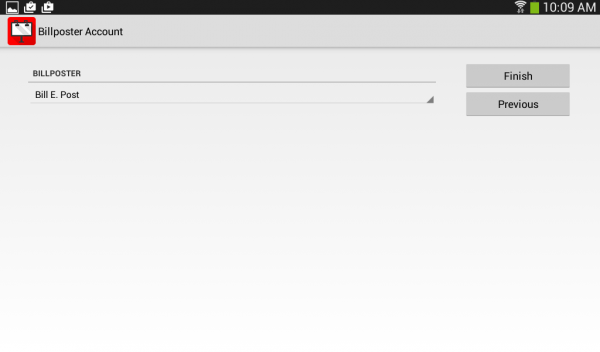
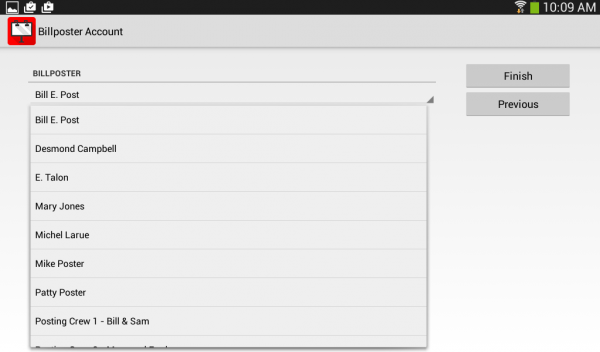
- At this point, you will be shown a screen where you can select a billposter. The first billposter on the list is shown by default. To change the billposter, click on the billposter name shown.
- From the list, select your name.
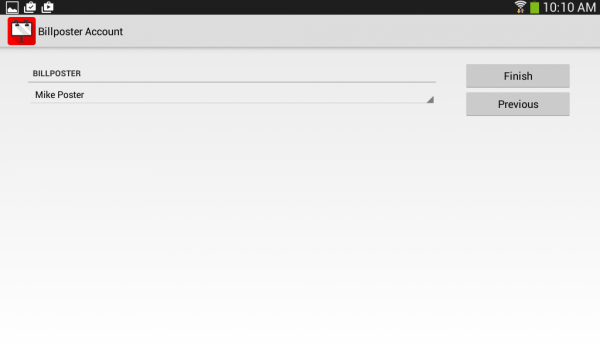
- Once you have selected your name, click Finish.
At this point you can modify the settings for the app on this device. When you go back to the app, you can start downloading your instruction lists.
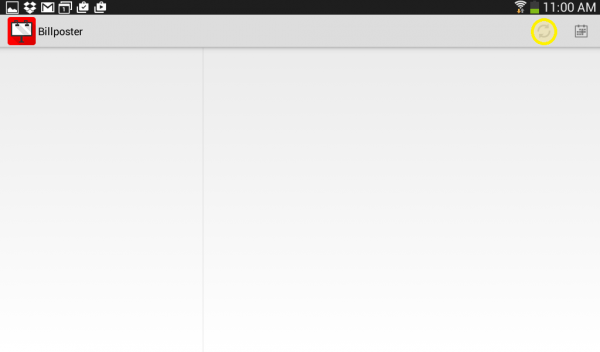
- You will see a blank screen. In the top right corner is a refresh button. This will load your posting tasks.
- Refresh, wait for the sync to complete and you should see posting tasks
Note: If a firewall is in place, make sure to open ports 80 and 8080
