Billposter
Page for Billposter
Contents |
Bill Posters
This database contains the name for each billposter team or individual billposter.
Entering a New Billposter
To add a new Billposter, click on the arrow beside the New icon () for a list of items you can add. Select OTHER, and then select Billposter. The Billposter Details Window will appear, and information for a new Billposter can be entered.
Ad Manager allows you to enter employee related information for a Billposter including address and contact information on the Details page. The Financial page can be used to enter additional information related to the Billposter's rates,etc. Ad Manager also allows you to track how to ship copy to the Billposter (Shipping page) and a substitute Billposter to use in the event this Billposter is not available (Substitute page).
Modifying a Billposter
To modify a Billposter, simply click the database from the OTHER folder, then double click the desired item and make the change(s) necessary. Once you have finished, click the Save () button.
Deleting a Billposter
To delete a Billposter, there must be no postings associated with them. Select the database from the OTHER folder, then double click the desired item. Select the Delete button () for the record. Ad Manager will ask you for confirmation to delete the Billposter.
Contacts
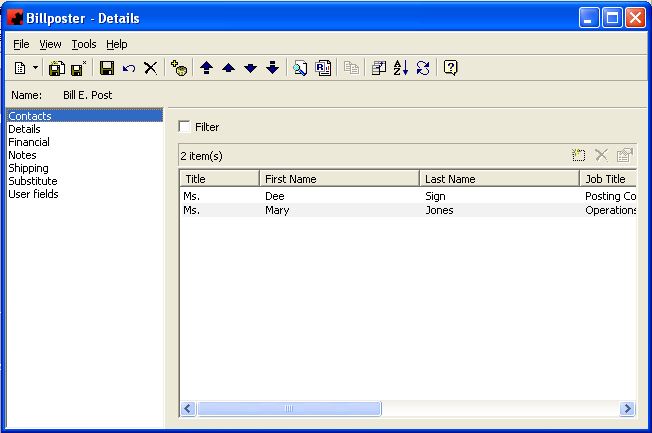
The Contacts Page is used to enter information referring to all Contact people if the Billposter is a team or company instead of an individual.
Tool buttons specific to the Contacts Page:
- Customize Current View allows you to select the columns to display and the order to display them in.
- Order allows you to sort the list of Contacts on the Billposter in the desired order.
- The Refresh button will reload the list of Contacts, in the event changes to the number of Contacts has occurred since you visited this page.
The pane in the window shows a listing of all Contacts that are assigned to this Billposter. The functions available through the buttons immediately above the pane are:
- Add a new Contact to the Billposter. Click on this button and either select an existing Name from the list or create a new record by choosing < New >.
- Delete the highlighted Contact from the Billposter.
- Edit the information for the highlighted Contact.
For additional information on buttons that appear at the top of the window, click here. For information on the menu items that appear under the Tools menu, click here.
The Filter check box allows you to filter the listing of Contacts to show only those that meet a certain criteria. When selected, a filter screen will appear, allowing you to choose to see Contacts with a certain Name, Phone number, or Address. When a filter is active, a check mark will appear in the filter box. To clear the filter and see all records, click on Filter, then the Clear button on the Filter screen, followed by the OK button.
Details
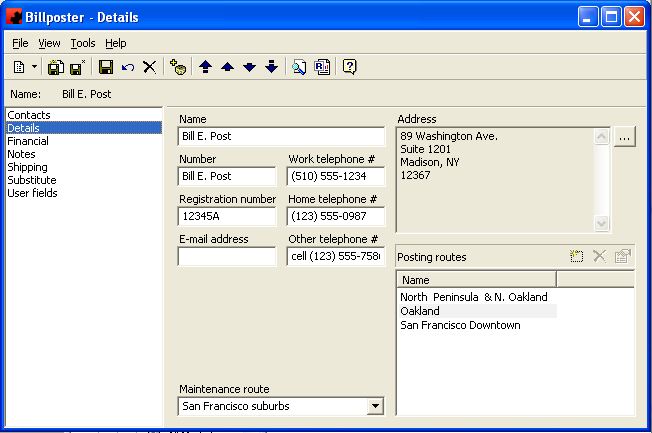
The Details Page is where information about the Billposter is displayed. This page contains the name and contact information for each Billposter team or individual billposter, as well as the posting routes and maintenance route they are responsible for. The Billposter database is found in Other - All Billposters.
For information on the buttons that appear at the top of the window, click here. For information on the menu items that appear under the Tools menu, click here.
Fill in the appropriate information for each field. Select the appropriate item from any of the drop down lists (in the boxes) or type in the information if it is not present.
Tool buttons specific to the Posting Routes section of the Details Page:
- Add a new Posting Route for this Billposter. A window will appear where you can select the desired route. Multiple Routes can be added for a Billposter.
- Delete a Posting route from this Billposter. Highlight the item and click the Delete button.
- Change the information associated with the highlighted Posting Route.
Fields
Address: This is the mailing address for the Billposter. To add the Address, click on the ellipsis () for the Address Builder window and fill in the information accordingly.
E-mail Address: This is the Billposter's e-mail address.
Home telephone #: This is the Billposter's home phone number.
Maintenance Route: This is where you identify which maintenance route this Billposter is assigned to.
Name: This is the name of the Billposter or Billposting Team.
Number: This is an internal Employee number assigned to the Billposter. This is a manditory field in Ad Manager. You can not save the record with this field left blank.
Other telephone #: This is an alternative phone number (i.e. Cell) for the Billposter.
Posting Routes: This is where you identify the name of the group of Faces or geographic areas this Billposter is responsible for posting.
Registration Number: This is a number assigned to the Billposter for payroll purposes. For example, a Social Security Number.
Work telephone #: This is the office number of this Billposter.
Financial
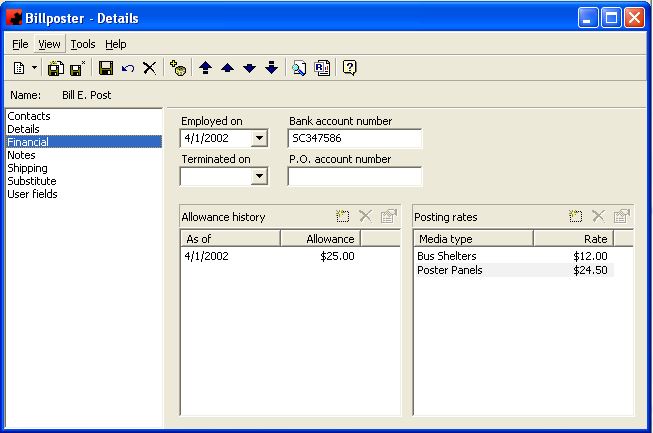
The Financial Page is where information about the Billposter's pay roll is displayed. Information such as employment start dates, termination dates, pay rates and allowances are found on this page.
For information on the buttons that appear at the top of the window, click here. For information on the menu items that appear under the Tools menu, click here.
Fill in the appropriate information for each field. Select the appropriate item from any of the drop down lists (in the boxes) or type in the information if it is not present.
Tool buttons specific to the Allowance history and Posting rates sections of the Financial Page:
- Add a new Allowance or Posting rate item for this Billposter. A window will appear where you can add the allowance value and as of date or select the desired media type and enter the posting rate. Multiple Allowances and Posting rates can be added for a Billposter.
- Delete an Allowance or Posting rate from this Billposter. Highlight the item and click the Delete button.
- Change the information associated with the highlighted Allowance/Posting rate.
Fields
Allowance history: This pane allows you to track any allowances that this Billposter is entitled to by entering the amount of the allowance and the date this rate takes effect. To add an Allowance for the Billposter, select the New () button and enter the amount of the Allowance in the Value field and the date this Allowance becomes effective in the As of field.
Bank Account Number: This is the Bank Account Number for direct deposit of pay checks for this Billposter.
Employed On: This is the Billposter's first day of employment.
P.O. Account Number: This is the Post Office account number if you are paying for a P.O. Box for this employee.
Posting Rates: This pane allows you to track any monies allotted to this Billposter if he is paid by each installation performed instead of by salary. You can distinguish the rate of posting paid by media type. To add a Posting rate to the Billposter, select the New () button and choose the desired Media Type. If the Media Type is not listed, you can add one by clicking on <NEW> at the top of the pulldown list.
Terminated On: This is the Billposter's last day of employment.
Notes
For more information on the Notes page, click here.
Shipping
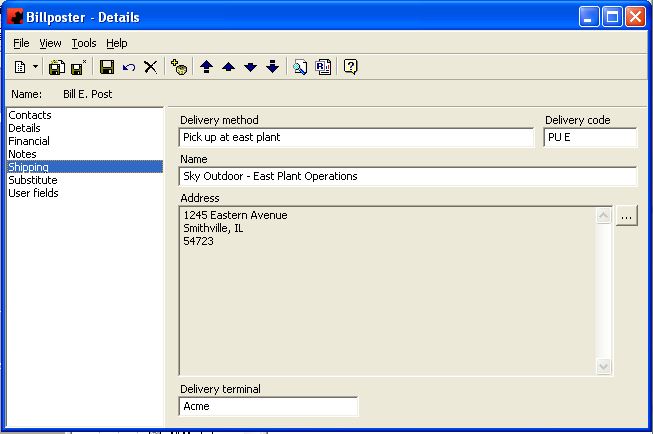
The Shipping Page is where you can track how and where to ship copy to the Billposter.
For information on the buttons that appear at the top of the window, click here. For information on the menu items that appear under the Tools menu, click here.
Fields
Address: This is the shipping address for the Billposter. To add the Address, click on the ellipsis () for the Address Builder window and fill in the information accordingly.
Delivery Code: This field can be used to designate a code for the shipping warehouse.
Delivery Method: This field allows you to specify how deliveries should be made.
Delivery Terminal: This is where the terminal where delivery should be made.
Name: This is the name of the Warehouse or Storage facility.
Substitute
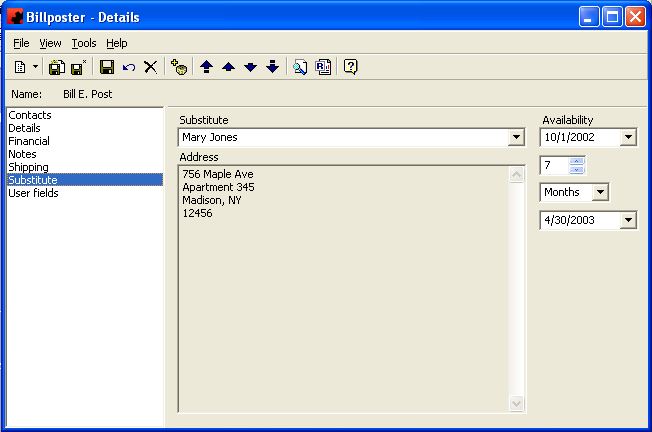
The Substitute Page is where information about a replacement Billposter can be added in the event the regular Billposter is unavailable.
For information on the buttons that appear at the top of the window, click here. For information on the menu items that appear under the Tools menu, click here.
Fill in the appropriate information for each field. Select the appropriate item from any of the drop down lists (in the boxes) or type in the information if it is not present.
Fields
Address: This is the mailing address for the Substitute.
Availability: This is the start date, duration and end date of the Substitute's availability to work.
Substitute: This is where you can select the name of the Substitute from a listing of contacts.
User Fields
For more information on the User fields page, click here.
