Contract
Contents |
Attachments
For more information on the Attachments page, click here
Bills
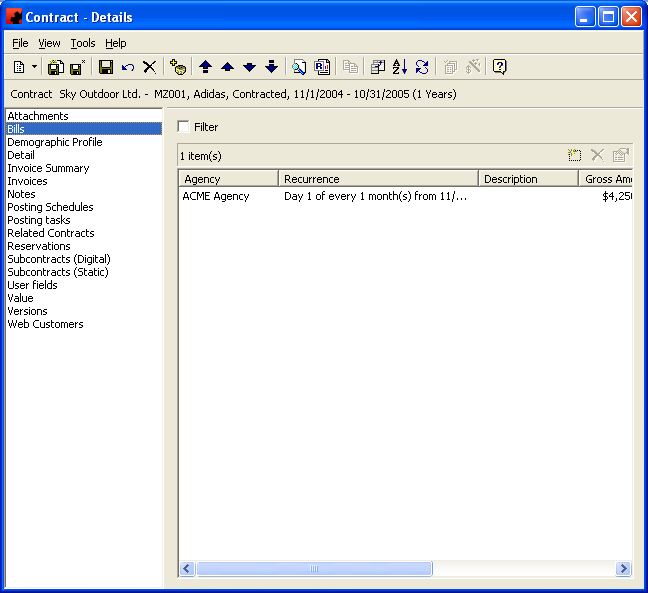
The Contract Bills Page provides a listing of all scheduled bills for this contract.
Tool buttons found at the top of the Contract - Details screen when you are on the Bills Page:
- Customize Current View allows you to select the columns to display and the order to display them in.
- Order allows you to sort the Bills in the desired order.
- The Refresh button will reload the list of Bills, in the event changes to the Bills have occurred since you visited this page.
- The Update button allows you to select one or more Bill Definitions and change information on them. All highlighted Bills will be changed to reflect the items selected.
![]() - This button allows you to allocate your revenue from this Contract to the assigned Faces.
- This button allows you to allocate your revenue from this Contract to the assigned Faces.
The functions available through the buttons immediately above the Bills pane are:
- Add a new Bill for this Contract. The New Bill window will open where you can choose the Agency to Bill, then proceed to the Bill Definition - Details window where you can enter information related to the Bill.
- Delete the highlighted Bill from this Contract. Highlight the item and click the Delete button.
- Opens the Bill Definition - Details window to allow you to review or change any information related to the Bill.
Right Click
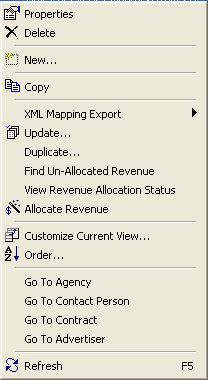
- Right clicking on the list of Bill Definitions will display this menu. From here you can change the status of a Bill as well as any line items by using the Update option, find revenue not yet allocated, view the status of revenue allocation, allocate revenue, and duplicate the Bill Definition.
To change the information being viewed in the list, simply right click in the list, and choose Customize Current View. To change the sort order, simply right click in the list, and choose Order.
Update - The Update menu item allows you to to modify a property (or properties) for one or more highlighted Bill Definitions.
Find Un-Allocated Revenue - This tool allows you to quickly get a list of which Bill Definitions, from the ones highlighted, have revenue that has not yet been allocated. The Un-Allocated Bill Definitions window will display these Bills. From here, you can highlight each one, click on the Allocate Revenue button in the toolbar and complete the Allocation.
View Revenue Allocation Status - This tool allows you to determine the allocation status for the highlighted Bill Definitions. Ad Manager will inform you if all Revenue has been allocated or if there is still an outstanding amount remaining. If there is still an outstanding amount, double click the Bill Definition to open it, click the Allocate Revenue button in the toolbar and complete the Allocation.
Allocate Revenue - This tool allows you to allocate the revenue from the highlighted Bill Definition(s) to the appropriate Faces.
Duplicate - The Duplicate menu item allows you to create a new Bill Definition with the same Line item configuration as the current Bill Definition.
Go To - The Go To feature allows you to open a window for the appropriate item for the highlighted record.
For additional information on the buttons that appear at the top of the window, click here. For information on the menu items that appear under the Tools menu, click here.
The Filter check box allows you to filter the listing of Bills to show only those that meet a certain criteria. When selected, a filter screen will appear, allowing you to choose to see Bills with certain recurrence patterns, for specific Agencies, etc. When a filter is active, a check mark will appear in the Filter box. To clear the filter and see all records, click on Filter, then the Clear button the Filter screen, followed by the OK button.
Demographic Profile
Type topic text here.
Details
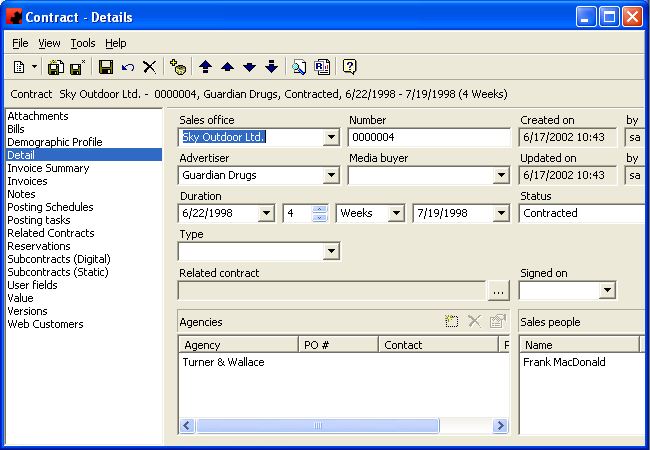
The Details Page is where information about the Contract is stored. Information on what type of Contract it is, who the advertiser is, Contract duration and amount are kept on this page.
Fill in the appropriate information for each field. Select the appropriate item from any of the drop down lists (in the boxes) or type in the information if it is not present.
Tool buttons specific to the Agencies and Sales people sections of the Details Page:
- Add a new Agency or Sales person item for this Contract . A window will appear where you can select the desired Agency/Sales person, and you can provide additional details as appropriate. Multiple Agencies and Sales People can be added for a Contract.
- Delete an Agency or Sales person from this Contract. Highlight the item and click the Delete button.
- Change the information associated with the highlighted Agency/Sales person.
For information on the buttons that appear at the top of the window, click here. For information on the menu items that appear under the Tools menu, click here.
Fields
Advertiser: This is the name of the Advertiser (Client). Since Ad Manager allows you to specify the brand at the Subcontract level, it is recommended the Advertiser's name go here.
Agencies: This is where any Agencies that are associated with this Contract can be added. In Ad Manager, the Agency is the "Bill To" field. Therefore, if you are dealing directly with the Advertiser and not going through an Agency, the Advertiser should be entered here as the Agency. To add an Agency to the Contract, select the New () button and choose the desired Agency. If the Agency is not listed, you can add one by clicking on <NEW> at the top of the pulldown list. For information on how to enter Agencies, click here. You can mark an Agency as being the "Primary Agency" so that it can appear on customized views and reports for this contract.
Created on/by: These two field show you when this Contract was created and who created it.
Duration: This is the entire duration of the Contract, from the first scheduled posting to the last date when copy is scheduled to be posted.
Hold Expiry: If a Contract is identified as a Limited Hold, this item will appear on the screen to allow you to enter the date and time that it shall revert to a Proposal.
Media Buyer: This is where you can identify who the Media Buyer for this Contract is.
Number: This is the Contract Number to be assigned to this Contract. If this is a Proposal, the Proposal Number may be entered or left blank. If left blank, Ad Manager will automatically number the Proposal for you.
Related Contract: This field allows you to reference another Contract assocated with this one.
Sales Office: This is the office/department/plant/company which sold the Contract.
Sales People: Any Sales people that are associated with this Contract can be identified, along with the percentage of the total commission they are to receive. To add a Sales person to the Contract, select the New () button. If the Sales person is not listed, choose <NEW> and enter the Sales person into the system. The total of all Sales people on the Contract must equal 100%.
Signed on: This is the date the Contract was Signed.
Status: This is the Status of the Contract. Ad Manager allows you to identify the Contract as being a Proposal (this status allows you to undertake scheduling without affecting the number of Faces available and is usually used for preliminary requests from clients), Limited Hold (Ad Manager allows you to hold (reserve) Faces for a Contract for a default of 72 hours - this will affect your list of available Faces), Unlimited Hold (Faces are reserved, and will remain unavailable until they are removed from the Hold, or the status of the Contract changes), or Contracted (the approval has been given to proceed).
Type: This is an optional field that you can use to designate the Contract type. For example, you can use it to mark the Contract as "New", "Renewal", "Out-for-Signature", "Cancelled", etc.
Updated on/by: These two fields show you when this Contract was last updated and by whom.
Invoice Summary
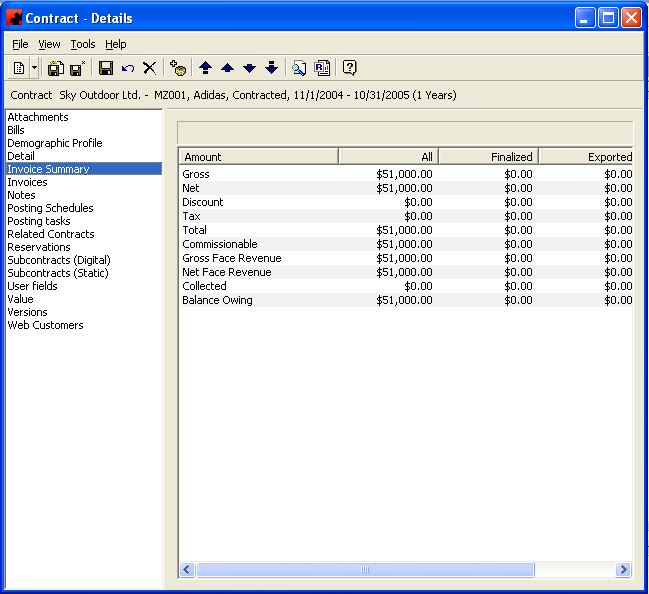
The Invoice Summary Page allows you to identify how well you have reached your Invoicing requirements. From this screen you can see how much money has been Invoiced, Finalized, Exported, Sent, Collected and the Current Balance Owing. As well as how much money is Commissionable and Discounted for this Contract.
For information on the buttons that appear at the top of the window, click here. For information on the menu items that appear under the Tools menu, click here.
Invoices
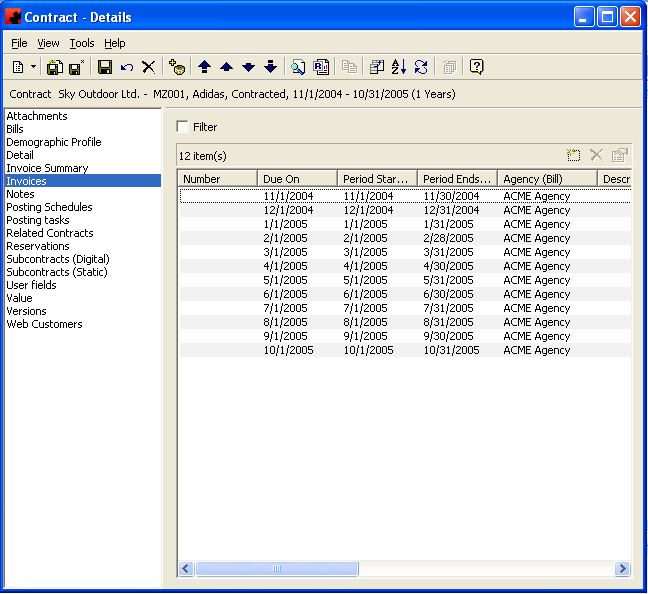
The Contract Invoices Page provides a listing of all Invoices that have been scheduled to be billed for this Contract.
Tool buttons found at the top of the Contract - Details screen when you are on the Invoices Page:
- Customize Current View allows you to select the columns to display and the order to display them in.
- Order allows you to sort the Invoices in the desired order.
- The Refresh button will reload the list of Invoices, in the event changes to the Invoices have occurred since you visited this page.
- The Update button allows you to select one or more Invoices and change information on them. All highlighted Invoices will be changed to reflect the items selected.
The functions available through the buttons immediately above the Invoices pane are:
- Add a new Invoice for this Contract . The Invoice-Detail window will appear where you can enter information related to the invoice.
- Delete the highlighted invoice from this Contract. Highlight the item and click the Delete button.
- Opens the Invoice-Details window to allow you to review or change any information related to the invoice.
Right Click
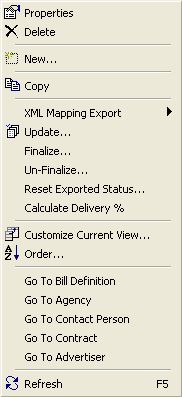
- Right clicking on the list of Invoices will display this menu. From here you can change the due date of an Invoice, the status of an Invoice as well as any line items by using the Update option, as well as, finalize, un-finalize, reset the exported status, and calculate the delivery percentage of an Invoice or group of highlighted Invoices.
To change the information being viewed in the list, simply right click in the list, and choose Customize Current View. To change the sort order, simply right click in the list, and choose Order.
Update - The Update menu item allows you to to modify a property (or properties) for one or more highlighted Invoices.
Finalize - Finalizing an Invoice will prevent you from making additional changes to it. This can be done manually prior to an Invoice Export, by using this tool, or it will automatically occur during the Export. If you wish to finalize invoices using this tool, highlight them first, then right-click to get this menu option. Once finalized, the Invoice is marked so and will display a unique Transaction ID as well as an Invoice Number.
Un-Finalize - If an Invoice has incorrectly been marked as Finalized, this tool allows you to un-finalize it. Ad Manager will remove the Finalized status of the Invoice, but will still show a unique Transaction ID, indicating this Invoice was Finalized at one time.
Reset Exported Status - If an Invoice has been Exported incorrectly, this tool allows you to mark it as un-exported, so that you may Export it again at a later date.
Calculate Delivery % - This tool will tell you the percent of completed Posting Tasks vs. Scheduled Postings for the period of the selected Invoice(s). This will allow you to determine if enough postings have been completed so that the Invoice can be Finalized and Exported.
Go To - The Go To feature allows you to open a window for the appropriate item for the highlighted record.
For additional information on the buttons that appear at the top of the window, click here. For information on the menu items that appear under the Tools menu, click here.
The Filter check box allows you to filter the listing of Invoices to show only those that meet a certain criteria. When selected, a filter screen will appear, allowing you to choose to see Invoices that are due on a certain date, finalized or exported on a certain date, etc. When a filter is active, a check mark will appear in the Filter box. To clear the filter and see all records, click on Filter, then the Clear button the Filter screen, followed by the OK button.
Notes
For more information on the Notes page, click here.
Posting Schedules
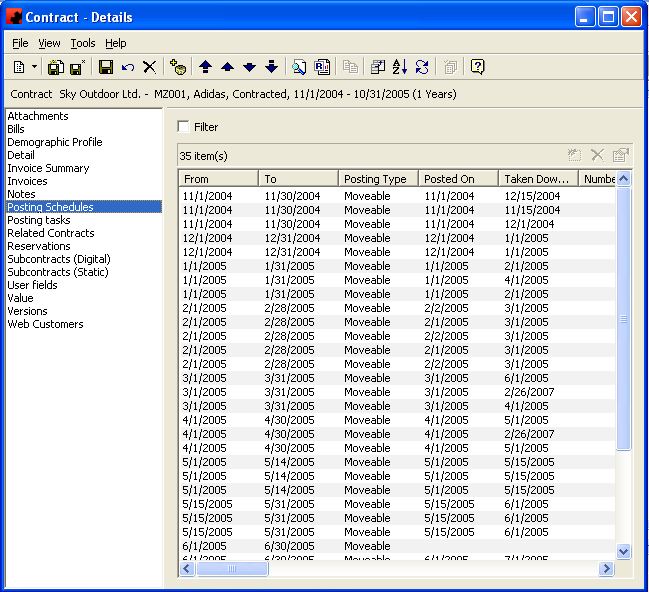
The Contract Posting Schedules Page allows you to see all scheduling that has been undertaken on all Subcontracts of this Contract.
Tool buttons found at the top of the Contract - Details Page when you are on the Posting Schedules Page:
- Customize Current View allows you to select the columns to display and the order to display them in.
- Order allows you to sort the activities in the desired order.
- The Refresh button will reload the list of activities, in the event changes to the activities have occurred since you visited this page.
The functions available through the buttons immediately above the Posting Schedules pane are:
()- Allows you to delete a scheduled item. When you delete scheduling from this page, Ad Manager automatically updates your Subcontract charting information for you.
() - Allows you to modify or review information related to the highlighted posting schedules. If you modify any information (dates, posting type, design), Ad Manager will check for any scheduling or location related conflicts and inform you of any problems. Ad Manager automatically updates your Subcontract charting information for you.
For information on the buttons that appear at the top of the window, click here. For information on the menu items that appear under the Tools menu, click here.
The Filter check box allows you to filter the listing of Posting schedules to show only those that meet a certain criteria. When selected, a filter screen will appear, allowing you to choose to see schedules (charting) related to a particular Site, Face, etc. When a filter is active, a check mark will appear in the Filter box. To clear the filter and see all records, click on Filter, then the Clear button on the Filter screen, followed by the OK button.
Right Click
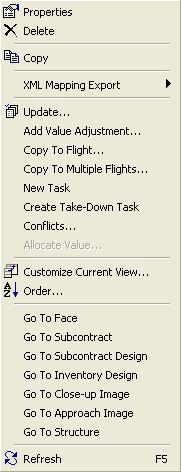
- Right clicking on the list of assigned Faces will display this menu. From here you can change posting type and alter the assignment's duration by using the Update option, copy to another flight, create a new task (e.g. repost), or create a Take Down task.
To change the information being viewed in the list, simply right click in the list, and choose Customize Current View. To change the sort order, simply right click in the list, and choose Order.
Update - The Update menu item allows you to to modify a property (or properties) for one or more highlighted schedules.
Copy To Flight - This will allow you to copy (transcribe) the highlighted Faces from this Subcontract flight to any other flight for any Subcontract. Ad Manager will check to ensure the Face is available and suitable on the new Subcontract flight.
Copy to Multiple Flights - This will allow you to copy (transcribe) the highlighted Faces from this Subcontract flight to other flights for other Subcontracts (instead of copying them one at a time). Ad Manager will check to ensure the Face(s) is/are available and suitable on the new Subcontract flights.
New Task - This will allow you to create a new posting of the same copy on a different date for this Subcontract or create a Take-Down record for the highlighted Face(s).
Create Take-Down Task - This feature allows you to inform Ad Manager to create a task that will generate a Posting Card/Instruction that will remove the existing copy and not replace it with new copy. You can specify the date that this Take-Down will occur.
Go To - The Go To feature allows you to open a window for the appropriate item for the highlighted record.
Posting Tasks
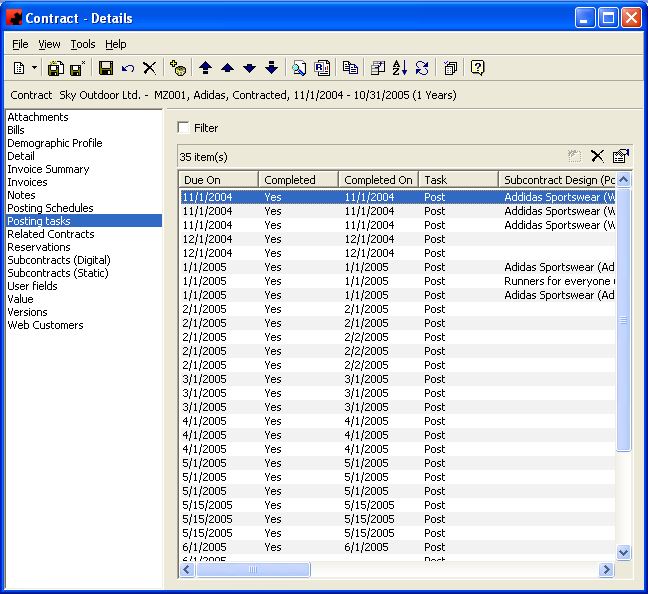
The Posting Tasks Page allows users to enter posting related information (including Billposter assignments and completion information) for any Face assigned to this Contract.
Tool buttons found at the top of the Contract - Details Screen when you are on the Posting Tasks Page:
- Customize Current View allows you to select the columns to display and the order to display them in.
- Order allows you to sort the activities in the desired order.
- The Refresh button will reload the list of activities, in the event changes to the activities have occurred since you visited this tab.
- The Update button allows you to select one or more posting tasks and update the posting task information for them. For more information on using the Update button, see Change or Remove Posting Information.
The functions available through the buttons immediately above the Posting Tasks pane are:
()- Allows you to delete a posting task. When you delete tasks from this page, Ad Manager automatically updates your Subcontract charting information for you.
() - Allows you to modify or review information related to the highlighted posting tasks. If you modify any information (dates, posting type, design), Ad Manager will check for any scheduling or location related conflicts and inform you of any problems. Ad Manager automatically updates your Subcontract charting information for you.
For additional information on the buttons that appear at the top of the window, click here. For information on the menu items that appear under the Tools menu, click here.
The Filter check box allows you to filter the listing of Posting tasks to show only those that meet a certain criteria. When selected, a filter screen will appear, allowing you to choose to see tasks related to a particular Site, Face, etc. When a filter is active, a check mark will appear in the Filter box. To clear the filter and see all records, click on Filter, then the Clear button on the Filter screen, followed by the OK button.
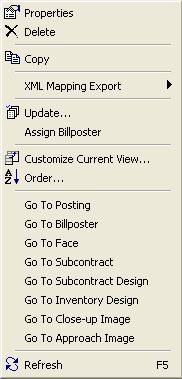
Right Click
- Right clicking on the list of posting tasks will display this menu. From here you can update posting information for this task, or go to the appropriate item.
To change the information being viewed in the list, simply right click in the list, and choose Customize Current View. To change the sort order, simply right click in the list, and choose Order.
Update - This allows you to enter posting related information (including Completion information) for the selected task.
Assign Billposter - Allows you to identify the Billposter who will be responsible for posting the copy. When producing posting cards/instructions, you can filter to find only those items that have been scheduled for a particular Billposter.
Go To - The Go To feature allows you to open a window for the appropriate item for the highlighted record.
Related Contracts
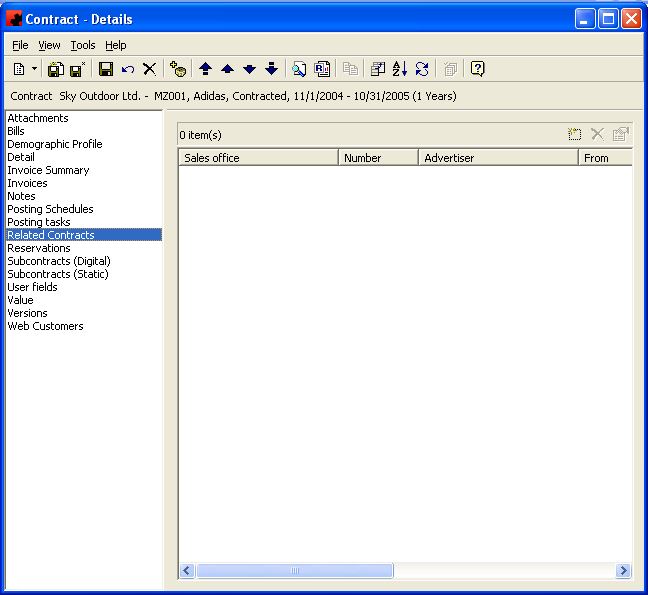
Ad Manager provides a listing of all other Contracts related to this Contract through the Related Contracts Page.
The functions available through the buttons immediately above the Related Contracts pane are:
- Add a new Related Contract for this Contract . The Contract - Details window will appear where you can enter information for the new Contract.
- Delete the highlighted Related Contract from this Contract. Highlight the item and click the Delete button.
- Opens the Related Contract window to allow you to review or change any properties related to the Contract.
For additional information on the buttons that appear at the top of the window, click here. For information on the menu items that appear under the Tools menu, click here.
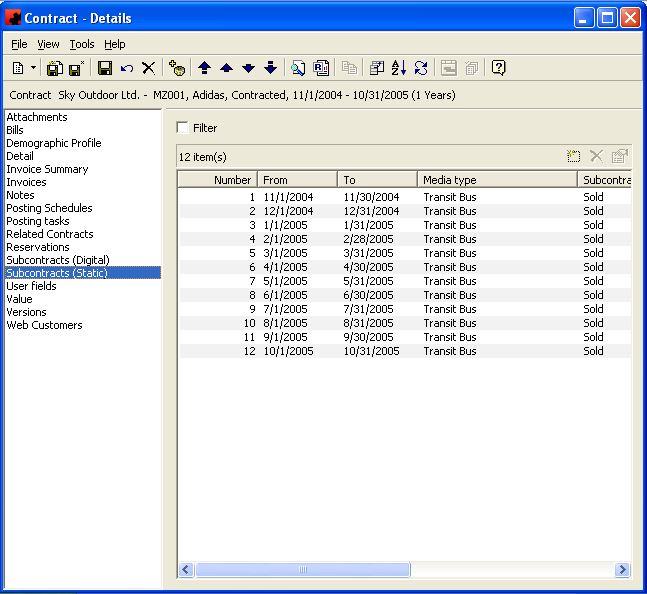
Subcontracts
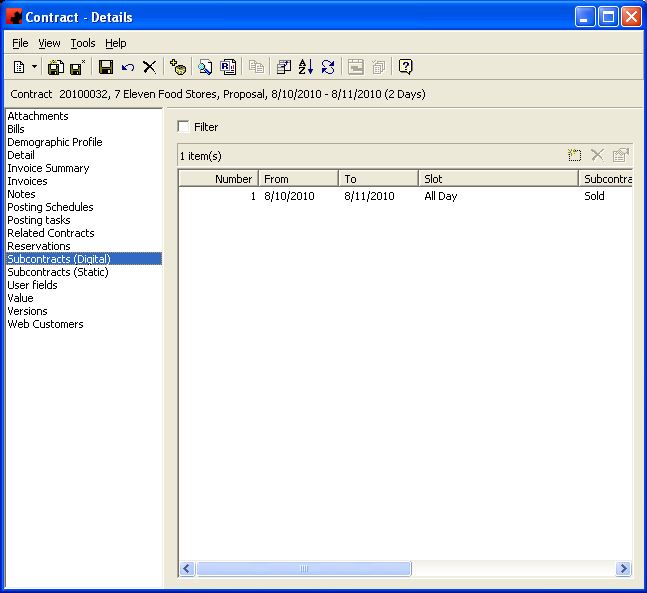
Ad Manager provides a listing of all Subcontracts for a Contract through the Subcontracts Page.
Tool buttons found at the top of the Contract - Details Screen when you are on the Subcontracts Page:
- Customize Current View allows you to select the columns to display and the order to display them in.
- Order allows you to sort the Subcontracts in the desired order.
- The Refresh button will reload the list of Subcontracts, in the event changes to the Subcontracts have occured since you visited this page.
- The Chart button allows you to chart (schedule) Faces to the highlighted Subcontract.
- The Update button allows you to select one or more Subcontracts and update information for them. All highlighted Subcontracts will be changed to reflect the items selected.
The functions available through the buttons immediately above the Subcontracts pane are:
- Add a new Subcontract for this Contract . The Subcontract window will appear where you can enter information for the Subcontract.
- Delete the highlighted Subcontract from this Contract. Highlight the item and click the Delete button.
- Opens the Subcontract window to allow you to review or change any properties related to the Subcontract.
For additional information on the buttons that appear at the top of the window, click here. For information on the menu items that appear under the Tools menu, click here.
The Filter check box allows you to filter the listing of Subcontracts to show only those that meet a certain criteria. When selected, a filter screen will appear, allowing you to choose to see Subcontracts starting on a certain date, of a certain media type, in a specific market, etc. When a filter is active, a check mark will appear in the Filter box. To clear the filter and see all records, click on Filter, then the Clear button on the Filter screen, followed by the OK button.
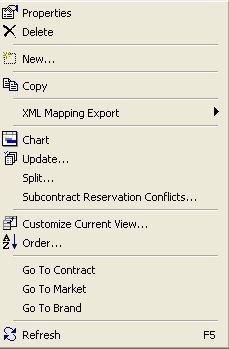
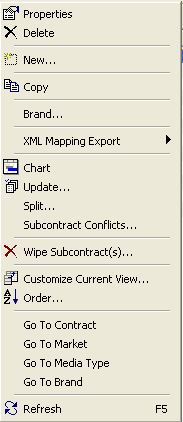
Right Click
- Right clicking on the list of Subcontracts will display this menu. From here you can change the market, media type and alter the Subcontract duration by using the Update option, change the Brand, chart faces to the Subcontract, or create a new Subcontract.
To change the information being viewed in the list, simply right click in the list, and choose Customize Current View. To change the sort order, simply right click in the list, and choose Order.
New - Allows you to create a new Subcontract for this Contract.
Brand - Allows you to select a brand for the currently highlighted Subcontract.
Chart - Allows you to schedule Faces for the currently highlighted Subcontract.
Update - The Update menu item allows you to to modify a property (or properties) for one or more highlighted Subcontracts.
Subcontract Conflicts - The Conflicts menu item allows you to view all conflicts that exist on the highlighted Subcontract(s). You can specify what conditions are considered to be a Conflict prior to clicking OK. The subsequent list consists of all scheduling that has generated a conflict.
Wipe Subcontract(s) - Allows you to delete the highlighted Subcontract(s) and all scheduling at one time. This will NOT delete the Contract, or Subcontract(s) that are not highlighted.
Go To - The Go To feature allows you to open a window for the appropriate item for the highlighted record.
Reservations
Type topic text here.
Subcontracts (Digital)
Type topic text here.
Subcontracts (Static)
Type topic text here.
User Fields
For more information on the User fields page, click here.
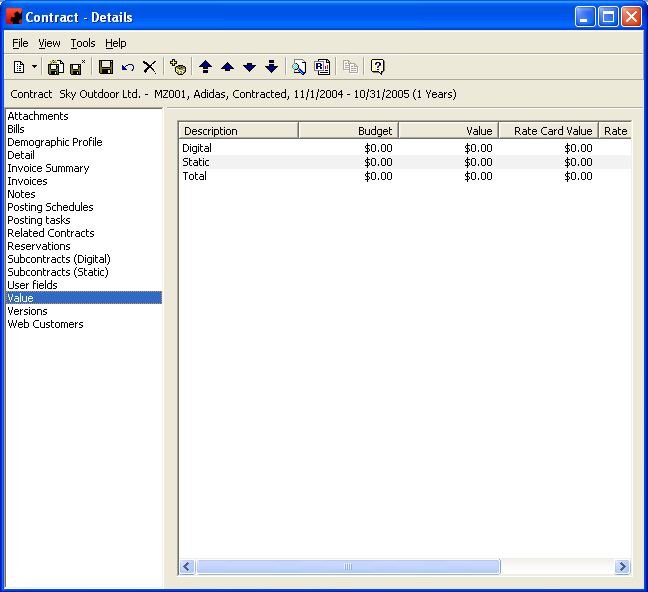
Contract Value
The Contract Value Page allows you to view information about the revenue generated by this Contract. This is the value for the entire Contract. Users can identify rate card, gross and net amounts. The Value is not entered on this screen; it is automatically calculated based on the values entered on the Subcontracts and Posting Schedules.
For information on the buttons that appear at the top of the window, click here. For information on the menu items that appear under the Tools menu, click here.
Versions
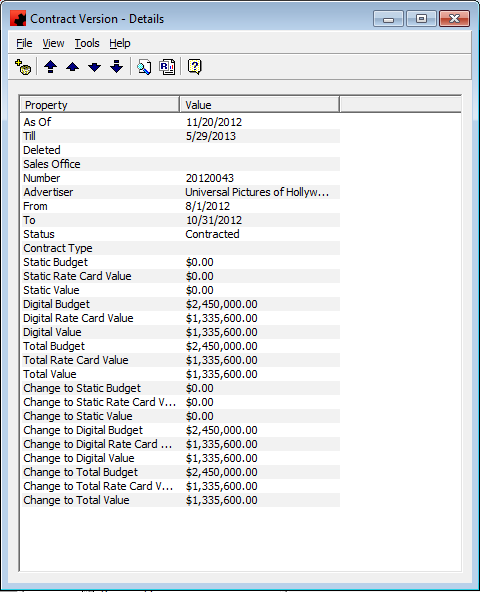
When the Sales History functionality detects a change in a Contract, it saves information about the previous Contract as a Version. This allows the user to see any changes that have been made to the Contracts.
The As Of date identifies when this Contract was first recorded by the Sales History tool. This is NOT the date the Contract was created, unless you are running the Sales History tool on a daily basis.
The Till date identifies when this Contract was marked as changed by the Sales History tool. This is NOT the date the Contract was changed, unless you are running the Sales History tool on a daily basis.
If a Contract has been Deleted, this field will indicate that it has been deleted.
The Sales Office field indicates the Sales Office for this Version of the Contract.
The Number field identifies the Contract Number for this Version of the Contract.
The Advertiser indicates the Advertiser for this Version of the Contract.
From indicates the Start date for this Version of the Contract.
To indicates the End date for this Version of the Contract.
Status indicates the Contract Status for this Version of the Contract.
Contract Type indicates the Contract Type for this Version of the Contract.
Static Budget indicates the total Budget entered for Static Subcontracts for this Version of the Contract.
Static Rate Card Value indicates the total Rate Card Value entered for Static Subcontracts for this Version of the Contract.
Static Value indicates the total Value assigned to all Postings for this Version of the Contract.
Digital Budget indicates the total Budget entered for Digital Subcontracts for this Version of the Contract.
Digital Rate Card Value indicates the total Rate Card Value entered for Digital Subcontracts for this Version of the Contract.
Digital Value indicates the total Value assigned to all Reservations for this Version of the Contract.
Total Budget indicates the total combined Budget entered for Static and Digital Subcontracts for this Version of the Contract.
Total Rate Card Value indicates the total combined Rate Card Value entered for Static and Digital Subcontracts for this Version of the Contract.
Total Value indicates the total combined Value assigned to all Postings and Reservations for this Version of the Contract.
Change to Static Budget indicates the difference in the Static budget between this Version of the Contract and the previous version of the Contract.
Change to Static Rate Card Value indicates the difference in the total Rate Card Value entered for Static Subcontracts between this Version of the Contract and the previous version of the Contract.
Change to Static Value indicates the difference in the total Value assigned to all Postings between this Version of the Contract and the previous version of the Contract.
Change to Digital Budget indicates the difference in the total Budget entered for Digital Subcontracts between this Version of the Contract and the previous version of the Contract.
Change to Digital Rate Card Value indicates the difference in the total Rate Card Value entered for Digital Subcontracts between this Version of the Contract and the previous version of the Contract.
Change to Digital Value indicates the difference in the total Value assigned to all Reservations between this Vers ion of the Contract and the previous version of the Contract.
Change to Total Budget indicates the difference in the total combined Budget entered for Static and Digital Subcontracts between this Version of the Contract and the previous version of the Contract.
Change to Total Rate Card Value indicates the difference in the total combined Rate Card Value entered for Static and Digital Subcontracts between this Version of the Contract and the previous version of the Contract.
Change to Total Value indicates the difference in the total combined Value assigned to all Postings and Reservations between this Version of the Contract and the previous version of the Contract.
Web Customers
Type topic text here.
