Invoice
Invoices in Ad Manager are created through a Bill Definition. For information on how to create a bill definition, click here.
Contents |
Modifying Invoices
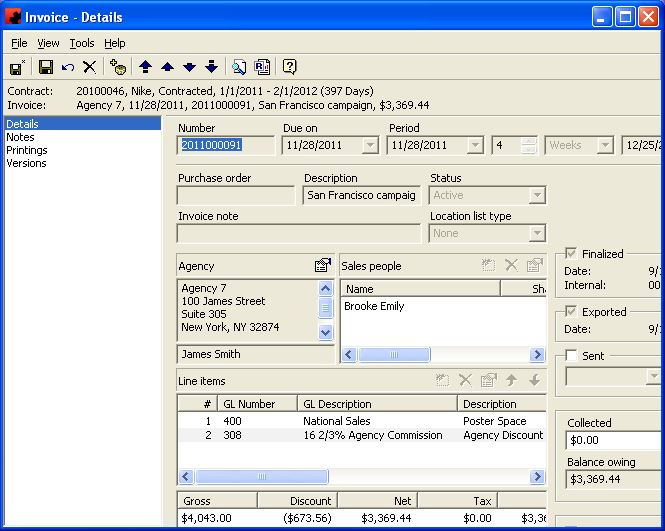
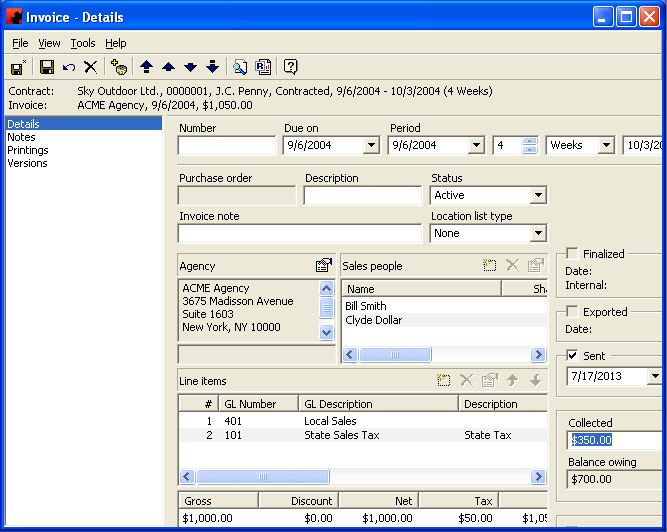
To make revisions to an Invoice in Ad Manager, first find the particular Invoice that requires changes. You can either choose the Invoice from the listing of all Invoices or select the Contract to which it applies and click on the Invoices Page to obtain the list of Invoices for that Contract. Double click on the Invoice you wish to revise and the following screen will appear:
Changing a Single Invoice
If you wish to change information about a single Invoice (e.g. adding a one time special credit or charge), this can be done from the Invoices Page of the Contract or from a list of Invoices.
To make the change, double click on the Invoice you wish to modify. From this screen, you can make any changes specific to this Invoice. Once you have made the necessary changes, click on the Save button.
NOTE 1: You might want to record why this Invoice has been changed. Click the Notes Page of the Invoice and make your remarks here. This will be saved with the changed Invoice for further reference.
NOTE 2: You cannot delete a single Invoice in Ad Manager; to skip an Invoice or not have it exported to your Accounting Package, change the type to Cancelled or On Hold on that Invoice and save it.
NOTE 3: If an Invoice has been Finalized and/or Exported, it cannot be modified. You must first Reset the Export Status, then Un-finalize the Invoice in order to make the changes. See Finalizing Invoices.
When an Invoice has been changed, Ad Manager will assign it a Number so at a quick glance you can see Invoices in a list that have been modified.
Changing All Invoices
If you wish to change a characteristic about all Invoices (e.g. change of Recurrence, Invoice Note, etc.) of a particular Bill Definition, this can be done from the Details Page or Recurrence Page of the Bill Definition as appropriate. Find the Bill Definition, either from a list of all Bill Definitions or from the corresponding Contract. Double click the item to open it and make the necessary changes. After you have made your changes, click on the Save button.
NOTE 1: You might want to record why this Bill Definition has been changed. Click the Notes Page of the Bill Definition and make your remarks here. This will be saved with the changed Bill Definition for further reference.
NOTE 2: If any Invoices have been exported from Ad Manager, they will not reflect the changes. Only non-exported Invoices will change.
Modifying Invoice Period Dates
When you create a new Bill Definition in Ad Manager, Invoice period dates are automatically created at the same time for each Invoice of the Bill. These dates are dependent upon information you input on the Recurrence Page of the Bill Definition and if you identified them as "Paid in advance" or not. They can also be contained in your Invoice Export and/or printed on an Invoice. However, you have the opportunity to change the period dates on any Invoice as required.
To change the information, select the Invoice by using the Find tool, selecting from the list of All Invoices or from the Invoice page of a Contract; change the date range and Save the record. The Invoice will now display the new dates.
NOTE: If the Invoice have been finalized and/or exported, you cannot change this information.
Deleting a Non-Standard Invoice
If you have altered one or more of the Invoices to be different from the standard Invoices that were set up using the Details or Recurrence Pages from the Bill Definition, you can delete these Invoices by highlighting them on the Invoices Page and clicking on the Delete button. This will reset the Invoices to the default Bill Definition.
NOTE: This will only work if the Invoices have not been exported from Ad Manager.
Processing Invoices
Finalizing Invoices
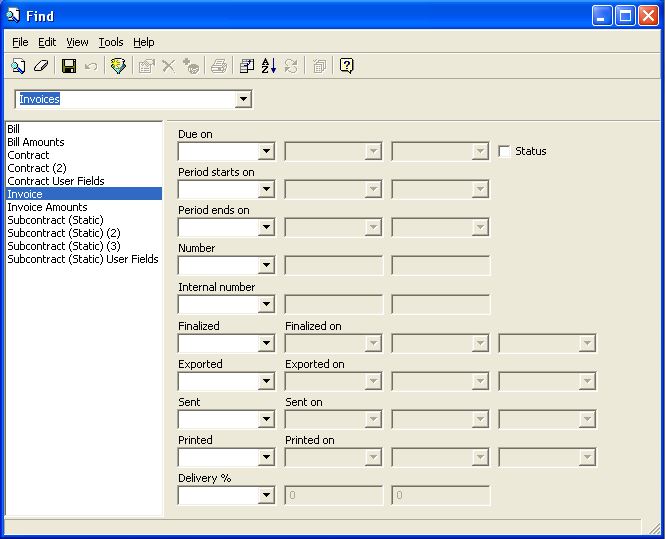
Finalizing an Invoice will prevent you from making additional changes to it. This can be done manually prior to an Invoice Export, or it will automatically occur during the Export if you are running the Exporter within Ad Manager. If you wish to finalize Invoices manually, use the Find tool and look for Invoices that meet your criteria.
Highlight the Invoices you wish to finalize and go to the Tools menu and click Finalize. Ad Manager will finalize these Invoices. If you were to open the Invoice details screen, Ad Manager will show the Invoice as Finalized with a Unique Transaction ID as well as an Invoice Number if you have set up Ad Manager to automatically number your Invoices under Tools - Options.
Prior to Finalizing your Invoices, you might wish to Customize the View of your Invoices list to add a column called "Delivery %". This column will tell you the percent of completed Posting Tasks vs. Scheduled Postings for the period of the Invoice. To Calculate the Delivery %, highlight the Invoices, click the Tools menu item and select "Calculate Delivery %". Ad Manager will then calculate this percentage for you so you can determine if enough postings have been completed and the Invoice can be Finalized and Exported.
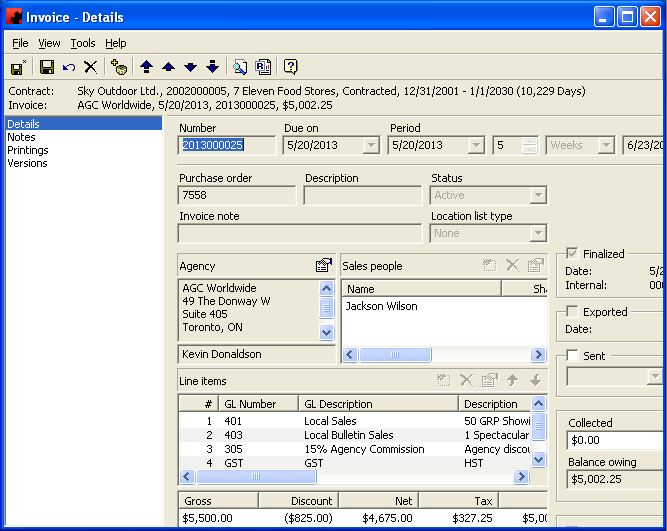
If at any time, you wish to check the details of one of the Invoices on the list, double click it and the Invoice Details page will appear. Once an Invoice is marked as Finalized, you cannot change the information on the Invoice. You must Un-Finalize it in order to make any changes.
Un-Finalizing Invoices
If an Invoice has incorrectly been marked as Finalized, Ad Manager provides you with the ability to Un-Finalize it. To Un-Finalize an Invoice, find it either using a Finder, from a list of Invoices or from the Invoices Page of a Contract. Right click on the Invoice you wish to Un-Finalize, go to the Tools menu and select Un-Finalize. Ad Manager will remove the Finalized status, but will still show a Unique Transaction ID, indicating that this Invoice was Finalized at one time.
Exporting Invoices
There are several ways invoices can be exported out of Ad Manager, depending on the connection that has been created for your organization. For information about how you can export your invoices to your accounting system, please contact our Services team.
Marking an Invoice as Sent
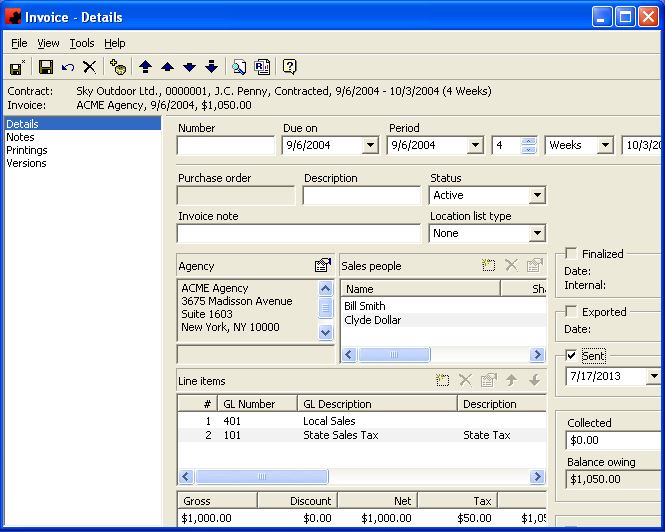
If you wish to track in Ad Manager whether an Invoice has been sent, you can do so from the Invoices Page of the Contract. Double click the appropriate Invoice and the screen above will appear. From this screen, click the box beside Sent and enter the date. Click the Save button to keep your changes.
Marking an Invoice as Collected
If you wish to track in Ad Manager whether monies have been collected against a particular Invoice you can do so from the Invoices Page of the Contract. Some Ad Manager exporters will automatically fill this information in, however you can do it manually if this option is not available.
Double click the appropriate Invoice and the screen above will appear. From this screen, enter the Collected dollars in the field called Collected and Ad Manager will automatically calculate the Balance owning amount.
Invoice Pages
Details Page
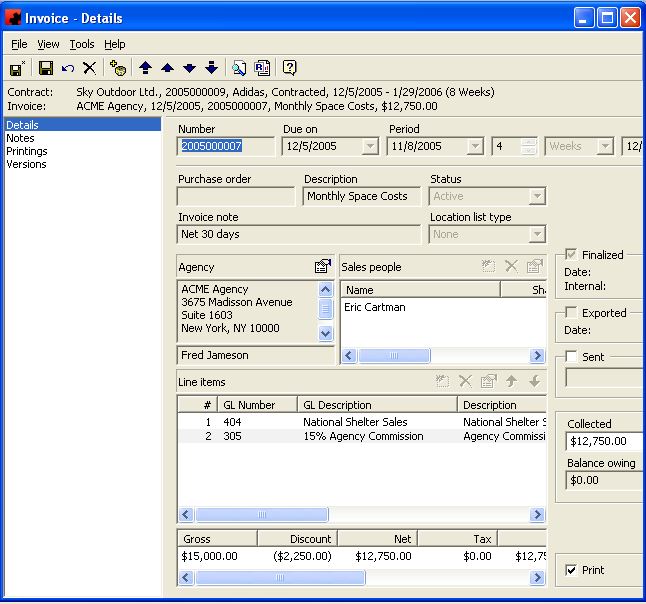
The Details Page is where information about the Invoice is displayed. Information on the status of the Invoice, on who is being invoiced, and what the line items for this invoice are can be found on this page.
For information on the buttons that appear at the top of the window, click here. For information on the menu items that appear under the Tools menu, click here.
The Line items pane shows a listing of all Line Items that are assigned to this Invoice. The functions available through the buttons immediately above the pane are:
- Add a new Line Item to the Invoice. Click on this button and the Invoice Line Item screen will open where you enter in a description for the Line item, as well as the GL Code to which this Line item is assigned.
- Delete the highlighted Line item from the Invoice.
- Edit the information for the highlighted Line item.
- Move the highlighted Line item up in the list of Line items.
- Move the highlighted Line item down in the list of Line items.
Fields
Agency: This is the person(s) or company that will be invoiced for this Bill Definition. You can select the appropriate Agency contact from the list or add them in by typing the appropriate name in the field. Ad Manager will default to the Agency that has been input on the Details page of the Contract.
Balance Owing: This is a calculation of monies not collected for this Invoice. This field is automatically updated by Ad Manager when Collected dollars are recorded in the Collected field.
Collected: If you wish to track whether monies have been collected against the Invoice, you can do so by clicking the plus button beside Collected and entering the collected dollars in the field called Collected. The plus () button next to the Collected field is used to add additional dollars to the collected amount as they are received.
Description: This is a quick description of what this Invoice pertains to. This description is for internal use only.
Due On: This is the date the invoice is due.
Exported: Once the Invoice has been exported out of Ad Manager, this checkbox will contain a checkmark, and the date the Invoice was exported will be shown in the Date field below it.
Finalized: This checkbox can be clicked to finalize the Invoice for exporting. Finalizing the Invoice will prevent you from making additional changes to it. This can be done manually before the Export, by clicking on the Finalized checkbox, or automatically during the export. Once the Invoice has been finalized, the date it was finalized will show below the check box as well as a unique transaction id.
Invoice Note: This is what you would like to appear as a memo item on the Invoice.
Line Items: This is a listing of items that are included on this Invoice. These are carried over from the Bill Definition. However, if you wish to add a one time special item or charge, you can do that here on the individual Invoice.
Location List Type: If you wish to have a location list appear on your Invoice, choose the format of the list by selecting it from this dropdown list. This does not automatically happen, but will need to be programmed to appear in the required format.
Number: This is the Invoice Number assigned by Ad Manager and exported with your Invoice to your accounting package.
Period: This is the date range for which this Invoice applies. The period dates are automatically created when the Bill Definition was saved. The dates are dependent upon information you input on the Recurrence page of the Bill Definition and if you identified them as Paid in Advance or not. The period dates can be exported to your accounting package to appear on the Invoice for this payment. However, you can modify the period dates for an individual Invoice here.
Print: Once you have printed your Invoices, Ad Manager will ask whether the Invoices have printed successfully. If they have, select "Yes" and Ad Manager will mark these Invoices as printed by removing the check from the Print check box. Ad Manager will not print this Invoice again, even if you select the same criteria, unless you go to the Invoice and mark the Print checkbox with a checkmark.
Purchase Order: This field will populate from the Contract Details page, if you have entered a purchase order number there.
Sales people: This field will populate from the Contract Details page, if you have entered the sales person(s) there. Otherwise, you can click on the New button above the pane and select a name from the list.
Sent: If you wish to track whether an Invoice has been sent, you can do so by clicking the box beside Sent and entering the date.
Status: The status determines if this Invoice can be exported. Only "Active" and "Force" statuses can be part of an Invoice Export file.
At the bottom of the page, you can view a summary identifying all dollar amounts for this Invoice.
Notes Page
For more information on the Notes page, click here.
Printings Page
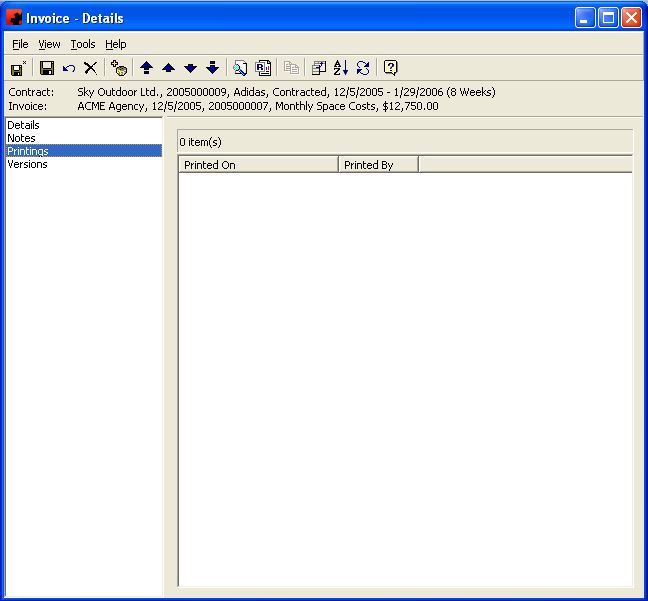
The Printings Page displays when the Invoice was printed and by whom. If the Invoice is printed more than once, a listing will appear on this page. Only Invoices printed from Ad Manager will display on this page.
For information on the buttons that appear at the top of the window, click here. For information on the menu items that appear under the Tools menu, click here.
Tool buttons found at the top of the Invoice - Details Screen when you are on the Printings Page:
- Customize Current View allows you to select the columns to display and the order to display them in.
- Order allows you to sort the Printings in the desired order.
- The Refresh button will reload the list of Printings, in the event changes to the Printings have occurred since you visited this page.
Versions Page
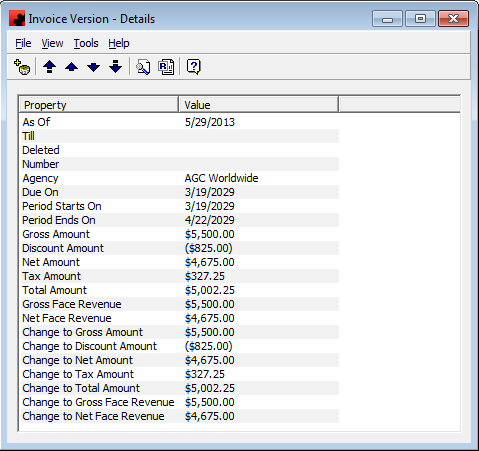
When the Sales History functionality detects a change in an invoice, it saves information about the previous invoice as a Version. This allows the user to see any changes that have been made to the invoices.
The As Of date identifies when this invoice was first recorded by the Sales History tool. This is NOT the date the invoice was created, unless you are running the Sales History tool on a daily basis.
The Till date identifies when this invoice was marked as changed by the Sales History tool. This is NOT the date the invoice was changed, unless you are running the Sales History tool on a daily basis.
If an invoice has been Deleted, this field will indicate that it has been deleted.
The Number field identifies the Invoice Number for this Version of the Invoice.
The Agency indicates the Agency for this Version of the Invoice.
Due On indicates the Due On date for this Version of the Invoice.
Period Starts On indicates the first date of the time period covered for this Version of the Invoice.
Period Ends On indicates the last date of the time period covered for this Version of the Invoice.
Gross Amount indicates the Gross Amount for this Version of the Invoice.
Discount Amount indicates the Discount Amount for this Version of the Invoice.
Net Amount indicates the Net Amount for this Version of the Invoice.
Tax Amount indicates the Tax Amount for this Version of the Invoice.
Total Amount indicates the Total Amount for this Version of the Invoice.
Gross Face Revenue indicates the Gross Revenue for GL Codes marked as Face Generated for this Version of the Invoice.
Net Face Revenue indicates the Net Revenue for GL Codes marked as Face Generated for this Version of the Invoice.
Change to Gross Amount indicates the difference in the Gross amount between this Version of the Invoice and the previous version of the Invoice.
Change to Discount Amount indicates the difference in the Discount amount between this Version of the Invoice and the previous version of the Invoice.
Change to Net Amount indicates the difference in the Net amount between this Version of the Invoice and the previous version of the Invoice.
Change to Tax Amount indicates the difference in the Tax amount between this Version of the Invoice and the previous version of the Invoice.
Change to Total Amount indicates the difference in the Total amount between this Version of the Invoice and the previous version of the Invoice.
Change to Gross Face Revenue indicates the difference in the Gross Face Revenue between this Version of the Invoice and the previous version of the Invoice.
Change to Net Face Revenue indicates the difference in the Net Face Revenue between this Version of the Invoice and the previous version of the Invoice.
