Difference between revisions of "Agencies"
Pat.wilkin (Talk | contribs) |
(→Details) |
||
| Line 114: | Line 114: | ||
The Details Page is where information about the Agency is stored. In Ad Manager, the Agency refers to the "Bill To", regardless of whether it is a recognized advertising agency or the Advertiser is being billed directly. Therefore, if dealing directly with the Advertiser and not going through an Agency, the Advertiser name should also be entered in Ad Manager as the Agency. | The Details Page is where information about the Agency is stored. In Ad Manager, the Agency refers to the "Bill To", regardless of whether it is a recognized advertising agency or the Advertiser is being billed directly. Therefore, if dealing directly with the Advertiser and not going through an Agency, the Advertiser name should also be entered in Ad Manager as the Agency. | ||
| − | [[File: | + | [[File:Agency575.PNG]] |
For information on the buttons that appear at the top of the window, [[Buttons#Agency|click here]]. For information on the menu items that appear under the Tools menu, [[FAQ and General Info#Agency Tools Menu|click here]]. | For information on the buttons that appear at the top of the window, [[Buttons#Agency|click here]]. For information on the menu items that appear under the Tools menu, [[FAQ and General Info#Agency Tools Menu|click here]]. | ||
| Line 129: | Line 129: | ||
Client No.: This is a required field and information must be entered. This number will correspond to an Account Number/Client Number that has been set up the company's accounting software. It can be contained in the export file when Invoice detail is exported from Ad Manager to the Accounting software. | Client No.: This is a required field and information must be entered. This number will correspond to an Account Number/Client Number that has been set up the company's accounting software. It can be contained in the export file when Invoice detail is exported from Ad Manager to the Accounting software. | ||
| + | |||
| + | Email: This can be used to enter the email address to be used for this agency (new in version 5.7.5) | ||
Fax: This is the Fax number of this particular Agency. | Fax: This is the Fax number of this particular Agency. | ||
| Line 135: | Line 137: | ||
Phone: This is the phone number of this Agency. | Phone: This is the phone number of this Agency. | ||
| + | |||
| + | Send invoices to: This is a list of email addresses that you want to have invoices sent to using e-billing mechanisms. When entering multiple email addresses, you can use a comma, a space or the return key to indicate a new email address. Ad Manager will then insert commas as appropriate upon saving (new in version 5.7.5). | ||
== Financial Details == | == Financial Details == | ||
Latest revision as of 06:09, 20 August 2016
Contents |
Agency Information
This database contains the name and contact information of each advertising agency or advertiser dealt with directly, rather than through an agency. This database is used during inputting of Contract information as well as for billing purposes. The Agencies database can be considered the "Bill To" database because this is who will receive the invoicing for advertising placed on a company's inventory.
Adding a New Agency
To add a new Agency, click on the arrow beside the New icon () for a list of items that can be added. Select Other, and then select Agency from the list. The Agency Details screen will appear, and a new Agency can be entered.
In the Details page, enter the Agency Name, Client No. (the corresponding account number in the accounting software) (Note: If users decide not to link to an accounting software, it is suggested that the Agency Name be copied/pasted into the Client No. field.),phone and fax numbers. To enter the address information, click the ellipsis button to the right of the field and enter the details in the window.
From time to time Agencies may go out of business or change names. When dates are entered in the Active to field, the Agency name will disappear from some pick lists. However, the Agency information will still remain in the database.
Modifying an Agency
To modify an Agency, click the database from the Other folder, then double-click the desired item and make the necessary change(s). Once completed, click the Save () button.
Deleting an Agency
To delete an Agency, there must be no Contracts or billing associated with it. Select the database from the Other folder, then double-click the desired item. Select the Delete button () for the record. Ad Manager will ask for confirmation to delete the Agency.
Bills
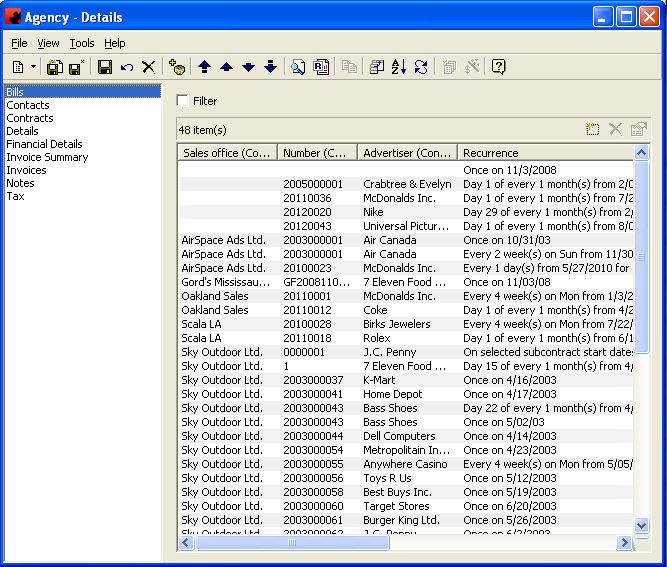
The Bills Page provides a listing of all billing schedules that have been entered into Ad Manager where this Agency is to be invoiced.
Tool buttons found at the top of the Agency - Details screen when on the Bills Page:
- Select the Customize Current View button to select the columns of data to be displayed and the order in which to display them.
- Select the Order button to sort the Bills in the desired order.
- The Refresh button will reload the list of Bills, in the event changes to the Bills have occurred since the page was visited.
- Select the Update button to select one or more Bill Definitions and change information on them. All highlighted Bills will be changed to reflect the items selected.
![]() - Select the Allocate Revenue button to allocate revenue identified as being face generated for the highlighted Bill to the assigned Faces.
- Select the Allocate Revenue button to allocate revenue identified as being face generated for the highlighted Bill to the assigned Faces.
The functions available through the buttons immediately above the Bills pane are:
- Add a new Bill. The New Bill window will open; identify if it is a Custom Bill or Contract Bill. If a Custom Bill, identify the Agency to be billed; if a Contract Bill, <Select> an existing Contract or create a <New> one. Then select the Agency to be billed. Proceed to the Bill Definition - Details window and enter information to create the Bill.
- Delete the highlighted Bill from this Agency. Highlight the item and click the Delete button. Note: Any Bills that have finalized and/or exported Invoices associated with them will not be deleted.
- Opens the Bill Definition - Details window to review or change any information related to the Bill.
Right Click
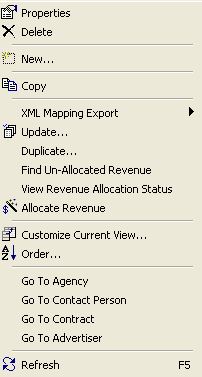
- Right clicking on the list of Bill will display this menu. This menu is used to change the status of a Bill as well as any line items by using the Update option, find revenue not yet allocated, view the status of revenue allocation, allocate revenue, and duplicate the Bill Definition.
Update - The Update menu item is used to modify a property (or properties) for one or more highlighted Bill Definitions.
Find Un-Allocated Revenue - This tool displays a list of which Bill Definitions, from the ones selected, have revenue that has not yet been allocated. The Un-Allocated Bill Definitions window will display these Bills. From this window, select each one, click on the Allocate Revenue button in the toolbar and complete the Allocation.
View Revenue Allocation Status - This tool allows you to determine the allocation status for the highlighted Bill Definitions. Ad Manager will inform you if all Revenue has been allocated or if there is still an outstanding amount remaining. If there is still an outstanding amount, double click the Bill Definition to open it, click the Allocate Revenue button in the toolbar and complete the Allocation.
Allocate Revenue - This tool is used to allocate the Face generated revenue from the selected Bill Definition(s) to the appropriate scheduled Faces.
Duplicate - The Duplicate menu item is used to create a new Bill Definition with the same Line item configuration as the current Bill Definition.
To change the information being viewed in the list of Bills, right click in the list, and choose Customize Current View. To change the sort order, right click in the list, and choose Order.
Go To - The Go To feature is used to open a window for the appropriate item for the selected record.
For additional information on the buttons that appear at the top of the window, click here. For information on the menu items that appear under the Tools menu, click here.
The Filter check box is used to filter the listing of Bills to show only those that meet a certain criteria. When selected, a Filter screen will appear, to enter search criteria to see Bills with certain recurrence patterns, for specific Agencies, etc. When a filter is active, a check mark will appear in the Filter box. To clear the filter and see all records, click on Filter, then the Clear button on the Filter screen, followed by the OK button.
Contacts
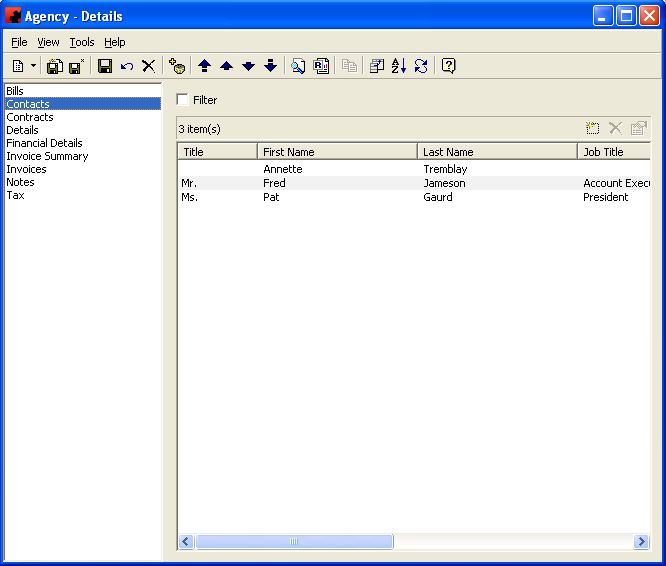
The Contacts Page is used to enter information referring to all Contact people for an Agency. Names on this list can be added to the Agency information on the Contract and can also appear on the Bill Definition to address invoicing to a specific person.
Tool buttons specific to the Contacts Page:
- Select the Customize Current View button to select the columns of data to be displayed and the order in which to display them.
- Select the Order button to sort the Agency Contacts in the desired order.
- The Refresh button will reload the list of Contacts, in the event changes to the number of Contacts has occurred since the page was visited.
The pane in the window shows a listing of all Contacts that are assigned to this Agency. The functions available through the buttons immediately above the pane are:
- Add a new Contact to the Agency. Click on this button and either select an existing Name from the list or create a new record by choosing < New >.
- Delete the selected Contact from the Agency. Note: If the Contact name appears on a Contract or any Bill Definition/Invoice, the name cannot be deleted.
- Edit the information for the selected Contact.
For additional information on buttons that appear at the top of the window, click here. For information on the menu items that appear under the Tools menu, click here.
The Filter check box is used to filter the listing of Contacts to show only those that meet a certain criteria. When selected, a Filter screen will appear, to enter search criteria to see Contacts with certain names or phone numbers as well as address information. When a filter is active, a check mark will appear in the Filter box. To clear the filter and see all records, click on Filter, then the Clear button on the Filter screen, followed by the OK button.
Contracts
The Contracts page is a listing of all Contracts that are associated with this Agency. To see more detail about a Contract, double click on it to view. The functions available through the buttons immediately above the pane are:
- Add a new Contract to the Agency. Click on this button and create a new one by completing the form .
- Delete the selected Contract from the Agency list. Note: If the Contract has Subcontracts/Postings/Posting Tasks or Bill Definitions/Invoices associated with it, the Contract cannot be deleted.
- Edit the information for the selected Contract.
Details
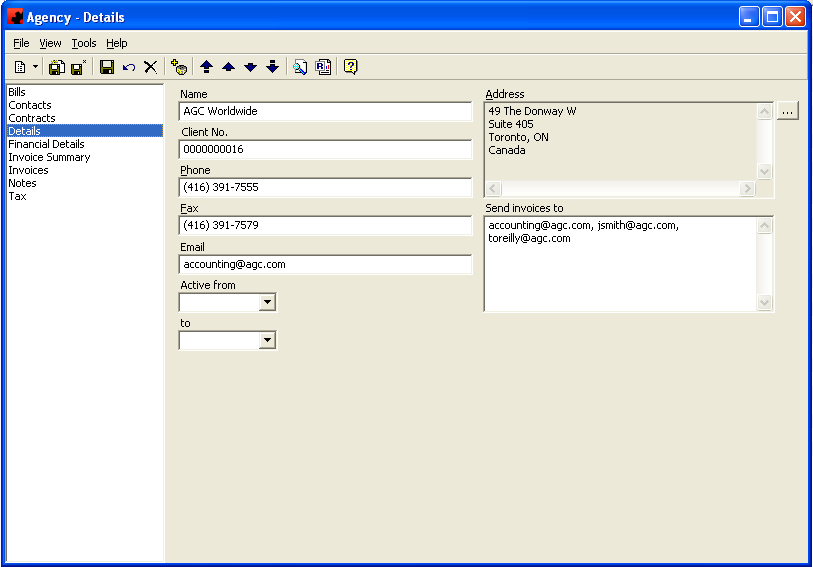
The Details Page is where information about the Agency is stored. In Ad Manager, the Agency refers to the "Bill To", regardless of whether it is a recognized advertising agency or the Advertiser is being billed directly. Therefore, if dealing directly with the Advertiser and not going through an Agency, the Advertiser name should also be entered in Ad Manager as the Agency.
For information on the buttons that appear at the top of the window, click here. For information on the menu items that appear under the Tools menu, click here.
Fill in the appropriate information for each field. Select the appropriate item from any of the drop down lists (in the boxes) or type in the information if it is not present.
Fields
Active From/To: The dates when this Agency became a client (From) and the date the Agency stops being a client (To). These fields are used when the Agency goes out of business and you no longer wish the name to appear on the list of Agencies when setting up a Contract or a Bill Definition. Once the "to" date is entered, the name will no longer appear in the list. However, the Agency record remains as part of the database.
Address: This is the mailing address for the Agency. To add the Address, click on the ellipsis () for the Address Builder window and fill in the information accordingly.
Client No.: This is a required field and information must be entered. This number will correspond to an Account Number/Client Number that has been set up the company's accounting software. It can be contained in the export file when Invoice detail is exported from Ad Manager to the Accounting software.
Email: This can be used to enter the email address to be used for this agency (new in version 5.7.5)
Fax: This is the Fax number of this particular Agency.
Name: This is the name of the Agency or Advertiser.
Phone: This is the phone number of this Agency.
Send invoices to: This is a list of email addresses that you want to have invoices sent to using e-billing mechanisms. When entering multiple email addresses, you can use a comma, a space or the return key to indicate a new email address. Ad Manager will then insert commas as appropriate upon saving (new in version 5.7.5).
Financial Details
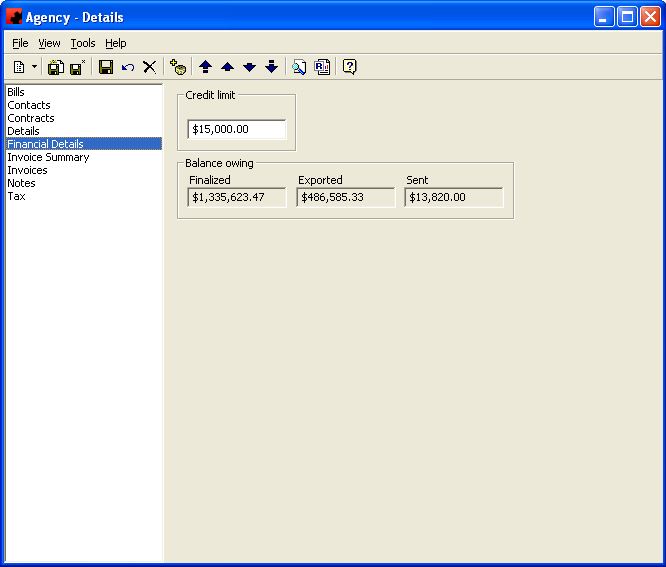
The Financial Details Page displays financial summary information for an Agency. If desired, identify a Credit Limit. The page also displays Balance Owing amounts of Finalized, Exported and Sent Invoicing for this Agency. This is for information only and will not generate a warning if the invoicing total is greater than the Credit Limit entered.
For information on the buttons that appear at the top of the window, click here. For information on the menu items that appear under the Tools menu, click here.
Invoice Summary
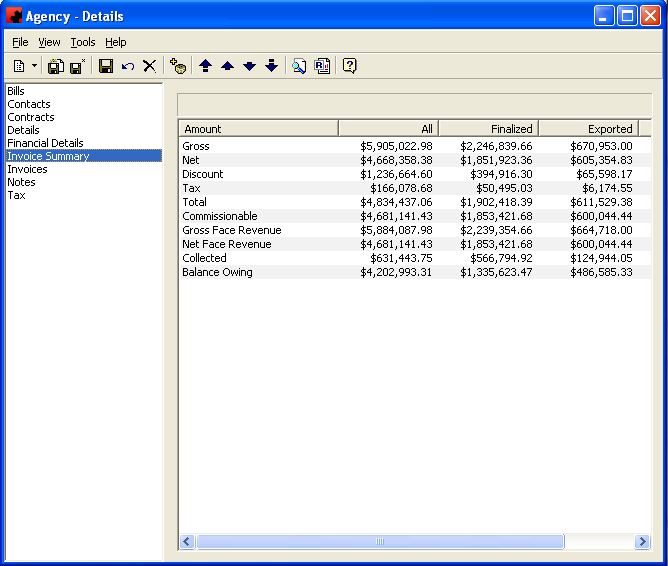
The Invoice Summary Page displays a summary of all Invoices created by Bill Definitions where this Agency is to be invoiced. It displays what has been set up to invoice, how much of the monies have been Finalized, Exported, Sent, Collected, etc. and any Owing Balances.
For information on the buttons that appear at the top of the window, click here. For information on the menu items that appear under the Tools menu, click here.
Invoices
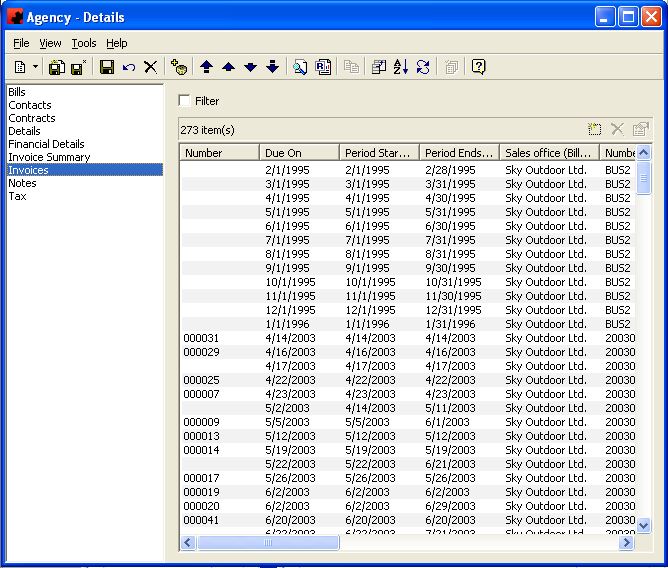
The Contract Invoices Page provides a listing of all Invoices created by Bill Definitions where this Agency is to be invoiced. Modifications may be made to any Invoice that has not been finalized nor exported by double clicking the line item to open the record.
Tool buttons found at the top of the Agency - Details screen when you are on the Invoices Page:
- Select the Customize Current View button to select the columns of data to be displayed and the order in which to display them.
- Select the Order button to sort the Agency Invoices in the desired order.
- The Refresh button will reload the list of Invoices, in the event changes to the Invoices have occurred since this page was visited.
- Select the Update button to select one or more Invoices and change information on them. All highlighted Invoices will be changed to reflect the items selected. Note: Invoices that have been finalized or exported cannot be updated unless their export status is reset and/or they are unfinalized.
The functions available through the buttons immediately above the Invoices pane are:
- Add a new Invoice for the Contract on this Agency . The Bill Definition window will appear to create a new one.
- Delete the selected Invoice from the Contract. Select the item and click the Delete button. Note: Invoices that have been finalized or exported cannot be deleted unless their export status is reset and/or they are unfinalized.
- Opens the Invoice-Details window to review or change any information related to the Invoice.
Right Click
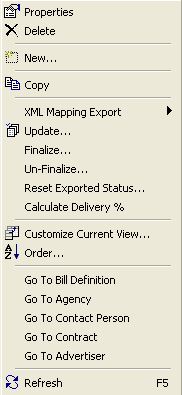
- Right clicking on the list of Invoices will display this menu. It is used to change the due date of an Invoice, the status of an Invoice as well as any line items by using the Update option, as well as, finalize, un-finalize, reset the exported status, and calculate the delivery percentage of an Invoice or group of selected Invoices.
Update - The Update menu item is used to modify a property (or properties) for one or more selected Invoices.
Finalize - Finalizing an Invoice will prevent the user from making additional changes to it. This can be done manually prior to an Invoice Export, by using this tool, or it will automatically occur during the Export. To finalize invoices using this tool, select them first, then right-click to get this menu option. Once finalized, the Invoice is marked so and will display a unique Transaction ID as well as an Invoice Number.
Un-Finalize - If an Invoice has incorrectly been marked as Finalized, this tool is used to un-finalize it. Ad Manager will remove the Finalized status of the Invoice, but will still show a unique Transaction ID, indicating this Invoice was Finalized at one time. As well the Invoice will still display an Invoice Number.
Reset Exported Status - If an Invoice has been Exported incorrectly, this tool is used to mark it as un-exported, so that it can be exported again.
Calculate Delivery % - This tool is used to calculate the percent of completed Posting Tasks vs. Scheduled Postings for the period of the selected Invoice(s). It is used to determine if enough postings have been completed so that the Invoice can be Finalized and Exported.
To change the information being viewed in the list, right click in the list, and choose Customize Current View. To change the sort order, right click in the list, and choose Order.
Go To - The Go To feature allows you to open a window for the appropriate item for the highlighted record.
For additional information on the buttons that appear at the top of the window, click here. For information on the menu items that appear under the Tools menu, click here.
The Filter check box is used to filter the listing of Invoices to show only those that meet a certain criteria. When selected, a filter screen will appear, to enter search criteria to see Invoices that are due on a certain date, finalized or exported on a certain date, etc. When a filter is active, a check mark will appear in the Filter box. To clear the filter and see all records, click on Filter, then the Clear button the Filter screen, followed by the OK button.
Notes
For more information on the Notes page, click here.
Tax
This page is used to specify which Taxes this Agency is exempt from paying. This is for information purposes - it does not automatically link to the Bill.
If an Agency is exempt from all Taxes, click the "Exempt from all sales taxes" check box.
To add a Tax to the list of exempt Taxes, click the New () button. Select the Taxes from the following screen.
To remove a Tax from the list of exempt Taxes, click the Delete () button.
