Difference between revisions of "Lease payment schedules"
m (→Adding Lease Payment Schedules) |
|||
| (11 intermediate revisions by 3 users not shown) | |||
| Line 1: | Line 1: | ||
| − | + | == Adding Lease Payment Schedules == | |
| + | In order to have Lease Payments for a particular Lease, you must first set up a Lease Payment Schedule. No Lease Payments will be created without the Schedule that acts as the "template" for its corresponding Payments. Ad Manager allows you to have multiple Payment Schedules, each with different Payees, different amounts and recurrences as needed. | ||
| + | To add a Lease Payment Schedule, go to the Lease you wish to add a Payment Schedule for. This can be done by using the Find tool or selecting the appropriate Lease from the list of All Leases. | ||
| − | + | When you have selected the desired Lease, click on the Payment Schedules Page. | |
| − | + | ||
| + | [[File:New_Lease_Payment_Schedule.JPG]] | ||
| + | To add a new Payment Schedule, click on the New ([[File:New_add_button.JPG]]) button and the following screen will appear. | ||
| − | + | [[File:New_New_Payment_Schedule.JPG]] | |
| − | + | From this screen you can add a Payment Schedule by selecting the appropriate Payee from the Payee list. If the Payee is not listed, you can add them in by typing the appropriate information. When you hit the Tab key on your keyboard after entering a new Payee, Ad Manager will display a window that allows you to enter in all relevant details about this Payee, including their Tax ID and Vendor Code information. NOTE: Vendor Code is a required field and must be entered. After entering the details, click OK to return to the Payment Schedule. | |
| − | + | You can also enter a Description of this Lease Payment, as well as a Cheque Comment. The Description is for internal use, identifying the type of Schedule this is on a listing of Payment Schedules (e.g. Monthly Lease Payment, Annual % Top-Up Payment, etc.), and the Cheque Comment is what can appear as a memo item on the cheque. | |
| − | + | From the Type list you can identify whether this lease is for Cash, Trade, or Other. | |
| − | + | The Status list allows you to identify whether this Payment Schedule is Active, Cancelled, In Dispute, On Hold or Suspended. NOTE: Only Lease Payments identified as Active can be exported from Ad Manager to your Accounting Package. | |
| − | + | You also can identify whether a Lease Payment will only be issued when an Invoice is received from the Payee. Check the box beside Invoice Required to indicate this. NOTE: Any payment with this box checked will not export until the Invoice Received box has been checked and details are entered on the Payment. | |
| − | + | ===Line Items=== | |
| + | To add Line Items for this Payment Schedule, click the New ([[File:New_add_button.JPG]]) button. The following screen will appear. | ||
| − | + | [[File:New_Payment_Line_Item.JPG]] | |
| − | + | From this screen you enter in a description for the Line item, as well as the GL Code to which this line item is assigned. This GL Code will match an identical Code set up in your Accounting Package. You can specify whether the dollar amount is a fixed amount, a percent of revenue, a percent of a specified amount, or a percent of the subtotal. Depending which of these choices you select, different fields of information will appear for you to fill in. Once you have completed your Line Item information, click OK. You can add additional Line Items as appropriate. You can also identify line items that you do not want to print on the cheque stub, by checking the box "Do not print". | |
| − | + | [[File:New_Payment_Line_Item_do_not_print.JPG]] | |
| − | + | This allows you to set up journal entries that are not part of the printed cheque information, but will be transferred to your accounting package. NOTE: This will only apply if you are printing your cheques using Ad Manager Reports. | |
| − | + | NOTE: If the Taxes and Discounts criteria have already been established in the GL Code database of Ad Manager, the percentages will automatically appear and the calculation will be done as the line items for each are added. | |
| − | + | Ad Manager processes the Line Items in the order they appear in the list of Line Items. If you have a Line Item that is taking a percentage of a subtotal and it is not in the correct spot, Ad Manager will calculate an incorrect amount. To move a Line up or down on the screen, highlight the Line Item and click the move up ([[File:New_move_up_button.JPG]]) or move down ([[File:New_move_down_button.JPG]]) button as appropriate. | |
| − | + | === Setting Up Recurrence === | |
| − | + | Once you have completed your Lease Payment details, you can identify the Recurrence for this Payment Schedule. This will determine how often and when the Payments are to be made. To do this, click on the Recurrence Page and the following screen will appear. | |
| − | + | [[File:New_Lease_Payment_Recurrence.JPG]] | |
| − | + | From this screen you can identify how often and for how long you wish to pay this Schedule. Do this by first selecting a Recurrence Pattern in the top section of the screen. If the Lease is paid quarterly (Jan 1, Apr 1, etc) for example, the Recurrence Pattern would be Monthly, Day 1 of every 3 months. | |
| − | + | In the bottom section of the screen set the Range of Recurrence. This identifies the period during which time you wish Payments to be generated. For example, you might enter the Start Date as January 1, 2003, click the End After and fill in 40 occurrences and the End by date will automatically fill in with the last Payment date, which, in this example will be October 1, 2012. | |
| + | You can also identify if the Payments are "Paid in advance" by leaving the check in the box at the bottom of this screen or paid in arrears by removing the check from the box. To remove the check from the box, click in the box. This field will determine the Period dates which are now part of the Payment information on the Payments page. This information can be contained in your Lease Payment Export to show on the printed cheque. NOTE: If the Payment Range of Recurrence is set up as Once, you must enter the Period dates to which it applies, regardless of whether the "paid in advance" box is checked or not. | ||
| − | + | [[File:New_Payments_paid_in_advance.JPG]] | |
| − | + | ||
| + | Once you have entered the Lease Payment Details and the Recurrence, click the Save button. If you wish to review or verify when Payments are scheduled, go to the Payments Page. | ||
| + | NOTE: No payments will appear on the Payments Page until the Schedule and its Recurrence have been saved. | ||
| − | + | === Marking an Invoice Required === | |
| + | If you have a Lease that requires an Invoice be received prior to payment, you can mark the Invoice received from the Payments Page. Double click the Payment that the Invoice applies to and the screen above will appear. From this screen, click the box beside Invoice Received. Ad Manager will ask you for the Invoice date and number. | ||
| − | + | [[File:New_Invoice_Recieved.JPG]] | |
| − | + | ||
| + | Fill this information in and click OK. Click the Save button to keep your changes. | ||
| + | == Creating Lease Payments with Escalators == | ||
| + | You may find that you will have a Lease signed by the Leasing Department on which escalators have been defined over the term of the Lease. For example, you might have a 20-year Lease that escalates by 5% at the end of every 5 years and you will need to set up the Payment Schedules accordingly. In our example you will have 4 Payments Schedules, each with its own amount, date range, etc. and the Schedules will show the following details: | ||
| − | + | Year 1 - Year 5 = Initial $$ amount | |
| + | Year 6 - Year 10 Initial $$ amount + 5% = Second $$ amount | ||
| − | = | + | Year 11 - Year 15 Second $$ amount + 5% = Third $$ amount |
| − | + | ||
| + | Year 16 - Year 20 Third $$ amount + 5% = Fourth $$ amount | ||
| + | You will find that the new Duplicate Tool will assist you in setting up these 4 Lease Payment Schedules, making the necessary changes for each escalator such as dollar amount and dates for the Recurrence. | ||
| − | + | ==Modifying Lease Payment Schedules== | |
| + | === Changing Recurrence Patterns === | ||
| + | Step one is to check the Payments page of the particular Lease Payment Schedule that you are changing to see if any Payments have been exported from Ad Manager. Find the Lease Payment Schedule and click on the Payments Page. | ||
| − | + | [[File:New_Lease_Payment_Schedule_Payments.JPG]] | |
| − | + | If no Payments have been exported yet from Ad Manager, click the Recurrence page. At the bottom of this screen change the recurrence to reflect the new dates and number of Payments you require. | |
| − | + | [[File:New_Lease_Payment_Schedule_Recurrence.JPG]] | |
| − | + | If Payments have been exported (even one), change the Recurrence as follows: | |
| − | + | Start date = date of the next Payment needed (refer back to your original listing to get this date. In our example above it would be 7/25/2005) | |
| − | + | Occurrences = Number of Payments you still require | |
| − | - Delete the highlighted Payment from this Payment Schedule. | + | End date = Date you want to end the Payments. |
| + | |||
| + | Save the Payment Schedule and check your Payments Page again to ensure that you now have the correct number of remaining Payments you need and no duplication. | ||
| + | |||
| + | == Lease Payment Schedule Pages == | ||
| + | === Details Page === | ||
| + | The Details Page is where information about the Lease Payment Schedule is displayed. Information on the status of the Lease Payment Schedule, on who the Payee is, and what the line items for this schedule are can be found on this page. | ||
| + | |||
| + | [[File:New_Lease_Payment_Schedule_Details.JPG]] | ||
| + | |||
| + | For information on the buttons that appear at the top of the window, [[Buttons#Lease Payment Schedule|click here]]. For information on the menu items that appear under the Tools menu, [[FAQ and General Info#Lease Payment Schedule Tools Menu|click here]]. | ||
| + | |||
| + | Fill in the appropriate information for each field. Select the appropriate item from any of the drop down lists (in the [[File:New_dropdown_button.JPG]] boxes) or type in the information if it is not present. | ||
| + | |||
| + | The Line items pane shows a listing of all Line Items that are assigned to this Payment Schedule. The functions available through the buttons immediately above the pane are: | ||
| + | |||
| + | [[File:New_add_button.JPG]]- Add a new Line Item to the Payment Schedule. Click on this button and the Payment Line Item screen will open where you enter in a description for the Line item, as well as the GL Code to which this Line item is assigned. | ||
| + | |||
| + | [[File:New_delete_button.JPG]]- Delete the highlighted Line item from the Payment Schedule. | ||
| + | |||
| + | [[File:New_properties_button.JPG]]- Edit the information for the highlighted Line item. | ||
| + | |||
| + | [[File:New_move_up_button.JPG]]- Move the highlighted Line item up in the list of Line items. | ||
| + | |||
| + | [[File:New_move_down_button.JPG]]- Move the highlighted Line item down in the list of Line items. | ||
| + | |||
| + | ==== Fields ==== | ||
| + | |||
| + | ''Cheque Comment'': This is what you would like to appear as a memo item on the cheque. | ||
| + | |||
| + | ''Description'': This is a quick description of what this Lease Payment pertains to. This description is for internal use only so that a user can identify this particular Schedule on a listing of Payment Schedules. | ||
| + | |||
| + | ''Invoice Required'': This check box allows you to identify whether a Lease Payment will only be issued when an invoice is received from the Payee. To identify that the Lease Payment requires an invoice, check the box next to Invoice Required. Any Payment with this box checked will not export until the Invoice Received Box has been checked and the details are entered on the Payment. | ||
| + | |||
| + | ''Line Items'': This is a listing of items that are included on this Payment Schedule. For information on how to enter line items to a payment schedule, [[Bill definition#Details|click here]]. | ||
| + | |||
| + | ''Payee'': This is the person(s) or company that will be paid for this Payment Schedule. You can select the appropriate Payee from the list or add them in by typing the appropriate name in the field. | ||
| + | |||
| + | ''Status'': This is a list allowing you to identify whether the Payment Schedule is Active, Cancelled, In Dispute, On Hold or Suspended. Only Lease Payments identified as Active can be exported from Ad Manager to your accounting package. | ||
| + | |||
| + | ''Type'': This is a list allowing you to identify whether this Lease Payment Schedule is for Cash, Trade, or Other. | ||
| + | |||
| + | At the bottom of the page, you can view a summary identifying all Payments to be made on this Payment Schedule. | ||
| + | |||
| + | === Notes Page === | ||
| + | |||
| + | For more information on the Notes page, [[Notes page|click here]]. | ||
| + | |||
| + | === Payment Summary Page=== | ||
| + | |||
| + | The Payment Summary Page summarizes the various dollar values of all Payments created by the Payment Schedule. From this screen you can see how much money has been Paid, Finalized, Exported, Sent, and the Current Balance Owing. | ||
| + | |||
| + | [[File:New_Lease_Payment_Schedule_Payment_Summary.JPG]] | ||
| + | |||
| + | For additional information on the buttons that appear at the top of the window, [[Buttons#Lease Payment Schedule|click here]]. For information on the menu items that appear under the Tools menu, [[Buttons#Lease Payment Schedule|click here]]. | ||
| + | |||
| + | === Payments Page=== | ||
| + | |||
| + | The Payments Page provides a listing of all payments that have been scheduled to be payed for this Lease Payment Schedule. | ||
| + | |||
| + | [[File:New_Lease_Payment_Schedule_Payments.JPG]] | ||
| + | |||
| + | Tool buttons found at the top of the Lease Payment Schedule - Details screen when you are on the Payments Page: | ||
| + | |||
| + | [[File:New_customize_button.JPG]]- Customize Current View allows you to select the columns to display and the order to display them in. | ||
| + | |||
| + | [[File:New_order_button.JPG]]- Order allows you to sort the Payments in the desired order. | ||
| + | |||
| + | [[File:New_refresh_button.JPG]]- The Refresh button will reload the list of Payments, in the event changes to the Payments have occurred since you visited this page. | ||
| + | |||
| + | [[File:New_update_button.JPG]]- The Update button allows you to select one or more Payments and change information on them. All highlighted Payments will be changed to reflect the items selected. | ||
| + | |||
| + | The functions available through the buttons immediately above the Payments pane are: | ||
| − | - | + | [[File:New_delete_button.JPG]]- Delete the highlighted Payment from this Payment Schedule. Highlight the item and click the Delete button. |
| − | + | [[File:New_properties_button.JPG]]- Opens the Payment - Details window to allow you to review or change any information related to the payment. | |
| − | + | Right clicking on the list of Payments will display this menu. From here you can change the due date of a payment, the status of a payment as well as any line items by using the Update option, as well as, finalize, un-finalize, and reset the exported status of a payment or group of highlighted payments. | |
| − | + | [[File:New_Lease_Payment_Schedule_Payments_right_click.JPG]] | |
To change the information being viewed in the list, simply right click in the list, and choose Customize Current View. To change the sort order, simply right click in the list, and choose Order. | To change the information being viewed in the list, simply right click in the list, and choose Customize Current View. To change the sort order, simply right click in the list, and choose Order. | ||
| Line 101: | Line 186: | ||
Go To - The Go To feature allows you to open a window for the appropriate item for the highlighted record. | Go To - The Go To feature allows you to open a window for the appropriate item for the highlighted record. | ||
| − | For additional information on the buttons that appear at the top of the window, click here. For information on the menu items that appear under the Tools menu, click here. | + | For additional information on the buttons that appear at the top of the window, [[Buttons#Lease Payment Schedule|click here]]. For information on the menu items that appear under the Tools menu, [[Buttons#Lease Payment Schedule|click here]]. |
The Filter check box allows you to filter the listing of Payments to show only those that meet a certain criteria. When selected, a filter screen will appear, allowing you to choose to see Payments that are due on a certain date, finalized or exported on a certain date, etc. When a filter is active, a check mark will appear in the Filter box. To clear the filter and see all records, click on Filter, then the Clear button the Filter screen, followed by the OK button. | The Filter check box allows you to filter the listing of Payments to show only those that meet a certain criteria. When selected, a filter screen will appear, allowing you to choose to see Payments that are due on a certain date, finalized or exported on a certain date, etc. When a filter is active, a check mark will appear in the Filter box. To clear the filter and see all records, click on Filter, then the Clear button the Filter screen, followed by the OK button. | ||
| + | === Recurrence Page === | ||
| + | The Recurrence Page allows you to identify how often and for how long you wish to pay this Schedule. | ||
| − | + | [[File:New_Lease_Payment_Schedule_Recurrence.JPG]] | |
| − | + | ||
| − | + | ||
| − | + | ||
| − | For information on the buttons that appear at the top of the window, click here. For information on the menu items that appear under the Tools menu, click here. | + | For information on the buttons that appear at the top of the window, [[Buttons#Lease Payment Schedule|click here]]. For information on the menu items that appear under the Tools menu, [[Buttons#Lease Payment Schedule|click here]]. |
| − | === Fields === | + | ==== Fields ==== |
| − | Recurrence Pattern: This allows you to choose how often you wish to pay this Schedule. In the example above, this schedule will be paid on the 20th day of every month. | + | ''Recurrence Pattern'': This allows you to choose how often you wish to pay this Schedule. In the example above, this schedule will be paid on the 20th day of every month. |
| − | Range of recurrence: This section allows you to identify the period during which time you wish Payments to be generated. A start date must be selected and either End after, or End by. The End after options allows you to select how many cheques you wish to cut for the duration of the schedule. By choosing this option, it will automatically display what the last payment date will be. The End by option allows you to select the end of this Schedule. In our example above, the Schedule began on September 1, 2004 and will run until August 31, 2014. | + | ''Range of recurrence'': This section allows you to identify the period during which time you wish Payments to be generated. A start date must be selected and either End after, or End by. The End after options allows you to select how many cheques you wish to cut for the duration of the schedule. By choosing this option, it will automatically display what the last payment date will be. The End by option allows you to select the end of this Schedule. In our example above, the Schedule began on September 1, 2004 and will run until August 31, 2014. |
| − | Paid in advance: Allows you to identify whether the payments are "paid in advance" by leaving the check in the box or paid in arrears by removing the check from the box. This field will determine the period dates which are now part of the Payment information on the Payments page. | + | ''Paid in advance'': Allows you to identify whether the payments are "paid in advance" by leaving the check in the box or paid in arrears by removing the check from the box. This field will determine the period dates which are now part of the Payment information on the Payments page. |
Latest revision as of 10:36, 31 January 2018
Contents |
Adding Lease Payment Schedules
In order to have Lease Payments for a particular Lease, you must first set up a Lease Payment Schedule. No Lease Payments will be created without the Schedule that acts as the "template" for its corresponding Payments. Ad Manager allows you to have multiple Payment Schedules, each with different Payees, different amounts and recurrences as needed.
To add a Lease Payment Schedule, go to the Lease you wish to add a Payment Schedule for. This can be done by using the Find tool or selecting the appropriate Lease from the list of All Leases.
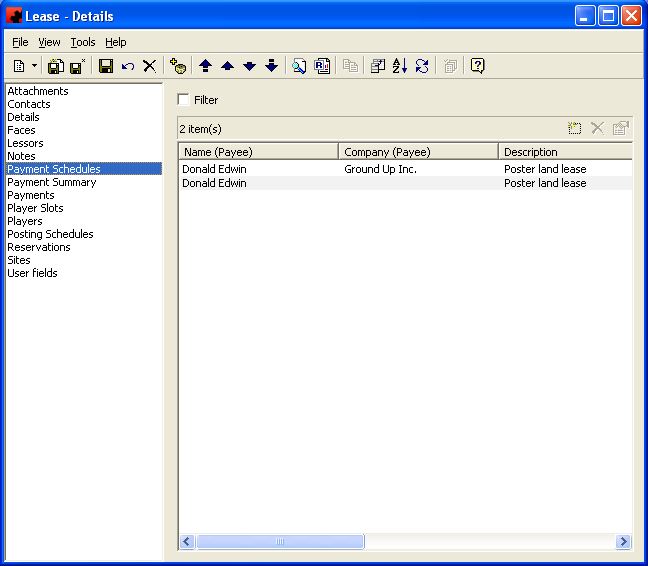
When you have selected the desired Lease, click on the Payment Schedules Page.
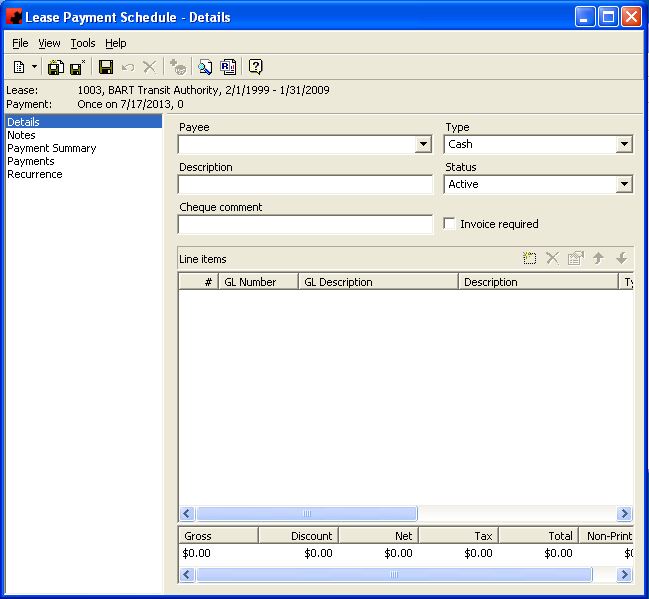
To add a new Payment Schedule, click on the New () button and the following screen will appear.
From this screen you can add a Payment Schedule by selecting the appropriate Payee from the Payee list. If the Payee is not listed, you can add them in by typing the appropriate information. When you hit the Tab key on your keyboard after entering a new Payee, Ad Manager will display a window that allows you to enter in all relevant details about this Payee, including their Tax ID and Vendor Code information. NOTE: Vendor Code is a required field and must be entered. After entering the details, click OK to return to the Payment Schedule.
You can also enter a Description of this Lease Payment, as well as a Cheque Comment. The Description is for internal use, identifying the type of Schedule this is on a listing of Payment Schedules (e.g. Monthly Lease Payment, Annual % Top-Up Payment, etc.), and the Cheque Comment is what can appear as a memo item on the cheque.
From the Type list you can identify whether this lease is for Cash, Trade, or Other.
The Status list allows you to identify whether this Payment Schedule is Active, Cancelled, In Dispute, On Hold or Suspended. NOTE: Only Lease Payments identified as Active can be exported from Ad Manager to your Accounting Package.
You also can identify whether a Lease Payment will only be issued when an Invoice is received from the Payee. Check the box beside Invoice Required to indicate this. NOTE: Any payment with this box checked will not export until the Invoice Received box has been checked and details are entered on the Payment.
Line Items
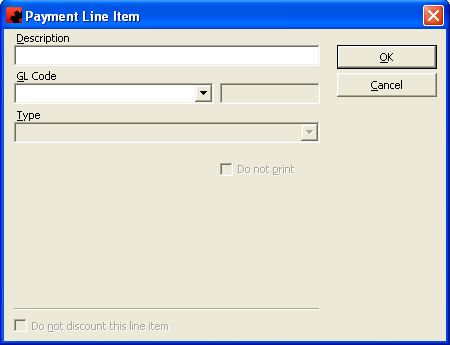
To add Line Items for this Payment Schedule, click the New () button. The following screen will appear.
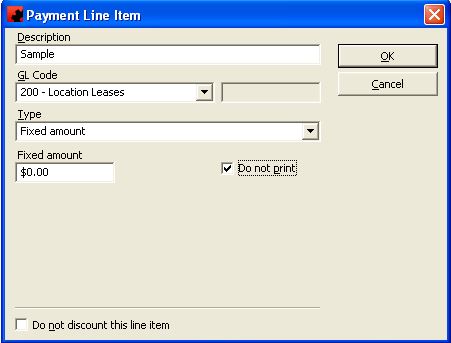
From this screen you enter in a description for the Line item, as well as the GL Code to which this line item is assigned. This GL Code will match an identical Code set up in your Accounting Package. You can specify whether the dollar amount is a fixed amount, a percent of revenue, a percent of a specified amount, or a percent of the subtotal. Depending which of these choices you select, different fields of information will appear for you to fill in. Once you have completed your Line Item information, click OK. You can add additional Line Items as appropriate. You can also identify line items that you do not want to print on the cheque stub, by checking the box "Do not print".
This allows you to set up journal entries that are not part of the printed cheque information, but will be transferred to your accounting package. NOTE: This will only apply if you are printing your cheques using Ad Manager Reports.
NOTE: If the Taxes and Discounts criteria have already been established in the GL Code database of Ad Manager, the percentages will automatically appear and the calculation will be done as the line items for each are added.
Ad Manager processes the Line Items in the order they appear in the list of Line Items. If you have a Line Item that is taking a percentage of a subtotal and it is not in the correct spot, Ad Manager will calculate an incorrect amount. To move a Line up or down on the screen, highlight the Line Item and click the move up () or move down (
) button as appropriate.
Setting Up Recurrence
Once you have completed your Lease Payment details, you can identify the Recurrence for this Payment Schedule. This will determine how often and when the Payments are to be made. To do this, click on the Recurrence Page and the following screen will appear.
From this screen you can identify how often and for how long you wish to pay this Schedule. Do this by first selecting a Recurrence Pattern in the top section of the screen. If the Lease is paid quarterly (Jan 1, Apr 1, etc) for example, the Recurrence Pattern would be Monthly, Day 1 of every 3 months.
In the bottom section of the screen set the Range of Recurrence. This identifies the period during which time you wish Payments to be generated. For example, you might enter the Start Date as January 1, 2003, click the End After and fill in 40 occurrences and the End by date will automatically fill in with the last Payment date, which, in this example will be October 1, 2012.
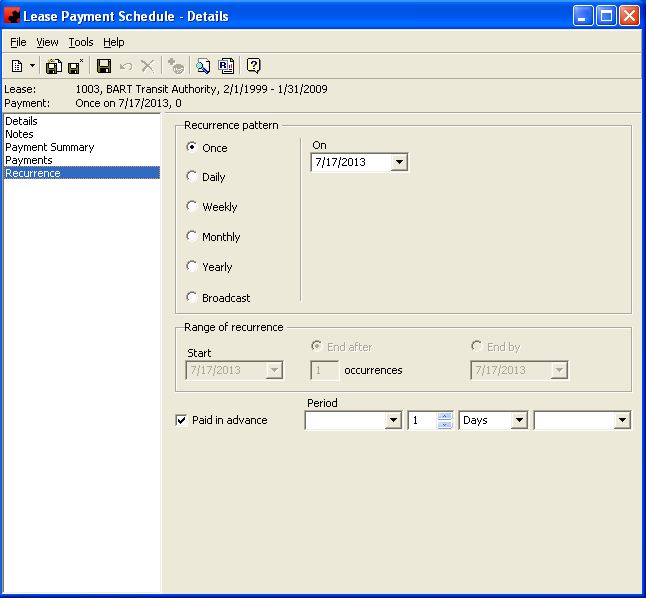
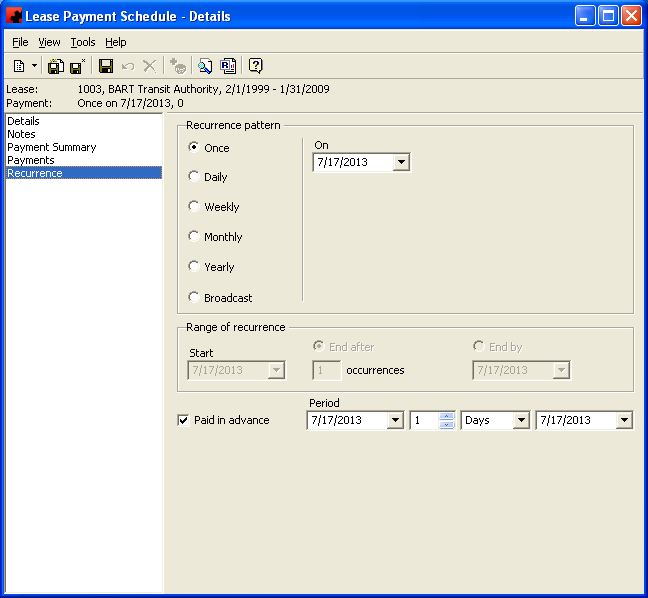
You can also identify if the Payments are "Paid in advance" by leaving the check in the box at the bottom of this screen or paid in arrears by removing the check from the box. To remove the check from the box, click in the box. This field will determine the Period dates which are now part of the Payment information on the Payments page. This information can be contained in your Lease Payment Export to show on the printed cheque. NOTE: If the Payment Range of Recurrence is set up as Once, you must enter the Period dates to which it applies, regardless of whether the "paid in advance" box is checked or not.
Once you have entered the Lease Payment Details and the Recurrence, click the Save button. If you wish to review or verify when Payments are scheduled, go to the Payments Page.
NOTE: No payments will appear on the Payments Page until the Schedule and its Recurrence have been saved.
Marking an Invoice Required
If you have a Lease that requires an Invoice be received prior to payment, you can mark the Invoice received from the Payments Page. Double click the Payment that the Invoice applies to and the screen above will appear. From this screen, click the box beside Invoice Received. Ad Manager will ask you for the Invoice date and number.
Fill this information in and click OK. Click the Save button to keep your changes.
Creating Lease Payments with Escalators
You may find that you will have a Lease signed by the Leasing Department on which escalators have been defined over the term of the Lease. For example, you might have a 20-year Lease that escalates by 5% at the end of every 5 years and you will need to set up the Payment Schedules accordingly. In our example you will have 4 Payments Schedules, each with its own amount, date range, etc. and the Schedules will show the following details:
Year 1 - Year 5 = Initial $$ amount
Year 6 - Year 10 Initial $$ amount + 5% = Second $$ amount
Year 11 - Year 15 Second $$ amount + 5% = Third $$ amount
Year 16 - Year 20 Third $$ amount + 5% = Fourth $$ amount
You will find that the new Duplicate Tool will assist you in setting up these 4 Lease Payment Schedules, making the necessary changes for each escalator such as dollar amount and dates for the Recurrence.
Modifying Lease Payment Schedules
Changing Recurrence Patterns
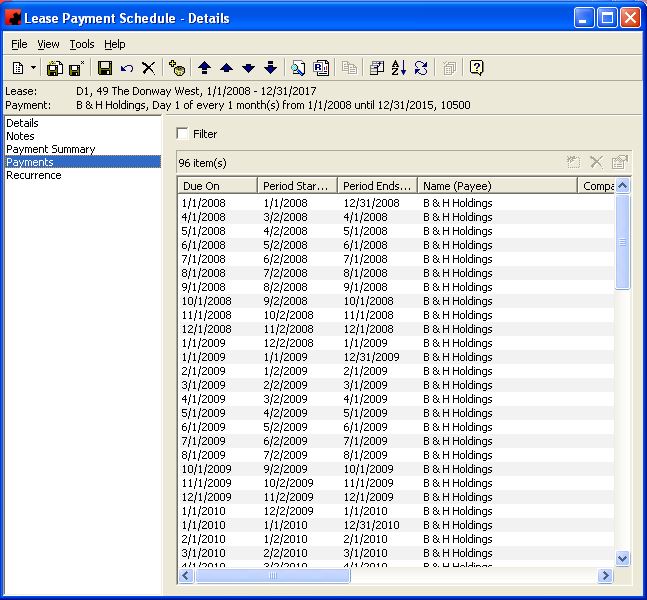
Step one is to check the Payments page of the particular Lease Payment Schedule that you are changing to see if any Payments have been exported from Ad Manager. Find the Lease Payment Schedule and click on the Payments Page.
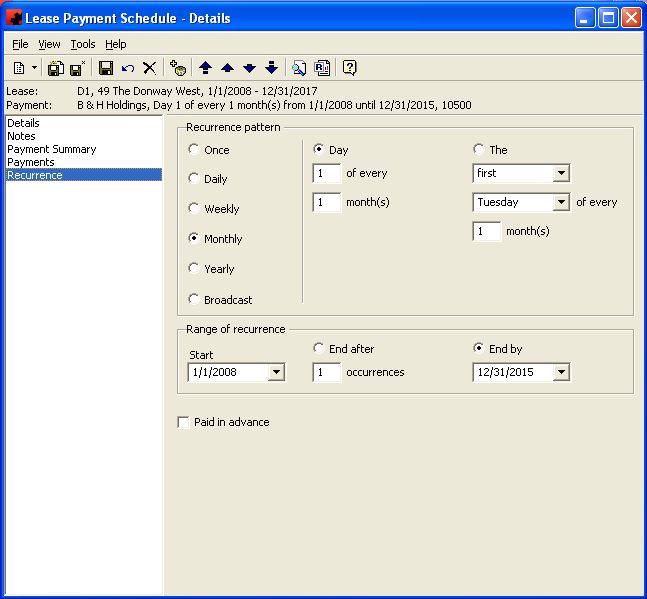
If no Payments have been exported yet from Ad Manager, click the Recurrence page. At the bottom of this screen change the recurrence to reflect the new dates and number of Payments you require.
If Payments have been exported (even one), change the Recurrence as follows:
Start date = date of the next Payment needed (refer back to your original listing to get this date. In our example above it would be 7/25/2005)
Occurrences = Number of Payments you still require
End date = Date you want to end the Payments.
Save the Payment Schedule and check your Payments Page again to ensure that you now have the correct number of remaining Payments you need and no duplication.
Lease Payment Schedule Pages
Details Page
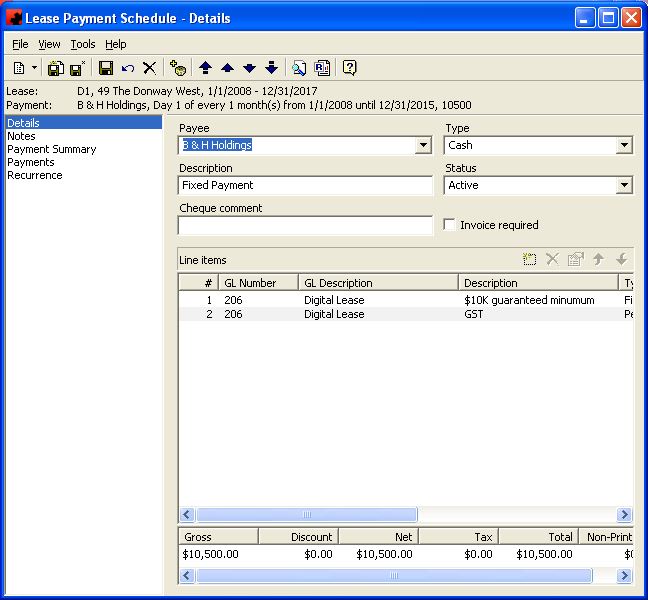
The Details Page is where information about the Lease Payment Schedule is displayed. Information on the status of the Lease Payment Schedule, on who the Payee is, and what the line items for this schedule are can be found on this page.
For information on the buttons that appear at the top of the window, click here. For information on the menu items that appear under the Tools menu, click here.
Fill in the appropriate information for each field. Select the appropriate item from any of the drop down lists (in the boxes) or type in the information if it is not present.
The Line items pane shows a listing of all Line Items that are assigned to this Payment Schedule. The functions available through the buttons immediately above the pane are:
- Add a new Line Item to the Payment Schedule. Click on this button and the Payment Line Item screen will open where you enter in a description for the Line item, as well as the GL Code to which this Line item is assigned.
- Delete the highlighted Line item from the Payment Schedule.
- Edit the information for the highlighted Line item.
- Move the highlighted Line item up in the list of Line items.
- Move the highlighted Line item down in the list of Line items.
Fields
Cheque Comment: This is what you would like to appear as a memo item on the cheque.
Description: This is a quick description of what this Lease Payment pertains to. This description is for internal use only so that a user can identify this particular Schedule on a listing of Payment Schedules.
Invoice Required: This check box allows you to identify whether a Lease Payment will only be issued when an invoice is received from the Payee. To identify that the Lease Payment requires an invoice, check the box next to Invoice Required. Any Payment with this box checked will not export until the Invoice Received Box has been checked and the details are entered on the Payment.
Line Items: This is a listing of items that are included on this Payment Schedule. For information on how to enter line items to a payment schedule, click here.
Payee: This is the person(s) or company that will be paid for this Payment Schedule. You can select the appropriate Payee from the list or add them in by typing the appropriate name in the field.
Status: This is a list allowing you to identify whether the Payment Schedule is Active, Cancelled, In Dispute, On Hold or Suspended. Only Lease Payments identified as Active can be exported from Ad Manager to your accounting package.
Type: This is a list allowing you to identify whether this Lease Payment Schedule is for Cash, Trade, or Other.
At the bottom of the page, you can view a summary identifying all Payments to be made on this Payment Schedule.
Notes Page
For more information on the Notes page, click here.
Payment Summary Page
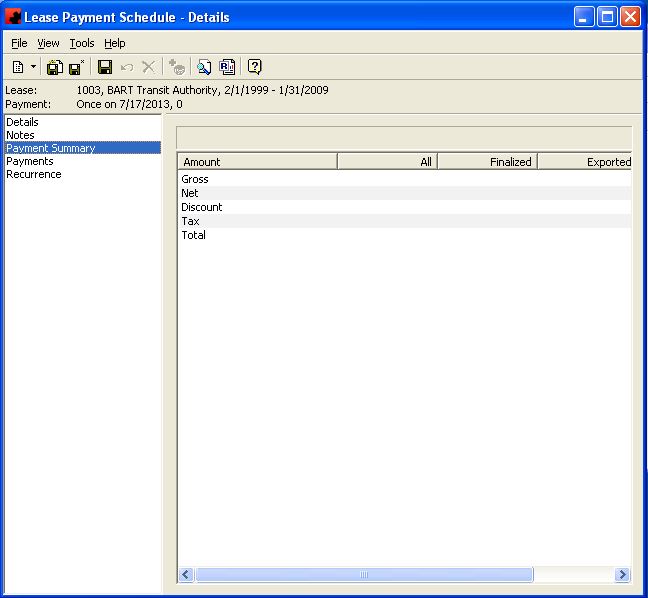
The Payment Summary Page summarizes the various dollar values of all Payments created by the Payment Schedule. From this screen you can see how much money has been Paid, Finalized, Exported, Sent, and the Current Balance Owing.
For additional information on the buttons that appear at the top of the window, click here. For information on the menu items that appear under the Tools menu, click here.
Payments Page
The Payments Page provides a listing of all payments that have been scheduled to be payed for this Lease Payment Schedule.
Tool buttons found at the top of the Lease Payment Schedule - Details screen when you are on the Payments Page:
- Customize Current View allows you to select the columns to display and the order to display them in.
- Order allows you to sort the Payments in the desired order.
- The Refresh button will reload the list of Payments, in the event changes to the Payments have occurred since you visited this page.
- The Update button allows you to select one or more Payments and change information on them. All highlighted Payments will be changed to reflect the items selected.
The functions available through the buttons immediately above the Payments pane are:
- Delete the highlighted Payment from this Payment Schedule. Highlight the item and click the Delete button.
- Opens the Payment - Details window to allow you to review or change any information related to the payment.
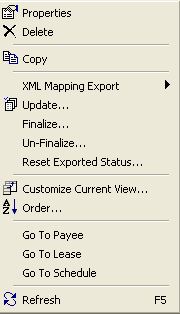
Right clicking on the list of Payments will display this menu. From here you can change the due date of a payment, the status of a payment as well as any line items by using the Update option, as well as, finalize, un-finalize, and reset the exported status of a payment or group of highlighted payments.
To change the information being viewed in the list, simply right click in the list, and choose Customize Current View. To change the sort order, simply right click in the list, and choose Order.
Update - The Update menu item allows you to to modify a property (or properties) for one or more highlighted Payments.
Finalize - Finalizing a Payment will prevent you from making additional changes to it. This can be done manually prior to a Payment Export, by using this tool, or it will automatically occur during the Export. If you wish to finalize payments using this tool, highlight them first, then right-click to get this menu option. Once finalized, the Payment is marked as Finalized and will display a unique Transaction ID as well as an Check Number.
Un-Finalize - If a Payment has incorrectly been marked as Finalized, this tool allows you to un-finalize it. Ad Manager will remove the Finalized status of the Payment, but will still show a unique Transaction ID, indicating this Payment was Finalized at one time.
Reset Exported Status - If a Payment has been Exported incorrectly, this tool allows you to mark it as un-exported, so that you may Export it again at a later date.
Go To - The Go To feature allows you to open a window for the appropriate item for the highlighted record.
For additional information on the buttons that appear at the top of the window, click here. For information on the menu items that appear under the Tools menu, click here.
The Filter check box allows you to filter the listing of Payments to show only those that meet a certain criteria. When selected, a filter screen will appear, allowing you to choose to see Payments that are due on a certain date, finalized or exported on a certain date, etc. When a filter is active, a check mark will appear in the Filter box. To clear the filter and see all records, click on Filter, then the Clear button the Filter screen, followed by the OK button.
Recurrence Page
The Recurrence Page allows you to identify how often and for how long you wish to pay this Schedule.
For information on the buttons that appear at the top of the window, click here. For information on the menu items that appear under the Tools menu, click here.
Fields
Recurrence Pattern: This allows you to choose how often you wish to pay this Schedule. In the example above, this schedule will be paid on the 20th day of every month.
Range of recurrence: This section allows you to identify the period during which time you wish Payments to be generated. A start date must be selected and either End after, or End by. The End after options allows you to select how many cheques you wish to cut for the duration of the schedule. By choosing this option, it will automatically display what the last payment date will be. The End by option allows you to select the end of this Schedule. In our example above, the Schedule began on September 1, 2004 and will run until August 31, 2014.
Paid in advance: Allows you to identify whether the payments are "paid in advance" by leaving the check in the box or paid in arrears by removing the check from the box. This field will determine the period dates which are now part of the Payment information on the Payments page.
