Difference between revisions of "Players"
Pat.wilkin (Talk | contribs) |
m |
||
| (15 intermediate revisions by 2 users not shown) | |||
| Line 1: | Line 1: | ||
| − | In Ad Manager, users can identify their digital inventory. This inventory is located under a [[Site]] as "Players". Each Player in Ad Manager links to a Player/Output combination in [[http://www.scala.com Scala]] Content Manager. | + | In Ad Manager Digital (1), users can identify their digital inventory. This inventory is located under a [[Site]] as "Players". Each Player in Ad Manager links to a Player/Output combination in [[http://www.scala.com Scala]] Content Manager. |
== Attachments == | == Attachments == | ||
| − | + | For more information on the Attachments page, [[Attachments page|click here]] | |
| − | + | ||
| − | + | ||
| − | + | ||
| − | + | ||
| − | + | ||
| − | + | ||
| − | + | ||
| − | + | ||
| − | + | ||
| − | + | ||
| − | + | ||
| − | + | ||
| − | + | ||
| − | + | ||
| − | + | ||
| − | For | + | |
== Categories == | == Categories == | ||
| Line 25: | Line 9: | ||
Items in the Conditions box on the left side of the screen are considered to be positive attributes for this Player. Items in the Restrictions box on the right side of the screen are considered to be negative attributes. | Items in the Conditions box on the left side of the screen are considered to be positive attributes for this Player. Items in the Restrictions box on the right side of the screen are considered to be negative attributes. | ||
| − | + | [[File:New_Player_Categories.JPG]] | |
The functions available through the buttons immediately above the Categories pane are: | The functions available through the buttons immediately above the Categories pane are: | ||
| − | [[File:New_add_button.JPG]]- Add a new Condition or Restriction to the Player. | + | [[File:New_add_button.JPG]]- Add a new Condition or Restriction to the Player. To add a new condition (positive attribute), select the [[File:New_add_button.JPG]] above the left box. To add a restriction (negative attribute), select the [[File:New_add_button.JPG]] above the right box. |
| − | [[File:New_delete_button.JPG]]- Delete the | + | [[File:New_delete_button.JPG]]- Delete the selected Condition or Restriction from the Player. To remove a condition (positive attribute), select the [[File:New_delete_button.JPG]] above the left box. To remove a restriction (negative attribute), select the [[File:New_delete_button.JPG]] above the right box. |
For additional information on the buttons that appear at the top of the window, [[Buttons#Face|click here]]. For information on the menu items that appear under the Tools menu, [[FAQ and General Info#Face Tools Menu|click here]]. | For additional information on the buttons that appear at the top of the window, [[Buttons#Face|click here]]. For information on the menu items that appear under the Tools menu, [[FAQ and General Info#Face Tools Menu|click here]]. | ||
| − | If the word "Yes" appears in either Inherited column, this indicates that the condition or restriction has been set at the Site level, and it applies to all Players at the Site. | + | If the word "Yes" appears in either Inherited column, this indicates that the condition or restriction has been set at the Site level, and it applies to all Players at the Site. Site Conditions or Restrictions cannot be deleted from the Player. It must be done at the Site Categories page. |
== Classification == | == Classification == | ||
| − | The Classification Page | + | The Classification Page is used to assign specific characteristics to a Player. These Player classifications can be used when scheduling Players to Subcontracts (Digital) by specifying the target classification. |
| − | + | [[File:New_Player_Classification.JPG]] | |
The functions available through the buttons immediately above the Classification pane are: | The functions available through the buttons immediately above the Classification pane are: | ||
| − | [[File:New_properties_button.JPG]]- The properties button | + | [[File:New_properties_button.JPG]]- The properties button is used to select a classification value for the classification item currently selected. |
For additional information on the buttons that appear at the top of the window, [[Buttons#Face|click here]]. For information on the menu items that appear under the Tools menu, [[FAQ and General Info#Face Tools Menu|click here]]. | For additional information on the buttons that appear at the top of the window, [[Buttons#Face|click here]]. For information on the menu items that appear under the Tools menu, [[FAQ and General Info#Face Tools Menu|click here]]. | ||
| − | The pane in the bottom portion of the screen shows each of the classification categories that | + | The pane in the bottom portion of the screen shows each of the classification categories that have been set up (for information on adding Classification Categories, see [[Custom classifications|Custom Classifications]]). |
| − | To enter a value, double click on the classification | + | To enter a value, double click on the classification, and select the value from the list. If the value is not on the list, it must be added from the Classifications Table (for information on adding Classification Values, see [[Custom classifications|Custom Classifications]]). |
==Day Parts== | ==Day Parts== | ||
| − | The Day Parts page provides a listing of all Day Parts that have been created when defining the [[Slot Structure]]. | + | The Day Parts page provides a listing of all Day Parts that have been created when defining the [[Slot Structure]]. Day Parts cannot be added, nor should they be eddited or removed from this screen. To change Day Parts, it must be done by creating a new [[Slot Structure]] and applying it to the Player. |
| − | + | [[File:New_Player_Day_Parts.JPG]] | |
The Day Parts screen shows the details of all Day Parts that have been assigned to a Player. It will show when they were active, the Frame they are scheduled for, the Name of the Day Part, the maximum loop length for this Day Part, the duration that this Day Part covers over the course of the day, and the frequency of plays that can be expected for a campaign scheduled to this Day Part. | The Day Parts screen shows the details of all Day Parts that have been assigned to a Player. It will show when they were active, the Frame they are scheduled for, the Name of the Day Part, the maximum loop length for this Day Part, the duration that this Day Part covers over the course of the day, and the frequency of plays that can be expected for a campaign scheduled to this Day Part. | ||
| + | |||
| + | The functions available through the buttons immediately above the Day Parts pane are: | ||
| + | |||
| + | [[File:New_properties_button.JPG] To view more details about the Day Part, select it in the list and click the Properties button, or double click it in the list. | ||
| + | |||
| + | The Filter check box is used to filter the listing of Day Parts to show only those that meet a certain criteria. When selected, a filter screen will appear, to enter criteria in order to see Day Parts with particular active from/active to dates, associated with a particular Frame, etc. When a filter is active, a check mark will appear in the filter box. To clear the filter and see all records, click on Filter, then the Clear button on the Filter screen, followed by the OK button. | ||
==Details== | ==Details== | ||
The Details page shows the basic information about the Player. | The Details page shows the basic information about the Player. | ||
| − | + | [[File:New_Player_Details.JPG]] | |
For information on the buttons that appear at the top of the window, [[Buttons#Face|click here]]. For information on the menu items that appear under the Tools menu, [[FAQ and General Info#Face Tools Menu|click here]]. | For information on the buttons that appear at the top of the window, [[Buttons#Face|click here]]. For information on the menu items that appear under the Tools menu, [[FAQ and General Info#Face Tools Menu|click here]]. | ||
| − | Fill in the appropriate information for each field. Select the appropriate item from any of the drop down lists (in the [[File:New_dropdown_button.JPG]] boxes) or | + | Fill in the appropriate information for each field. Select the appropriate item from any of the drop down lists (in the [[File:New_dropdown_button.JPG]] boxes) or enter the information if it is not present. |
=== Fields === | === Fields === | ||
| Line 75: | Line 65: | ||
Output: This is the output number of the Player as it appears in Scala Content Manager. This name must match in order for data to be transferred between the two systems. | Output: This is the output number of the Player as it appears in Scala Content Manager. This name must match in order for data to be transferred between the two systems. | ||
| − | Description: This is where | + | Description: This is where a desired descriptive name of the player by which it can be referred is entered. This can be the same or different from the Name field. |
| − | Area: This is where | + | Area: This is where users specify the predetermined geographic area where this Player is located. Selecting an Area from the list associates the Player with a Market. |
Screens: This is the number of screens that are controlled by the Player/Output. | Screens: This is the number of screens that are controlled by the Player/Output. | ||
| Line 83: | Line 73: | ||
==Exceptions== | ==Exceptions== | ||
| − | This page shows any issues that may have occurred at the Player. This list can be manually populated | + | This page shows any issues that may have occurred at the Player. This list can be manually populated in order to provide a history of any issues. As well, a list of Player Exceptions can be displayed on a Digital Proof of Play report. |
| − | + | [[File:New_Player_Exceptions.JPG]] | |
| + | The functions available through the buttons immediately above the Player Exception pane are: | ||
| − | [[File:New_add_button.JPG]]- Add a new exception for this Player. | + | [[File:New_add_button.JPG]]- Add a new exception for this Player. Click the New button and choose either "New" to create a new Exception or "Select" to pick from an existing list of Player Exceptions. When "New" is chosen, a window will appear to enter the information about the issue that occurred. |
| − | [[File: | + | [[File:New_Player_Exceptions_New.JPG]] |
| − | [[File:New_properties_button.JPG]]- Open the document or File item. | + | |
| + | === Fields === | ||
| + | Description: Enter a description to identfy the Exception | ||
| + | From: Enter the date and time that the Exception started | ||
| + | To: Enter the date and time that the Exception ended | ||
| + | Reported on: Enter the date the Exception was reported. By: Enter the identity of the person who reported the Exception | ||
| + | Details: This is a free form area where additional information may be entered concering the Exeption. | ||
| + | |||
| + | When "Select" is chosen, a Filter window will appear to enter criteria to find the existing one. | ||
| + | |||
| + | [[File:New_Player_Exceptions_Select.JPG]] | ||
| + | |||
| + | |||
| + | [[File:New_delete_button.JPG]]- Delete an exception for this Player. Select the item, and click the Delete button. | ||
| + | |||
| + | [[File:New_properties_button.JPG]]- Open the document or File item. Select the item and click the properties button. | ||
| + | |||
| + | The Filter check box is used to filter the listing of Player Exceptions to show only those that meet a certain criteria. When selected, a filter screen will appear, to enter criteria in order to see Player Exceptions with particular start dates, end dates, descriptions, etc. When a filter is active, a check mark will appear in the filter box. To clear the filter and see all records, click on Filter, then the Clear button on the Filter screen, followed by the OK button. | ||
== Inactivity == | == Inactivity == | ||
| − | The Inactivity Page maintains a history of all dates that a Site or | + | The Inactivity Page maintains a history of all dates that a Site or Player has been/will be inactive. |
| − | + | [[File:New_Player_Inactivity.JPG]] | |
The functions available through the buttons immediately above the Inactivity pane are: | The functions available through the buttons immediately above the Inactivity pane are: | ||
| − | [[File:New_add_button.JPG]]- To add an inactivity, click the New button. When selected, a screen will appear | + | [[File:New_add_button.JPG]]- To add an inactivity, click the New button. When selected, a screen will appear to enter the reason for the inactivity, the date range the Player will be inactive, and any other notes that need to be maintained about this inactive time frame. |
| − | [[File:New_delete_button.JPG]]- To delete an inactivity period from the list, | + | [[File:New_delete_button.JPG]]- To delete an inactivity period from the list, select it and click on the Delete button. A Site Inactivity cannot be deleted from the Player. It must be done at the Site Inactivity page. |
| − | [[File:New_properties_button.JPG]]- To modify an inactivity period, | + | [[File:New_properties_button.JPG]]- To modify an inactivity period, select it and click the Properties button. Make the appropriate changes to the dates or notes, and click the Save ([[File:New_save_button.JPG]]) button. |
For additional information on the buttons that appear at the top of the window, [[Buttons#Face|click here]]. For information on the menu items that appear under the Tools menu, [[FAQ and General Info#Face Tools Menu|click here]]. | For additional information on the buttons that appear at the top of the window, [[Buttons#Face|click here]]. For information on the menu items that appear under the Tools menu, [[FAQ and General Info#Face Tools Menu|click here]]. | ||
| Line 111: | Line 119: | ||
Inactivity items with a "Yes" in the Site column indicate they are Site inactivities and affect all Players at the Site. | Inactivity items with a "Yes" in the Site column indicate they are Site inactivities and affect all Players at the Site. | ||
| − | The Filter check box | + | The Filter check box is used to filter the listing of Inactivity periods to show only those that meet a certain criteria. When selected, a filter screen will appear, to enter criteria in order to see Inactivity periods with particular start dates, end dates, durations, etc. When a filter is active, a check mark will appear in the filter box. To clear the filter and see all records, click on Filter, then the Clear button on the Filter screen, followed by the OK button. |
==Indoor Maps== | ==Indoor Maps== | ||
| − | The Indoor Maps page | + | The Indoor Maps page is used to specify the location of the Player on maps that are used to display the location of indoor or place based media. A new map cannot be imported from the Indoor Map page; users can only select an existing map on which to position the Player. To import a new map, it must be done from the [[Indoor Maps]] database. |
| − | + | [[File:New_Player_Indoor_Maps.JPG]] | |
| − | |||
| − | + | The functions available through the buttons immediately above the Indoor Map pane are: | |
| − | + | [[File:New_add_button.JPG]]- To add an Indoor Map, click the New button. When selected, a screen will appear asking for the Place from which to load the map. Enter the filter criteria, click OK, select the map to be loaded and click OK again. | |
| − | [[File: | + | [[File:New_Player_Indoor_Maps_Details.JPG]] |
| − | [[File:New_properties_button.JPG]]- To modify an Indoor Map, | + | When the map of the Place is displayed, in order to identify the position of the Player, click the Set Coordinates button([[File:New_set_coordinates_button.JPG]]). Move the cursor to the desired location on the map and click. The player location will be marked with a "[" icon. To rotate the icon counterclockwise enter the desired amount to rotate it in the Angle (Degrees) box. Once the Player is positioned and a Name has been entered, click the Save and Close button. |
| + | |||
| + | To identify this map as the Default one, click the Tools menu and select "Make Default". | ||
| + | |||
| + | [[File:New_delete_button.JPG]]- To delete an Indoor Map from the list, select it and click on the Delete button. | ||
| + | |||
| + | [[File:New_properties_button.JPG]]- To modify an Indoor Map, select it and click the Properties button. Make the appropriate changes and click the Save ([[File:New_save_button.JPG]]) button. | ||
== Line of Sight == | == Line of Sight == | ||
| − | Ad Manager allows users to establish line of sight relationships between | + | Ad Manager allows users to establish line of sight relationships between Players. When the scheduling of Reservations is done to Players that have a line of sight relationship Ad Manager will automatically check those Players to ensure there are no Advertiser or Category conflicts. |
| − | + | [[File:New_Player_Line_of_Sight.JPG]] | |
The functions available through the buttons immediately above the Line Of Sight pane are: | The functions available through the buttons immediately above the Line Of Sight pane are: | ||
| − | [[File:New_add_button.JPG]]- | + | [[File:New_add_button.JPG]]- To add a new line of sight relationship between the current Player and another, click the New button. Enter search criteria to filter for the other Player(s) and click <OK>. Select the Player(s) from the list and click <OK>. Ad Manager automatically enters the inverse relationship between the two Players. |
| − | [[File:New_delete_button.JPG]]- | + | [[File:New_delete_button.JPG]]- To delete a line of sight relationship, select the Player(s) in the pane and click the Delete button. Ad Manager automatically deletes the inverse relationship between the two Players. |
| − | [[File:New_properties_button.JPG]]- | + | [[File:New_properties_button.JPG]]- To view information related to the Player that is in line of sight, select it and click the Properties button. |
For additional information on the buttons that appear at the top of the window, [[Buttons#Face|click here]]. For information on the menu items that appear under the Tools menu, [[FAQ and General Info#Face Tools Menu|click here]]. | For additional information on the buttons that appear at the top of the window, [[Buttons#Face|click here]]. For information on the menu items that appear under the Tools menu, [[FAQ and General Info#Face Tools Menu|click here]]. | ||
| − | The Filter check box allows you to filter the listing of Players to show only those that meet a certain criteria. When selected, a filter screen will appear, | + | The Filter check box allows you to filter the listing of Players in line of sight to show only those that meet a certain criteria. When selected, a filter screen will appear, in which to enter criteria to choose to see Players related to a particular market, area, facing a particular way, etc. When a filter is active, a check mark will appear in the filter box. To clear the filter and see all records, click on Filter, then the Clear button on the Filter screen, followed by the OK button. |
== Map == | == Map == | ||
| − | The Player Map Page | + | The Player Map Page allows the Player to be viewed on a map and to edit the latitude and longitude information for the Player (this allows users to position a Player on a Site in a different position than the other Players associated with it) directly on the map. |
| − | + | [[File:New_Player_Map.JPG]] | |
Tool buttons specific to the Player Map Page: | Tool buttons specific to the Player Map Page: | ||
| − | [[File:New_zoom_in.JPG]]- | + | [[File:New_zoom_in.JPG]]- Click the Zoom In button, then click on the map to see the map zoomed in twice as close as before, centered where the map was clicked. By holding the left mouse button down and dragging the mouse, a box is drawn on the map. Release the left mouse button and Ad Manager will zoom into the specified area. |
| − | [[File:New_zoom_out_button.JPG]]- | + | [[File:New_zoom_out_button.JPG]]- Click the Zoom Out button, then click on the map to see the map zoomed out twice as much as before, centered where the map was clicked. By holding the left mouse button down and dragging the mouse, a box is drawn on the map. Release the left mouse button and Ad Manager will shrink the map to the size specified by the box. |
| − | [[File:New_pan_button.JPG]]- The Pan | + | [[File:New_pan_button.JPG]]- The Pan button is used to move the map to see different areas not visible on the screen. Click the Pan button, put your mouse over the map, hold down the left mouse button and drag the mouse. The map will move with the Pan tool; release the mouse button and Ad Manager will draw the new area of the map. |
| − | [[File:New_label_map_button.JPG]]- The Label Map Feature | + | [[File:New_label_map_button.JPG]]- The Label Map Feature button is used to click on an item on the map, and have Ad Manager automatically label it. Click the Label Map Feature button, then click on the map where the label is required and the label will appear. Note: Prior to using this button, it is suggested that users ensure that the labelling features of the Map Layers have been set up under Tools>Options>Map Layers in Ad Manager's main Explorer Window. Note: Labels cannot be moved once they are added to the map. To remove the labels, click the Tools Menu and select "Clear Labels". Ad Manager will remove all labels that do not have the "Auto-Label" check box active on the map layer. |
| − | [[File:New_set_lat_long_button.JPG]]- The Set the Latitude/Longitude of the Player | + | [[File:New_set_lat_long_button.JPG]]- The Set the Latitude/Longitude of the Player buttonl is used to "geocode" your Player quickly, easily and accurately. Using the other tools, find the correct location of this Player on the map, select this button and click on the appropriate spot on the map. Ad Manager will automatically update the latitude and longitude of this Player, and place a symbol there, indicating this is where the Player is located. |
| − | [[File:New_centre_button.JPG]]- The Center the Map on this | + | [[File:New_centre_button.JPG]]- The Center the Map on this Player is used to reposition the map with this Player centered. |
For additional information on the buttons that appear at the top of the window, [[Buttons#Site|click here]]. For information on the menu items that appear under the Tools menu, [[FAQ and General Info#Site Tools Menu|click here]]. | For additional information on the buttons that appear at the top of the window, [[Buttons#Site|click here]]. For information on the menu items that appear under the Tools menu, [[FAQ and General Info#Site Tools Menu|click here]]. | ||
| Line 177: | Line 190: | ||
== Notes == | == Notes == | ||
| − | + | For more information on the Notes page, [[Notes page|click here]]. | |
| − | + | ||
| − | + | ||
| − | + | ||
| − | For information on the | + | |
| − | + | ||
| − | + | ||
== Player Slots == | == Player Slots == | ||
| − | The Player Slots page provides a listing of all saleable advertising opportunities that have been created when defining the [[Slot Structure]]. Player Slots are single Day Parts, Day Parts that have been combined so they can be sold as a unit, or they can be Triggers. A Player Slot is what | + | The Player Slots page provides a listing of all saleable advertising opportunities that have been created when defining the [[Slot Structure]]. Player Slots are single Day Parts, Day Parts that have been combined so they can be sold as a unit, or they can be Triggers. A Player Slot is what is sold, and what is ultimately scheduled on a Subcontract (Digital). Player Slots cannot be added, edited or removed from this screen. If you wish to change Player Slots, this must be done by creating a new Slot Structure and applying it to the Player. |
| − | + | [[File:New_Player_Player_Slots.JPG]] | |
The Player Slots screen shows the details of all Player Slots that have been assigned to a Player. It will show when they were active, the Frame they are scheduled for, the Name of the Player Slot, the maximum loop length for this Player Slot, the duration that this Player Slot covers over the course of the day, and the frequency of plays that can be expected for a campaign scheduled to this Player Slot. | The Player Slots screen shows the details of all Player Slots that have been assigned to a Player. It will show when they were active, the Frame they are scheduled for, the Name of the Player Slot, the maximum loop length for this Player Slot, the duration that this Player Slot covers over the course of the day, and the frequency of plays that can be expected for a campaign scheduled to this Player Slot. | ||
| − | + | The functions available through the buttons immediately above the Player Slots pane are: | |
| − | + | [[File:New_properties_button.JPG]] - To view more details related to a particular Player Slot, select it in the list and click the Properties button; or double click the Player Slot in the list. | |
| − | + | The Filter check box is used to filter the listing of Player Slots to show only those that meet a certain criteria. When selected, a filter screen will appear, to enter criteria in order to see Player Slots with particular active from/active to dates, associated with a particular Frame, available, etc. When a filter is active, a check mark will appear in the filter box. To clear the filter and see all records, click on Filter, then the Clear button on the Filter screen, followed by the OK button. | |
| − | + | == Playlists == | |
| + | The Playlists page displays a listing of all Playlists that are to be send to Scala Content Manager. Each Playlist contains all Reservations that will play as part of a loop for the date range specified. Every time a new Reservation is scheduled to a Player, Ad Manager modifies all affected Playlists automatically. | ||
| − | [[File: | + | [[File:New_Player_Playlists.JPG]] |
| + | The listing of Playlists shows information about when a Playlist will start playing, when it will stop playing and the Frame and Day Part affected. The list will also display the number of items that are scheduled to play in the loop, as well as the amount of time the loop will take to play once. Playlists cannot be added or deleted from here. | ||
| − | + | The functions available through the buttons immediately above the Playlists pane are: | |
| − | + | [[File:New_properties_button.JPG]] - To view more details related to a particular Playlist, select it in the list and click the Properties button; or double click the Playlist in the list. | |
| − | |||
| − | + | [[File:New_Player_Playlists_Details.JPG]] | |
| − | + | ||
| − | + | The Playlist screen is used to view the Reservations that are to play for the selected time frame, as well as to determine the order of play. | |
| − | The | + | === Fields === |
| + | Loop Structure: The user can assign a Loop Structure to a Playlist. Doing so will have the Reservations play in a specific order, based on the Loop Segment assigned to each item on a Subcontract (Digital). To apply a loop structure, select it from the list of Loop Structures, go to the Tools menu and click "Apply Loop Structure". | ||
| − | + | Auto-shuffle: This feature is used to randomize the Playlist each time through the loop. | |
| − | + | Sequence approved: This is used to mark that the Playlist has been reviewed and put into the desired order. If a new item is scheduled to the Playlist, the Sequence approved is removed so the user knows the Playlist needs to be approved again. | |
| − | The Playlist | + | Entries: The Entries window shows the Reservations in the Playlist and the order that they will play. If there are Reservations that are in conflict with items immediately adjacent to them, a red flag ([[File:New_red_flag_button.JPG]]) will appear. This indicates that the Reservations should be separated, if possible. |
| − | + | The functions available through the buttons immediately above the Entries pane are: | |
| − | + | ||
| − | + | [[File:New_properties_button.JPG]]- To see more detail about a Playlist Reservation, select it and click the properties button, or by double clicking the Playlist Reservation. | |
| − | + | [[File:New_move_up_button.JPG]]- The Move Up button is used to move the highlighted Playlist Reservation up in the order of Playlist Reservations. | |
| − | + | [[File:New_move_down_button.JPG]]- The Move Down button is used to move the highlighted Playlist Reservation down in the order of Playlist Reservations. | |
| − | + | Adjacency constraints: When a Reservation is selected in the Entries window, any Reservations in the Playlist that will generate an Adjacency constraint will be listed. To have Ad Manager change the order of Reservations to remove the conflict, go to the Tools menu and select "Re-shuffle". | |
| − | + | The Filter check box is used to filter the listing of Playlists to show only those that meet a certain criteria. When selected, a filter screen will appear, to enter criteria in order to see Playlists with particular start dates, end dates, of a certain length, with a certain number of Entries, etc. When a filter is active, a check mark will appear in the filter box. To clear the filter and see all records, click on Filter, then the Clear button on the Filter screen, followed by the OK button. | |
| − | + | ||
| − | + | ||
| − | + | ||
| − | + | ||
== Reservations == | == Reservations == | ||
| − | The Reservations page shows a listing of all Subcontract Reservations that have been scheduled to Player Slots on this Player. | + | The Reservations page shows a listing of all Subcontract(Digital) Reservations that have been scheduled to Player Slots on this Player. Reservations cannot be added to the Player here. |
| − | + | [[File:New_Player_Reservations.JPG]] | |
| − | + | The functions available through the buttons immediately above the Reservations pane are: | |
| − | [[File: | + | [[File:New_delete_button.JPG]]- To delete an unpublished Reservation, select the Reservation in the pane and click the Delete button. |
| + | [[File:New_properties_button.JPG]]- To view additional information related to the Reservation, select it and click the Properties button, or double click the Reservation in the list. | ||
| + | |||
| + | The Filter check box is used to filter the listing of Reservations to show only those that meet a certain criteria. When selected, a filter screen will appear, to enter criteria in order to see Reservations with particular start dates, end dates, of a certain length, with a Media Item assigned, associated with a particular Contract, etc. When a filter is active, a check mark will appear in the filter box. To clear the filter and see all records, click on Filter, then the Clear button on the Filter screen, followed by the OK button. | ||
== Slot Structure Assignments == | == Slot Structure Assignments == | ||
The Slot Structure Assignments page displays a list of all [[Slot Structure assignments]] that have been applied to this Player. Each [[Slot Structure]] will define the Day Parts, Triggers and Player Slots for this Player. | The Slot Structure Assignments page displays a list of all [[Slot Structure assignments]] that have been applied to this Player. Each [[Slot Structure]] will define the Day Parts, Triggers and Player Slots for this Player. | ||
| − | + | [[File:New_Player_Slot_Structure_Assignments.JPG]] | |
| − | + | The functions available through the buttons immediately above the Slot Structure Assignments pane are: | |
| − | [[File: | + | [[File:New_add_button.JPG]]- To assign a Slot Structure to the Player, click the New button. When selected, enter the date this Slot Structure takes effect for this Player, and select the Slot Structure to use. |
| − | [[File:New_properties_button.JPG]]- To modify a Slot Structure Assignment for a Slot Structure that has not had any scheduling done for this Player, | + | [[File:New_delete_button.JPG]]- To delete a Slot Structure Assignment that has not had any scheduling done for this Player,select it and click the Delete button. |
| + | |||
| + | [[File:New_properties_button.JPG]]- To modify a Slot Structure Assignment for a Slot Structure that has not had any scheduling done for this Player, select it and click the Properties button. Make the appropriate changes to the dates or notes, and click the Save ([[File:New_save_button.JPG]]) button. The Properties button can also be used to view more detail about a selected Slot Structure Assignment. | ||
| + | |||
| + | The Filter check box is used to filter the listing of Slot Structure Assignments to show only those that meet a certain criteria. When selected, a filter screen will appear, to enter criteria in order to see Slot Structure Assignments with particular start dates, end dates, in effect dates, assigned, etc. When a filter is active, a check mark will appear in the filter box. To clear the filter and see all records, click on Filter, then the Clear button on the Filter screen, followed by the OK button. | ||
== Triggers == | == Triggers == | ||
| − | The Triggers page provides a listing of all Triggers that have been created when defining the Slot Structure. | + | The Triggers page provides a listing of all Triggers that have been created when defining the Slot Structure. Triggers cannot be added nor should they be removed or edited from this screen. To change Triggers, it must be done by creating a new Slot Structure and applying it to the Player. |
| − | + | [[File:New_Player_Triggers.JPG]] | |
The Triggers screen shows the details of all Triggers that have been assigned to a Player. It will show when they were active, the Frame they are scheduled for, the Name of the Trigger, the maximum loop length for this Trigger, the duration that this Trigger covers over the course of the day, and the frequency of plays that can be expected for a campaign scheduled to this Trigger. | The Triggers screen shows the details of all Triggers that have been assigned to a Player. It will show when they were active, the Frame they are scheduled for, the Name of the Trigger, the maximum loop length for this Trigger, the duration that this Trigger covers over the course of the day, and the frequency of plays that can be expected for a campaign scheduled to this Trigger. | ||
| + | The functions available through the buttons immediately above the Triggers pane are: | ||
| + | |||
| + | [[File:New_properties_button.JPG]] - To view more details about the Trigger, select it in the list and click the Properties button. | ||
| + | |||
| + | The Filter check box is used to filter the listing of Triggers to show only those that meet a certain criteria. When selected, a filter screen will appear, to enter criteria in order to see Triggers with particular Active from dates, Active to dates, only those that are Active, associated with a particular Frame, etc. When a filter is active, a check mark will appear in the filter box. To clear the filter and see all records, click on Filter, then the Clear button on the Filter screen, followed by the OK button. | ||
== User Fields == | == User Fields == | ||
For more information on the User fields page, [[User fields page|click here]]. | For more information on the User fields page, [[User fields page|click here]]. | ||
Latest revision as of 15:01, 25 November 2015
In Ad Manager Digital (1), users can identify their digital inventory. This inventory is located under a Site as "Players". Each Player in Ad Manager links to a Player/Output combination in [Scala] Content Manager.
Contents |
Attachments
For more information on the Attachments page, click here
Categories
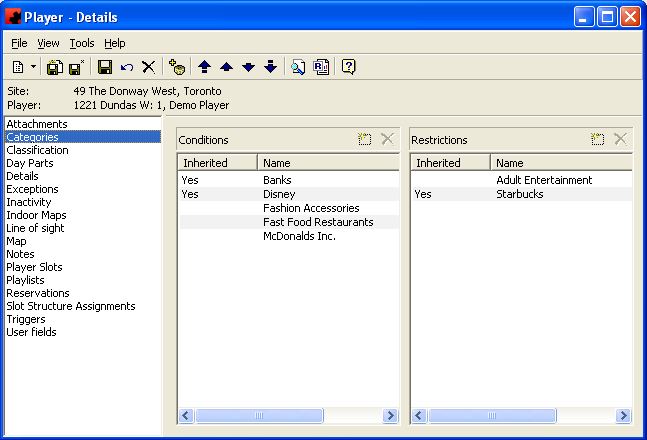
The Categories Page maintains a listing of all items that have been specified as positive conditions or restrictions at a Player. Site conditions and restrictions are inherited by each Player and are shown in this window.
Items in the Conditions box on the left side of the screen are considered to be positive attributes for this Player. Items in the Restrictions box on the right side of the screen are considered to be negative attributes.
The functions available through the buttons immediately above the Categories pane are:
- Add a new Condition or Restriction to the Player. To add a new condition (positive attribute), select the
above the left box. To add a restriction (negative attribute), select the
above the right box.
- Delete the selected Condition or Restriction from the Player. To remove a condition (positive attribute), select the
above the left box. To remove a restriction (negative attribute), select the
above the right box.
For additional information on the buttons that appear at the top of the window, click here. For information on the menu items that appear under the Tools menu, click here.
If the word "Yes" appears in either Inherited column, this indicates that the condition or restriction has been set at the Site level, and it applies to all Players at the Site. Site Conditions or Restrictions cannot be deleted from the Player. It must be done at the Site Categories page.
Classification
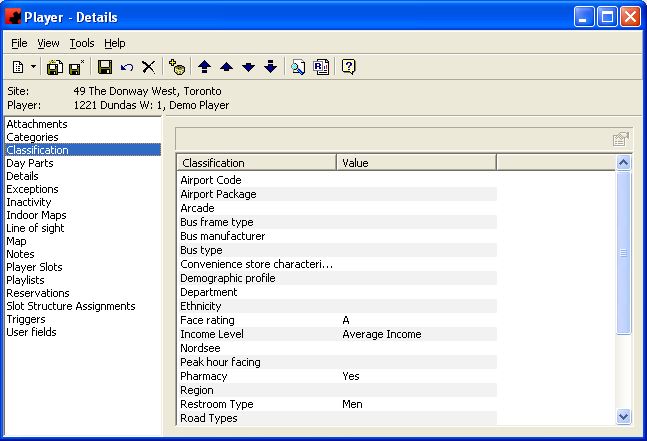
The Classification Page is used to assign specific characteristics to a Player. These Player classifications can be used when scheduling Players to Subcontracts (Digital) by specifying the target classification.
The functions available through the buttons immediately above the Classification pane are:
- The properties button is used to select a classification value for the classification item currently selected.
For additional information on the buttons that appear at the top of the window, click here. For information on the menu items that appear under the Tools menu, click here.
The pane in the bottom portion of the screen shows each of the classification categories that have been set up (for information on adding Classification Categories, see Custom Classifications).
To enter a value, double click on the classification, and select the value from the list. If the value is not on the list, it must be added from the Classifications Table (for information on adding Classification Values, see Custom Classifications).
Day Parts
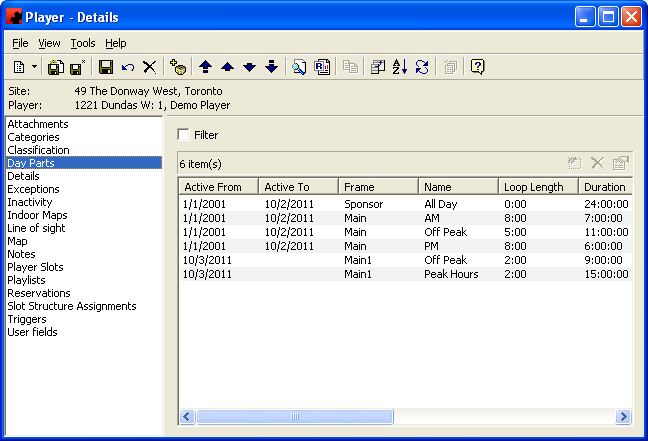
The Day Parts page provides a listing of all Day Parts that have been created when defining the Slot Structure. Day Parts cannot be added, nor should they be eddited or removed from this screen. To change Day Parts, it must be done by creating a new Slot Structure and applying it to the Player.
The Day Parts screen shows the details of all Day Parts that have been assigned to a Player. It will show when they were active, the Frame they are scheduled for, the Name of the Day Part, the maximum loop length for this Day Part, the duration that this Day Part covers over the course of the day, and the frequency of plays that can be expected for a campaign scheduled to this Day Part.
The functions available through the buttons immediately above the Day Parts pane are:
[[File:New_properties_button.JPG] To view more details about the Day Part, select it in the list and click the Properties button, or double click it in the list.
The Filter check box is used to filter the listing of Day Parts to show only those that meet a certain criteria. When selected, a filter screen will appear, to enter criteria in order to see Day Parts with particular active from/active to dates, associated with a particular Frame, etc. When a filter is active, a check mark will appear in the filter box. To clear the filter and see all records, click on Filter, then the Clear button on the Filter screen, followed by the OK button.
Details
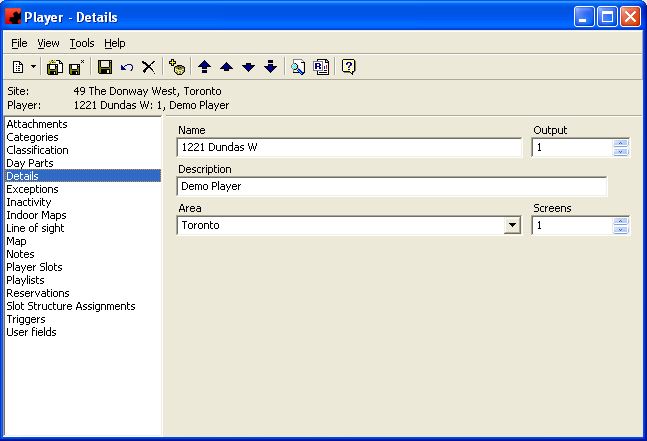
The Details page shows the basic information about the Player.
For information on the buttons that appear at the top of the window, click here. For information on the menu items that appear under the Tools menu, click here.
Fill in the appropriate information for each field. Select the appropriate item from any of the drop down lists (in the boxes) or enter the information if it is not present.
Fields
Name: This is the name of the Player as it appears in Scala Content Manager. This name must match in order for data to be transferred between the two systems.
Output: This is the output number of the Player as it appears in Scala Content Manager. This name must match in order for data to be transferred between the two systems.
Description: This is where a desired descriptive name of the player by which it can be referred is entered. This can be the same or different from the Name field.
Area: This is where users specify the predetermined geographic area where this Player is located. Selecting an Area from the list associates the Player with a Market.
Screens: This is the number of screens that are controlled by the Player/Output.
Exceptions
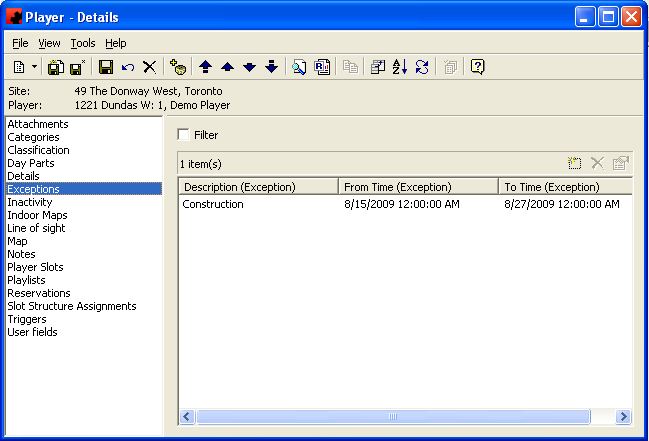
This page shows any issues that may have occurred at the Player. This list can be manually populated in order to provide a history of any issues. As well, a list of Player Exceptions can be displayed on a Digital Proof of Play report.
The functions available through the buttons immediately above the Player Exception pane are:
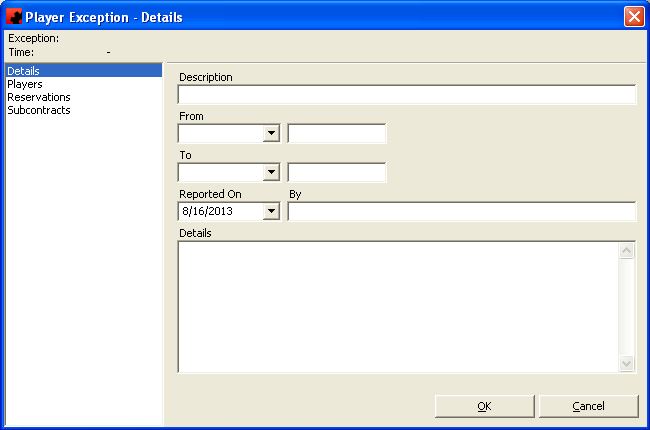
- Add a new exception for this Player. Click the New button and choose either "New" to create a new Exception or "Select" to pick from an existing list of Player Exceptions. When "New" is chosen, a window will appear to enter the information about the issue that occurred.
Fields
Description: Enter a description to identfy the Exception From: Enter the date and time that the Exception started To: Enter the date and time that the Exception ended Reported on: Enter the date the Exception was reported. By: Enter the identity of the person who reported the Exception Details: This is a free form area where additional information may be entered concering the Exeption.
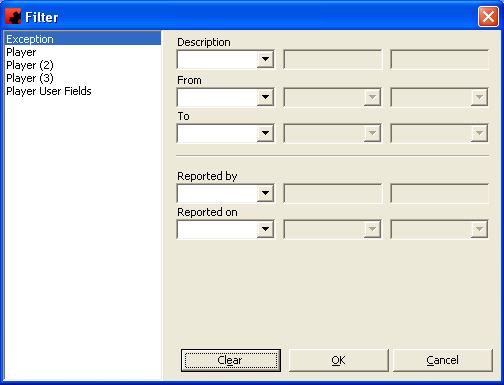
When "Select" is chosen, a Filter window will appear to enter criteria to find the existing one.
- Delete an exception for this Player. Select the item, and click the Delete button.
- Open the document or File item. Select the item and click the properties button.
The Filter check box is used to filter the listing of Player Exceptions to show only those that meet a certain criteria. When selected, a filter screen will appear, to enter criteria in order to see Player Exceptions with particular start dates, end dates, descriptions, etc. When a filter is active, a check mark will appear in the filter box. To clear the filter and see all records, click on Filter, then the Clear button on the Filter screen, followed by the OK button.
Inactivity
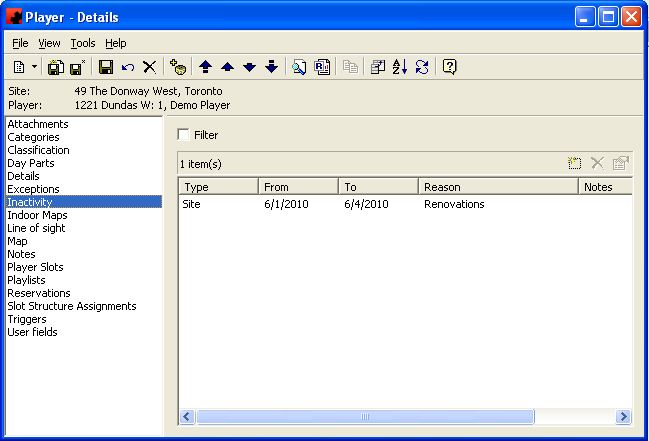
The Inactivity Page maintains a history of all dates that a Site or Player has been/will be inactive.
The functions available through the buttons immediately above the Inactivity pane are:
- To add an inactivity, click the New button. When selected, a screen will appear to enter the reason for the inactivity, the date range the Player will be inactive, and any other notes that need to be maintained about this inactive time frame.
- To delete an inactivity period from the list, select it and click on the Delete button. A Site Inactivity cannot be deleted from the Player. It must be done at the Site Inactivity page.
- To modify an inactivity period, select it and click the Properties button. Make the appropriate changes to the dates or notes, and click the Save (
) button.
For additional information on the buttons that appear at the top of the window, click here. For information on the menu items that appear under the Tools menu, click here.
Inactivity items with a "Yes" in the Site column indicate they are Site inactivities and affect all Players at the Site.
The Filter check box is used to filter the listing of Inactivity periods to show only those that meet a certain criteria. When selected, a filter screen will appear, to enter criteria in order to see Inactivity periods with particular start dates, end dates, durations, etc. When a filter is active, a check mark will appear in the filter box. To clear the filter and see all records, click on Filter, then the Clear button on the Filter screen, followed by the OK button.
Indoor Maps
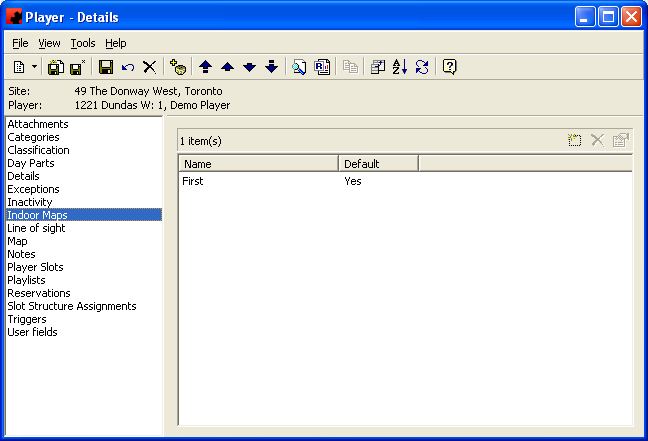
The Indoor Maps page is used to specify the location of the Player on maps that are used to display the location of indoor or place based media. A new map cannot be imported from the Indoor Map page; users can only select an existing map on which to position the Player. To import a new map, it must be done from the Indoor Maps database.
The functions available through the buttons immediately above the Indoor Map pane are:
- To add an Indoor Map, click the New button. When selected, a screen will appear asking for the Place from which to load the map. Enter the filter criteria, click OK, select the map to be loaded and click OK again.
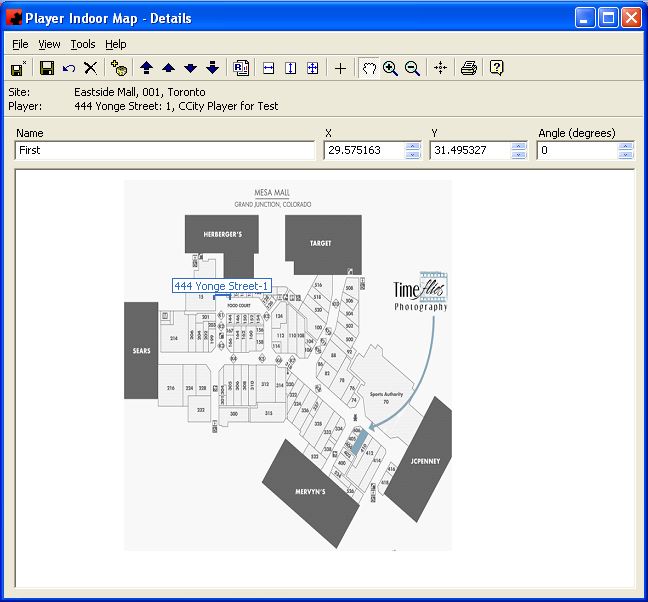
When the map of the Place is displayed, in order to identify the position of the Player, click the Set Coordinates button(). Move the cursor to the desired location on the map and click. The player location will be marked with a "[" icon. To rotate the icon counterclockwise enter the desired amount to rotate it in the Angle (Degrees) box. Once the Player is positioned and a Name has been entered, click the Save and Close button.
To identify this map as the Default one, click the Tools menu and select "Make Default".
- To delete an Indoor Map from the list, select it and click on the Delete button.
- To modify an Indoor Map, select it and click the Properties button. Make the appropriate changes and click the Save (
) button.
Line of Sight
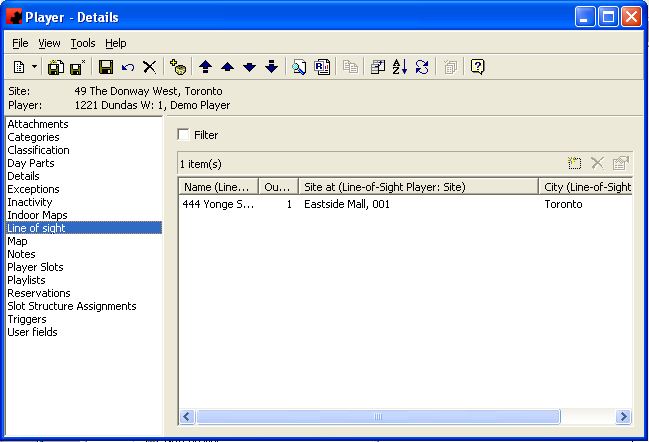
Ad Manager allows users to establish line of sight relationships between Players. When the scheduling of Reservations is done to Players that have a line of sight relationship Ad Manager will automatically check those Players to ensure there are no Advertiser or Category conflicts.
The functions available through the buttons immediately above the Line Of Sight pane are:
- To add a new line of sight relationship between the current Player and another, click the New button. Enter search criteria to filter for the other Player(s) and click <OK>. Select the Player(s) from the list and click <OK>. Ad Manager automatically enters the inverse relationship between the two Players.
- To delete a line of sight relationship, select the Player(s) in the pane and click the Delete button. Ad Manager automatically deletes the inverse relationship between the two Players.
- To view information related to the Player that is in line of sight, select it and click the Properties button.
For additional information on the buttons that appear at the top of the window, click here. For information on the menu items that appear under the Tools menu, click here.
The Filter check box allows you to filter the listing of Players in line of sight to show only those that meet a certain criteria. When selected, a filter screen will appear, in which to enter criteria to choose to see Players related to a particular market, area, facing a particular way, etc. When a filter is active, a check mark will appear in the filter box. To clear the filter and see all records, click on Filter, then the Clear button on the Filter screen, followed by the OK button.
Map
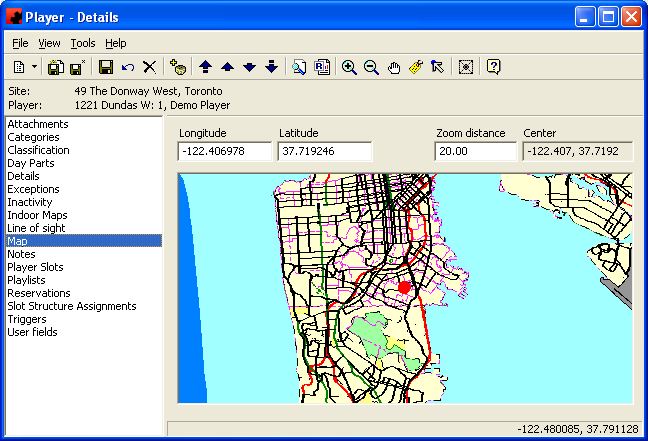
The Player Map Page allows the Player to be viewed on a map and to edit the latitude and longitude information for the Player (this allows users to position a Player on a Site in a different position than the other Players associated with it) directly on the map.
Tool buttons specific to the Player Map Page:
- Click the Zoom In button, then click on the map to see the map zoomed in twice as close as before, centered where the map was clicked. By holding the left mouse button down and dragging the mouse, a box is drawn on the map. Release the left mouse button and Ad Manager will zoom into the specified area.
- Click the Zoom Out button, then click on the map to see the map zoomed out twice as much as before, centered where the map was clicked. By holding the left mouse button down and dragging the mouse, a box is drawn on the map. Release the left mouse button and Ad Manager will shrink the map to the size specified by the box.
- The Pan button is used to move the map to see different areas not visible on the screen. Click the Pan button, put your mouse over the map, hold down the left mouse button and drag the mouse. The map will move with the Pan tool; release the mouse button and Ad Manager will draw the new area of the map.
- The Label Map Feature button is used to click on an item on the map, and have Ad Manager automatically label it. Click the Label Map Feature button, then click on the map where the label is required and the label will appear. Note: Prior to using this button, it is suggested that users ensure that the labelling features of the Map Layers have been set up under Tools>Options>Map Layers in Ad Manager's main Explorer Window. Note: Labels cannot be moved once they are added to the map. To remove the labels, click the Tools Menu and select "Clear Labels". Ad Manager will remove all labels that do not have the "Auto-Label" check box active on the map layer.
- The Set the Latitude/Longitude of the Player buttonl is used to "geocode" your Player quickly, easily and accurately. Using the other tools, find the correct location of this Player on the map, select this button and click on the appropriate spot on the map. Ad Manager will automatically update the latitude and longitude of this Player, and place a symbol there, indicating this is where the Player is located.
- The Center the Map on this Player is used to reposition the map with this Player centered.
For additional information on the buttons that appear at the top of the window, click here. For information on the menu items that appear under the Tools menu, click here.
Fields
Center - This displays the latitude and longitude co-ordinates at the center of the map currently visible.
Latitude - The latitude is how many degrees north (positive value) or south (negative value) of the equator the Player is.
Longitude - The longitude is how many degrees east (negative value) or west (positive value) of the Prime Meridian the Player is.
Zoom Distance - The zoom distance is the distance (in miles) across the width of the map.
Notes
For more information on the Notes page, click here.
Player Slots
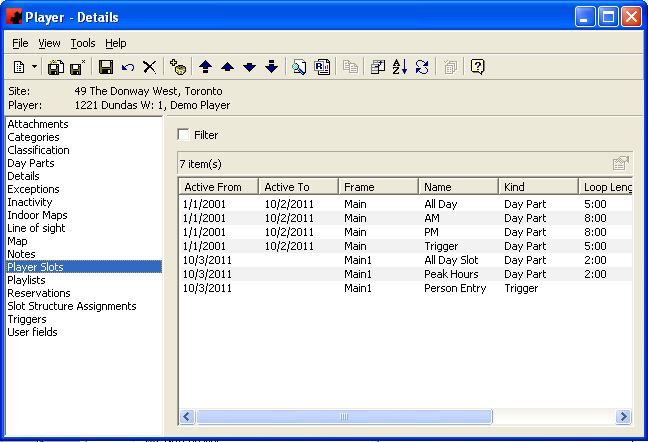
The Player Slots page provides a listing of all saleable advertising opportunities that have been created when defining the Slot Structure. Player Slots are single Day Parts, Day Parts that have been combined so they can be sold as a unit, or they can be Triggers. A Player Slot is what is sold, and what is ultimately scheduled on a Subcontract (Digital). Player Slots cannot be added, edited or removed from this screen. If you wish to change Player Slots, this must be done by creating a new Slot Structure and applying it to the Player.
The Player Slots screen shows the details of all Player Slots that have been assigned to a Player. It will show when they were active, the Frame they are scheduled for, the Name of the Player Slot, the maximum loop length for this Player Slot, the duration that this Player Slot covers over the course of the day, and the frequency of plays that can be expected for a campaign scheduled to this Player Slot.
The functions available through the buttons immediately above the Player Slots pane are:
- To view more details related to a particular Player Slot, select it in the list and click the Properties button; or double click the Player Slot in the list.
The Filter check box is used to filter the listing of Player Slots to show only those that meet a certain criteria. When selected, a filter screen will appear, to enter criteria in order to see Player Slots with particular active from/active to dates, associated with a particular Frame, available, etc. When a filter is active, a check mark will appear in the filter box. To clear the filter and see all records, click on Filter, then the Clear button on the Filter screen, followed by the OK button.
Playlists
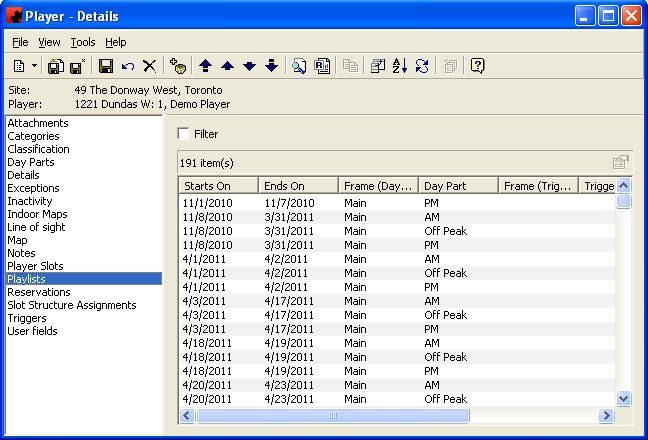
The Playlists page displays a listing of all Playlists that are to be send to Scala Content Manager. Each Playlist contains all Reservations that will play as part of a loop for the date range specified. Every time a new Reservation is scheduled to a Player, Ad Manager modifies all affected Playlists automatically.
The listing of Playlists shows information about when a Playlist will start playing, when it will stop playing and the Frame and Day Part affected. The list will also display the number of items that are scheduled to play in the loop, as well as the amount of time the loop will take to play once. Playlists cannot be added or deleted from here.
The functions available through the buttons immediately above the Playlists pane are:
- To view more details related to a particular Playlist, select it in the list and click the Properties button; or double click the Playlist in the list.
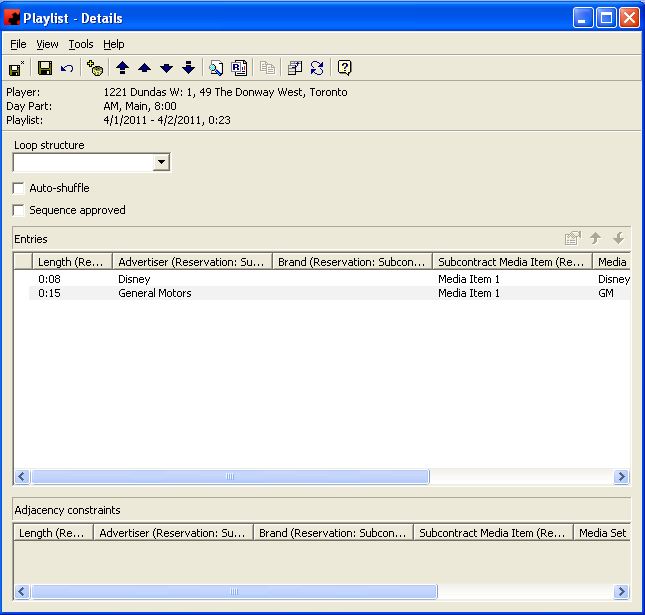
The Playlist screen is used to view the Reservations that are to play for the selected time frame, as well as to determine the order of play.
Fields
Loop Structure: The user can assign a Loop Structure to a Playlist. Doing so will have the Reservations play in a specific order, based on the Loop Segment assigned to each item on a Subcontract (Digital). To apply a loop structure, select it from the list of Loop Structures, go to the Tools menu and click "Apply Loop Structure".
Auto-shuffle: This feature is used to randomize the Playlist each time through the loop.
Sequence approved: This is used to mark that the Playlist has been reviewed and put into the desired order. If a new item is scheduled to the Playlist, the Sequence approved is removed so the user knows the Playlist needs to be approved again.
Entries: The Entries window shows the Reservations in the Playlist and the order that they will play. If there are Reservations that are in conflict with items immediately adjacent to them, a red flag () will appear. This indicates that the Reservations should be separated, if possible.
The functions available through the buttons immediately above the Entries pane are:
- To see more detail about a Playlist Reservation, select it and click the properties button, or by double clicking the Playlist Reservation.
- The Move Up button is used to move the highlighted Playlist Reservation up in the order of Playlist Reservations.
- The Move Down button is used to move the highlighted Playlist Reservation down in the order of Playlist Reservations.
Adjacency constraints: When a Reservation is selected in the Entries window, any Reservations in the Playlist that will generate an Adjacency constraint will be listed. To have Ad Manager change the order of Reservations to remove the conflict, go to the Tools menu and select "Re-shuffle".
The Filter check box is used to filter the listing of Playlists to show only those that meet a certain criteria. When selected, a filter screen will appear, to enter criteria in order to see Playlists with particular start dates, end dates, of a certain length, with a certain number of Entries, etc. When a filter is active, a check mark will appear in the filter box. To clear the filter and see all records, click on Filter, then the Clear button on the Filter screen, followed by the OK button.
Reservations
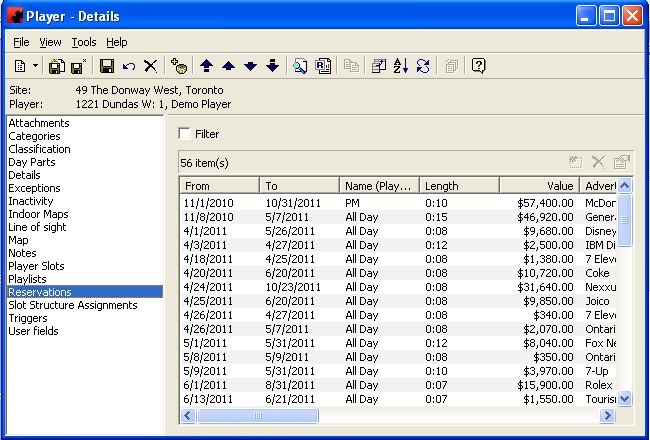
The Reservations page shows a listing of all Subcontract(Digital) Reservations that have been scheduled to Player Slots on this Player. Reservations cannot be added to the Player here.
The functions available through the buttons immediately above the Reservations pane are:
- To delete an unpublished Reservation, select the Reservation in the pane and click the Delete button.
- To view additional information related to the Reservation, select it and click the Properties button, or double click the Reservation in the list.
The Filter check box is used to filter the listing of Reservations to show only those that meet a certain criteria. When selected, a filter screen will appear, to enter criteria in order to see Reservations with particular start dates, end dates, of a certain length, with a Media Item assigned, associated with a particular Contract, etc. When a filter is active, a check mark will appear in the filter box. To clear the filter and see all records, click on Filter, then the Clear button on the Filter screen, followed by the OK button.
Slot Structure Assignments
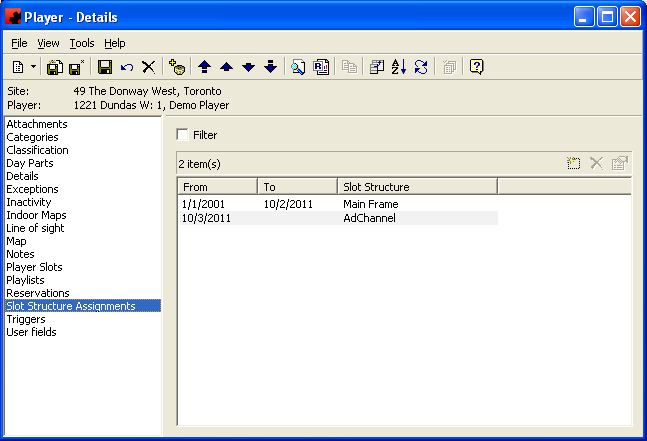
The Slot Structure Assignments page displays a list of all Slot Structure assignments that have been applied to this Player. Each Slot Structure will define the Day Parts, Triggers and Player Slots for this Player.
The functions available through the buttons immediately above the Slot Structure Assignments pane are:
- To assign a Slot Structure to the Player, click the New button. When selected, enter the date this Slot Structure takes effect for this Player, and select the Slot Structure to use.
- To delete a Slot Structure Assignment that has not had any scheduling done for this Player,select it and click the Delete button.
- To modify a Slot Structure Assignment for a Slot Structure that has not had any scheduling done for this Player, select it and click the Properties button. Make the appropriate changes to the dates or notes, and click the Save (
) button. The Properties button can also be used to view more detail about a selected Slot Structure Assignment.
The Filter check box is used to filter the listing of Slot Structure Assignments to show only those that meet a certain criteria. When selected, a filter screen will appear, to enter criteria in order to see Slot Structure Assignments with particular start dates, end dates, in effect dates, assigned, etc. When a filter is active, a check mark will appear in the filter box. To clear the filter and see all records, click on Filter, then the Clear button on the Filter screen, followed by the OK button.
Triggers
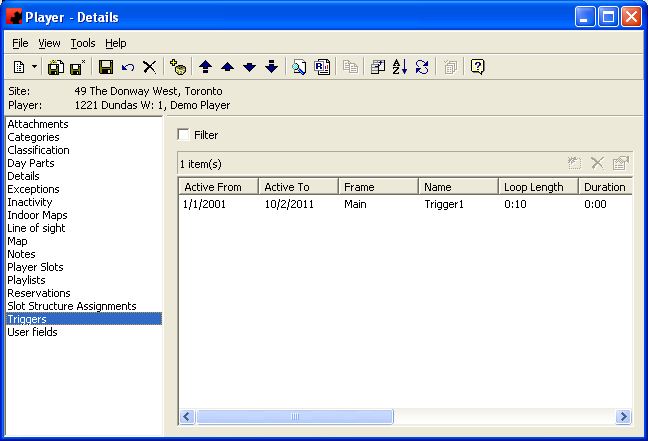
The Triggers page provides a listing of all Triggers that have been created when defining the Slot Structure. Triggers cannot be added nor should they be removed or edited from this screen. To change Triggers, it must be done by creating a new Slot Structure and applying it to the Player.
The Triggers screen shows the details of all Triggers that have been assigned to a Player. It will show when they were active, the Frame they are scheduled for, the Name of the Trigger, the maximum loop length for this Trigger, the duration that this Trigger covers over the course of the day, and the frequency of plays that can be expected for a campaign scheduled to this Trigger.
The functions available through the buttons immediately above the Triggers pane are:
- To view more details about the Trigger, select it in the list and click the Properties button.
The Filter check box is used to filter the listing of Triggers to show only those that meet a certain criteria. When selected, a filter screen will appear, to enter criteria in order to see Triggers with particular Active from dates, Active to dates, only those that are Active, associated with a particular Frame, etc. When a filter is active, a check mark will appear in the filter box. To clear the filter and see all records, click on Filter, then the Clear button on the Filter screen, followed by the OK button.
User Fields
For more information on the User fields page, click here.
