Task schedules
Page for Task Schedules.
Contents |
Details
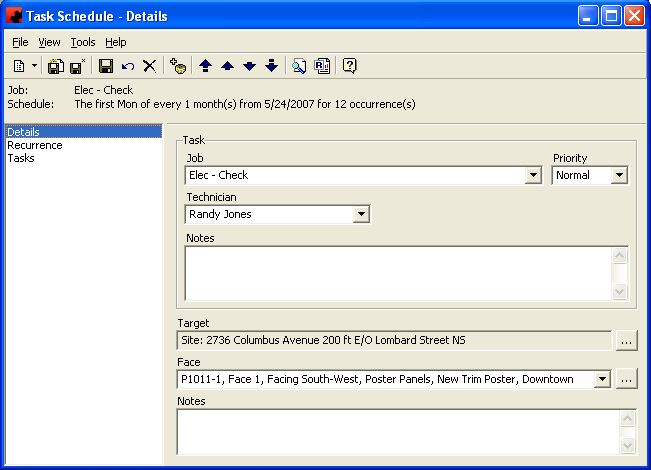
Scheduled Tasks are generated by Ad Manager from the Task Schedules that you define. They are used to identify routine maintenance that reoccurs at defined times, such as emptying garbage cans, cutting grass, and changing time clocks. The Details Page contains information on the particular Task Schedule such as the Job that pertains to this particular Schedule, its priority and the Technician (crew or person) assigned for the schedule.
For information on the buttons that appear at the top of the window, click here. For information on the menu items that appear under the Tools menu, click here.
Fill in the appropriate information for each field. Select the appropriate item from any of the drop down lists (in the boxes) or type in the information if it is not present.
Fields
Face: If a Site is selected as the Target of the Schedule, this field becomes active and you are given the option to then target a specific Face on the Site. To select a Face to target, click on the ellipsis () button next to the Face field. This action will then bring up a filter screen so you may specify which Face you are targetting.
Notes: This Notes field at the bottom of the screen can contain additional information concerning the Target, keeping in mind that these Notes should be relevant for the duration of the Schedule.
Target: This is the Sites or Structures the Schedule focuses on. To select the target, click on the ellipsis () button and select either Site or Structure from the menu items. This action will then bring up a filter screen so you may specify which Sites or which Structures you are targetting. By selecting a target, the Task Schedule is then linked to those Sites/Faces or Structures, so choose the target option that best suits the Task and where the attention should be focused.
Task: This is the section that identifies the work required to perform this Task Schedule.
Job: This is the job that pertains to this particular Schedule. A Job is the work that specifically needs to be done in order to complete a Task. A Schedule can only have one Job attached to it.
Notes: This is a place to enter additional information for the Technician pertaining to this particular Task, keeping in mind these Notes should be relevant for the duration of the Schedule. These Notes will appear on the Activity page of the Scheduled Tasks.
Priority: This allows you to mark the Task Schedule as needing either Immediate, Low or Normal priority for resolving it, Normal being the default.
Technician: This is the person or crew that will be completing the Tasks on this Task Schedule.
Recurrence
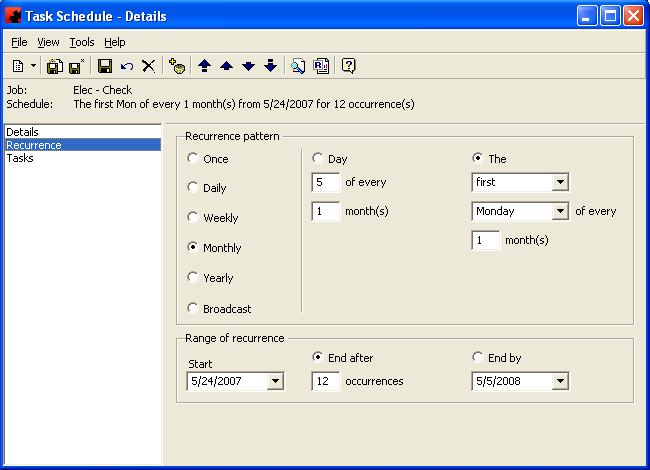
The Recurrence Page allows you to identify when and how long you wish this Task Schedule to run. In the example shown below, the Task Schedule Recurrence has been set to happen the last Monday of every October for the next 10 years.
For information on the buttons that appear at the top of the window, click here. For information on the menu items that appear under the Tools menu, click here.
Fields
Range of recurrence: The period during which time you wish Tasks to be generated.
Recurrence Pattern: This section allows you to identify how often and for how long the Task Schedule should run. You can select to schedule the task either once, daily, weekly, monthly, yearly or using the Broadcast calendar. The fields available to you will change depending on which pattern you choose.
Ad Manager will automatically set up the number of Tasks which correspond to these dates and display them on the Tasks page for you to verify.4
Tasks
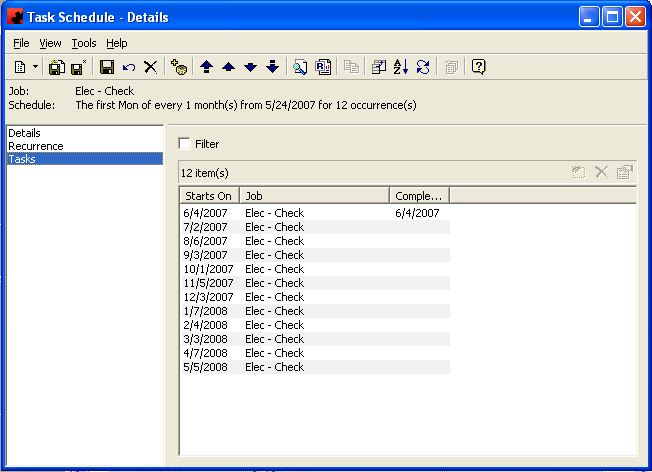
The Tasks Page displays the list of Maintenance Tasks that have been created by the Schedule. You can edit any Task from this resulting list, if needed, as long as the Task has not been issued on a Work Order.
Tool buttons specific to the Tasks Page:
- Customize Current View allows you to select the columns to display and the order to display them in.
- Order allows you to sort the list of Tasks for the Task Schedule in the desired order.
- The Update button allows you to select one or more Tasks and change information on them. All highlighted Tasks will be changed to reflect the items selected.
The pane in the window shows a listing of all Tasks created by this Task Schedule. The functions available through the buttons immediately above the pane are:
- Delete the highlighted Task(s) from the Schedule. If you delete a Task that has been modified, it resets it to the way it originally was created. It does not delete the Task from the list.
- Edit the information for the highlighted Task(s).
Right Click
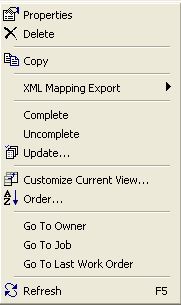
- Right clicking on the list of Tasks will display this menu. From here you can change the start date of the Task as well as change the technician to perform the Task using the Update option, complete, and uncomplete the Task.
To change the information being viewed in the list, simply right click in the list, and choose Customize Current View. To change the sort order, simply right click in the list, and choose Order.
Complete - If a Task has not been assigned to a Work Order, or the Work Order has not been issued, you can manually record that the Task has been completed in those cases when the work has already been done using this tool option and entering the date of completion.
Uncomplete - This allows you to re-open a Task, that has been previously marked as Complete.
Update - The Update menu item allows you to to modify a property (or properties) for one or more highlighted Task(s).
Go To - The Go To feature allows you to open a window for the appropriate item for the highlighted record.
For additional information on buttons that appear at the top of the window, click here. For information on the menu items that appear under the Tools menu, click here.
The Filter check box allows you to filter the listing of Tasks to show only those that meet a certain criteria. When selected, a filter screen will appear, allowing you to choose to see Tasks starting on a certain date, for a certain job, for a certain technician, on a specific workorder, etc. When a filter is active, a check mark will appear in the filter box. To clear the filter and see all records, click on Filter, then the Clear button on the Filter screen, followed by the OK button.


