Structures
Page for Structures.
Contents |
Details
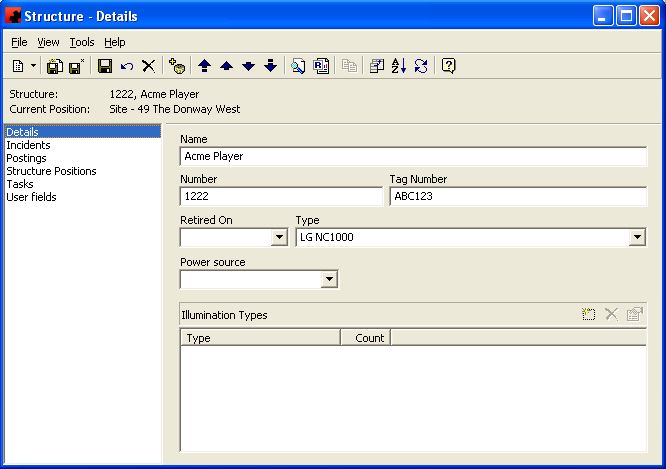
The Details Page is where information about the Structure is displayed. Information on what type of Structure it is, as well as, what type of lighting fixtures are on the Structure is kept on this page.
For information on the buttons that appear at the top of the window, click here. For information on the menu items that appear under the Tools menu, click here.
Fill in the appropriate information for each field. Select the appropriate item from any of the drop down lists (in the boxes) or type in the information if it is not present.
Tool buttons specific to the Illumination Types section of the Details Page:
- Add a new Illumination Type for this Structure. A window will appear where you can select the desired Illumination Type from the list or choose <NEW> to add a new one. Then enter the Count (the amount of fixtures). Multiple Illumination Types can be added for a Structure.
- Delete an Illumination Type from this Structure. Highlight the item and click the Delete button.
- Change the information associated with the highlighted Illumination Type.
Fields
Illumination Types: This pane lists what type of lighting fixture(s) is on this particular Structure and how many.
Name: This is a descriptive name for the Structure so that it can anyone looking at a list of Structures can differentiate it from the others.
Number: This is an assigned Number for the Structure. It may be useful to follow a logical numbering system that identifies similar Structures - for example, begin the numbering sequence for chrome and glass bus shelters with CG and then a number. This will help to identify Structures by simply looking at the number. The number is a required field and must be entered in order for the record to be saved.
Retired On: This is the date the Structure has been retired and will no longer be used. This will remove the Structure from active inventory.
Tag Number: This number can be used to identify the Structure and will appear in Ad Manager as well as on the physical Structure itself.
Type: This allows you to identify what type of Structure this unit is, i.e. garbage can, unipole, 2-panel bus shelter, 3-sided MPA unit, single frame unit, etc. You can choose the type from the drop-down menu, or ehter in a new Structure type if it is not in the list.
Incidents
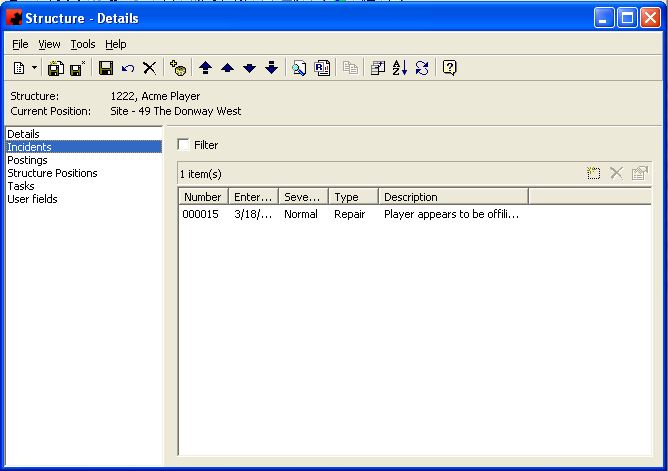
The Incidents Page displays all Incidents that have ever been associated with the specific Structure.
Tool buttons specific to the Incidents Page:
- Customize Current View allows you to select the columns to display and the order to display them in.
- Order allows you to sort the list of Incidents for the Structure in the desired order.
The pane in the window shows a listing of all Incidents for this Structure. The functions available through the buttons immediately above the pane are:
- Add a new Incident to the Structure.
- Edit the information for the highlighted Incident(s).
For additional information on buttons that appear at the top of the window, click here. For information on the menu items that appear under the Tools menu, click here.
The Filter check box allows you to filter the listing of Incidents to show only those that meet a certain criteria. When selected, a filter screen will appear, allowing you to choose to see Incidents entered on a certain date, of a certain status, of a certain type, reported by a certain source, etc. When a filter is active, a check mark will appear in the filter box. To clear the filter and see all records, click on Filter, then the Clear button on the Filter screen, followed by the OK button.
Postings
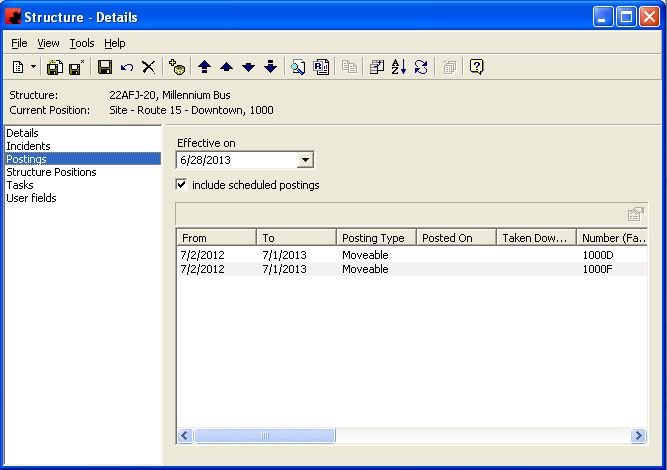
The Postings Page displays all postings or scheduled postings for the Structure, as of a specified date. This page provides both past and future history for the Structure.
Tool buttons specific to the Postings Page:
- Customize Current View allows you to select the columns to display and the order to display them in.
- Order allows you to sort the list of Positions for the Structure in the desired order.
The pane in the window shows a listing of all Postings for this Structure. The functions available through the buttons immediately above the pane are:
- Edit the information for the highlighted Posting(s).
Fields
Effective On: The Effective on date allows you to select a date to view what Postings were on or scheduled to be on the Structure starting that date.
Show Scheduled Postings: This option allows you to see what Postings have been scheduled to go into the Structure, but have not yet been posted. To see scheduled postings, click in the box.
Right Click
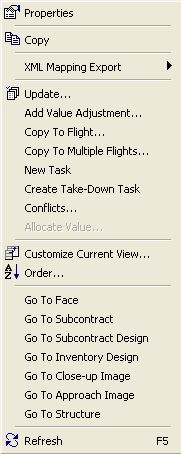
- Right clicking on the list of Postings will display this menu. From here you can copy to another flight, create a new task (e.g. repost), create a Take-Down task, or use the Update tool to change a posting type, add a posting note or alter the assignment's duration.
To change the information being viewed in the list, simply right click in the list, and choose Customize Current View. To change the sort order, simply right click in the list, and choose Order.
Update - The Update menu item allows you to to modify a property (or properties) for one or more highlighted schedule.
Copy To Flight - This will allow you to copy (transcribe) the highlighted Faces from this Subcontract flight to any other flight for any Subcontract. Ad Manager will check to ensure the Face is available and suitable on the new Subcontract flight.
Copy to Multiple Flights - This will allow you to copy (transcribe) the highlighted Faces from this Subcontract flight to other flights for other Subcontracts (instead of copying them one at a time). Ad Manager will check to ensure the Face(s) is/are available and suitable on the new Subcontract flights.
New Task - This will allow you to create a new posting of the same copy on a different date for this Subcontract or create a take down record for the highlighted Face(s).
Create Take-Down Task - This feature allows you to inform Ad Manager to create a task that will generate a Posting Card/Instruction that will remove the existing copy and not replace it with new copy. You can specify the date that this Take-Down will occur.
Go To - The Go To feature allows you to open a window for the appropriate item for the highlighted record.
Structure Positions
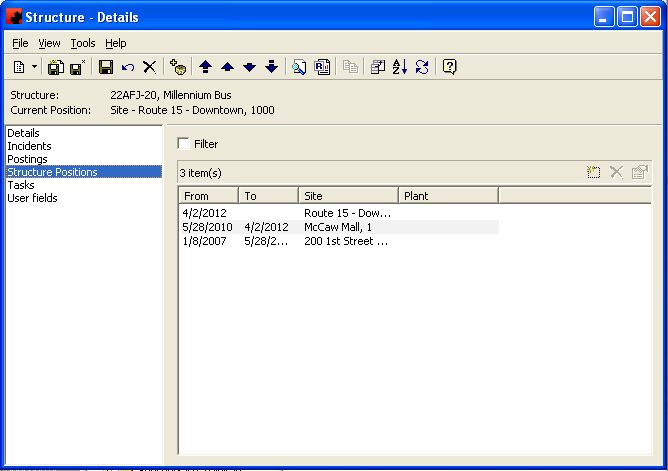
The Structure Positions Page displays the history of where the Structure has been located, whether it be on a Site or in a Plant. Since Structures quite often move around, either to different Sites, to the shop etc., it is important to keep track of where this Structure has been, and for how long.
Tool buttons specific to the Structure Positions Page:
- Customize Current View allows you to select the columns to display and the order to display them in.
- Order allows you to sort the list of Structure Positions for the Structure in the desired order.
The pane in the window shows a listing of all Structure Positions for this Structure. The functions available through the buttons immediately above the pane are:
- Add a new Position to the Structure.
- Delete the highlighted Position from the Structure.
- Edit the information for the highlighted Structure Position(s).
For additional information on buttons that appear at the top of the window, click here. For information on the menu items that appear under the Tools menu, click here.
The Filter check box allows you to filter the listing of Structure Positions to show only those that meet a certain criteria. When selected, a filter screen will appear, allowing you to choose to see the Structure's move on a certain date, how many times its been moved to the Plant or to a specified Site, etc. When a filter is active, a check mark will appear in the filter box. To clear the filter and see all records, click on Filter, then the Clear button on the Filter screen, followed by the OK button.
Tasks
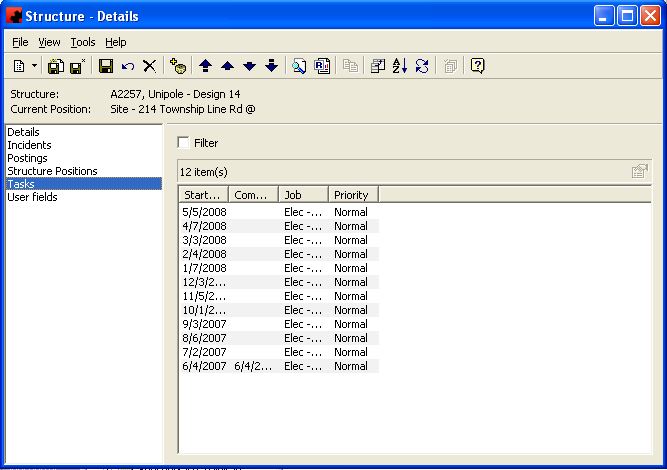
The Tasks Page displays all Maintenance Tasks that have ever been associated with the specific Structure either through an Incident or a Scheduled Task. You cannot add or delete Tasks from this list.
Tool buttons specific to the Tasks Page:
- Customize Current View allows you to select the columns to display and the order to display them in.
- Order allows you to sort the list of Tasks for the Structure in the desired order.
- The Update button allows you to select one or more Tasks and change information on them. All highlighted Tasks will be changed to reflect the items selected.
The pane in the window shows a listing of all Tasks for this Structure. The functions available through the buttons immediately above the pane are:
- Edit the information for the highlighted Task(s).
Right Click
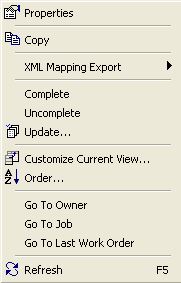
- Right clicking on the list of Tasks will display this menu. From here you can change the start date of the Task as well as change the technician to perform the Task using the Update option, complete, and uncomplete the Task.
To change the information being viewed in the list, simply right click in the list, and choose Customize Current View. To change the sort order, simply right click in the list, and choose Order.
Complete - If a Task has not been assigned to a Work Order, or the Work Order has not been issued, you can manually record that the Task has been completed in those cases when the work has already been done using this tool option and entering the date of completion.
Uncomplete - This allows you to re-open a Task, that has been previously marked as Complete.
Update - The Update menu item allows you to to modify a property (or properties) for one or more highlighted Task(s).
Go To - The Go To feature allows you to open a window for the appropriate item for the highlighted record.
For additional information on buttons that appear at the top of the window, click here. For information on the menu items that appear under the Tools menu, click here.
The Filter check box allows you to filter the listing of Tasks to show only those that meet a certain criteria. When selected, a filter screen will appear, allowing you to choose to see Tasks starting on a certain date, for a certain job, for a certain technician, on a specific workorder, etc. When a filter is active, a check mark will appear in the filter box. To clear the filter and see all records, click on Filter, then the Clear button on the Filter screen, followed by the OK button.
User Fields
For more information on the User fields page, click here.
