Multimedia
Page for Multimedia.
Contents |
Add an Attachment
If you wish to attach a document (DOC, XLS, PDF, etc.), to Designs, Leases, Sites, Faces, Contracts or Subcontracts, you can do so quickly and easily.
Adding Attachments
To attach documents, go to the appropriate record (Face, Site, Design, Lease, Contract or Subcontract) and select the Attachments Page. Click on the New Button (). A window will appear where you can select the appropriate file from your machine.
Modifying an Attached File
If you wish to modify an attached file, go to the appropriate record and select the Attachments page. Highlight the desired item and click on the Properties button () to modify the document. You must then save the document and re-attach it.
Printing an Attached File
If you wish to print an attached file, go to the appropriate record and select the Attachments page. Highlight the desired item and click on the Properties button (). The document can now be printed and closed.
Deleting Attachments
To delete an attached item, go to the appropriate record and select the Attachments page. Highlight the desired item and click on the Delete button ().
Saving Attachments
To save an attached item for use outside of Ad Manager, go to the appropriate record and select the Attachments page. Highlight the desired item and click on the Save button (). The Save Attachment As screen will appear directing you to save the attachment elsewhere on your computer or network server.
Adding Images
If you wish to enter a picture (BMP, JPG, EMF or GIF), video or Surround View image you can do so quickly and easily.
Adding Images
To add images, go to the appropriate record (Face, Site, Design. Posting Task) and select the Images page. Click on the New Button () to add new images. A window will appear where you can select the appropriate file from your machine. Once you have selected the item, enter the description to be used for the image. For Sites and Faces, if you wish to make this your primary image to be used in your Photo Sheets, select it from the Primary Image drop down list. For Designs, if you wish to make this your primary image to be used on posting cards/instructions, select it from the Primary Image drop down list. For Posting Tasks, if you wish to use the images for completion reports, specify which image you will use for a close-up and which one for an approach image by selecting each one from its corresponding drop down list.
Modifying Images
If you wish to change the description or file selected for a particular image item, go to the appropriate record and select the Images page. Highlight the desired item and click on the Properties button () to modify the image.
Deleting Images
To delete an image, go to the appropriate record and select the Images page. Highlight the desired item and click on the Delete button ().
Saving Images
To save an image for use outside of Ad Manager, go to the appropriate record and select the Images page. Highlight the desired item and click on the Save button (). The Save Image As screen will appear directing you to save the image elsewhere on your computer or network server.
Adding Multimedia for a Site
If you wish to enter a picture (BMP, JPG, EMF or GIF), video or Surround View image you can do so quickly and easily.
Adding Multimedia
To add multimedia, go to the appropriate record (Face, Site, Design) and select the Images tab. Click on the New Button () to add new multimedia. A window will appear where you can select the appropriate file from your machine. Once you have selected the item, enter the description to be used for the multimedia item. For Sites and Faces, if you wish to make this your primary image to be used in your Photo Sheets, select it from the Primary Image drop down list.
Modifying a Multimedia item
If you wish to change the description or file selected for a particular multimedia item, go to the appropriate record and select the Multimedia tab. Click on the Properties button () to modify the multimedia item.
Deleting Multimedia
To delete a multimedia item, go to the appropriate record and select the Multimedia tab. Click on the Delete button () to delete a multimedia item.
Loading Photos
Ad Manager provides users the ability to load images for all Sites or all Faces automatically, based on the Site or Face Number. Ad Manager will automatically load the image for the Site or Face that matches the filename of the photo. If the photo filename does not exactly match the Ad Manager Site or Face Number, the photo will not be loaded into Ad Manager.
If you wish to load pictures, go to the Ad Manager Explorer window and select "All Sites" or "All Faces" as appropriate. Then, click on Tools - Load Photo(s).
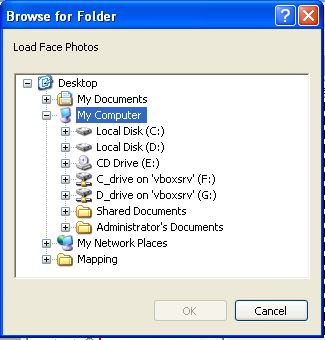
From this screen, select the directory where the photos are stored by clicking on the ellipsis () and selecting the appropriate directory. Once the directory has been selected, select whether the photos to be loaded are being loaded using their Site number or their Face number. Click OK to proceed, and Ad Manager will load the photos as appropriate.
Setting Up Drive By Videos
Type topic text here.
Setting Up Panel View
Type topic text here.
Setting Up Photo Sheets
Type topic text here.
Setting Up Surround View
Type topic text here.
Using and Printing Photo Sheets
Type topic text here.
Using Drive By Videos
Type topic text here.
Using Panel View
Type topic text here.
Using Surround View
Type topic text here.
