Slot Structure
Contents |
What is a Slot Structure?
The Slot Structure is used to define how a digital network will be set up for sale. Each Player in Ad Manager is assigned to a Slot Structure, and based on the setup of the Slot Structure, it will identify all the advertising opportunities the Player has to sell.
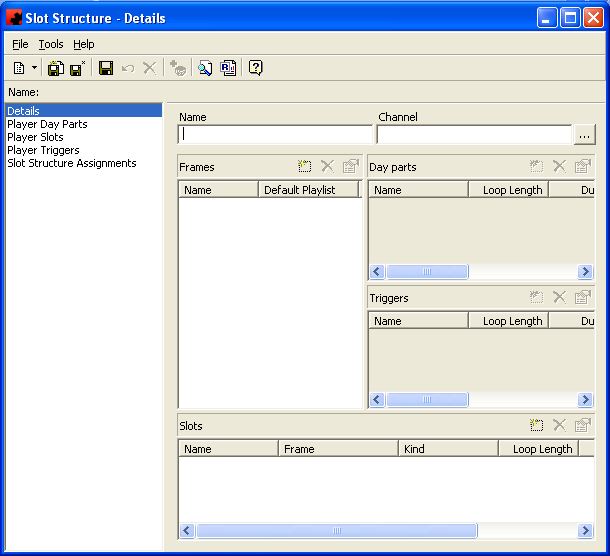
To create a new Slot Structure, go to the Players folder in the Tree View and click All Slot Structures. Go to the File menu and click New, Slot Structure, or right click in the Detail View and click New.
When creating a Slot Structure, define the Name to give this Slot Structure so it can be assigned to Players as appropriate.
Selecting the Channel and Frame to Control
The Channel identifies the Scala Content Manager Channel that this particular Slot Structure will use. To select a Content Manager channel, click the ellipsis (), select the desired Channel and click OK.
Once the Channel is selected, choose which Frame to create the advertising opportunities (Slots) for. In the Frame pane Ad Manager will display the Frames that have been marked in Scala Content Manager as <Controlled by Ad Manager>. If the Frame to be set up is not on the list, check the Channel definition in Scala Content Manager and make sure the Frame has been marked as <Controlled by Ad Manager>.
The Default Playlist field is used to identify a Default Playlist that has been created in Scala Content Manager which will play on the Player(s) when there is no Ad Manager Playlist(s)to play. This will assist in preventing the screens "going black" when there is nothing to play. Click the ellipsis (), select the desired Playlist from the list (need image) and click OK.
The functions available through the buttons immediately above the Frame pane are:
) - Click the New button to add a Frame or Audio Track. This is used by users who do not already have Scala Content Manager set up with Channels and Players. Once Ad Manager and Scala Content Manager are linked, these Frames will be identified as being controlled by Ad Manager.
Select either Frame or Audio Track and in the next window enter a name for the Frame and select a Default Playlist, if desired.
- Click the Delete button to delete a selected Frame.
- Click the Properties button to view or modify details about the selected Frame.
Setting up Day Parts
Once the Frame is selected, create any Day Parts that will be used to sell periods of time during the day. Note: Create the smallest time frames that will be sold - these can be aggregated into larger blocks of time for sale later in this process.
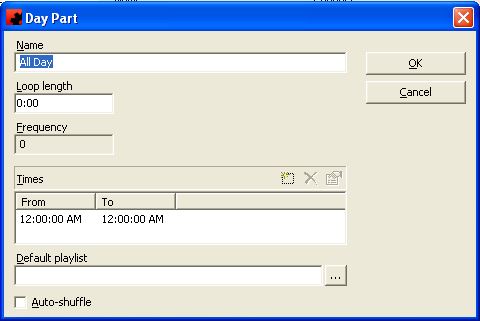
If not selling by Day Parts, leave the default Day Part of "All Day". This represents a full 24 hour period. Double click on the Day Part and enter the maximum Loop length for the Day Part - this can be entered as the number of seconds, or as minutes:seconds. If desired, set the Default playlist for the Day Part, that will play when nothing is scheduled, then click OK. To randomize the Playlist each time it cycles through the Reservations, click the Auto-shuffle checkbox.
To set up Day Parts, go to the Day Parts pane, and double click the "All Day" Day Part.
Change the name of the "All Day" Day Part to become one of the time frames to be set up (e.g. Morning, Afternoon, Evening, etc.). Enter the maximum Loop length for the Day Part - this can be entered as the number of seconds, or as minutes:seconds.
Double click the Times displayed (for the All Day Day Part, this will be 12:00:00 AM - 12:00:00 PM). Enter the new start time and end time in the format hour:minutes:seconds. Times may be entered in 12 or 24 hour clock format, or they can be suffixed with an A (AM) or a P(PM). Click OK.
If desired, specify a Default playlist for this Day Part. This will only play if nothing is scheduled to play at the affected Players. To add a Default playlist, click the ellipsis () to see a list of Scala Content Manager playlists. Select the desired playlist and click OK.
To randomize the Playlist each time it cycles through the Reservations, click the Auto-shuffle checkbox.
If selling another part of the day with the same Loop length, and this new time frame will ALWAYS be sold with the one already entered, add the additional Time(s) as appropriate by clicking the New button.
If the Loop length is different for the new time frame to be entered, or if the time frame may or may not be sold with this time frame, a new Day Part must be added.
To add a new Day part, click New button (). Follow the steps above to create the Day Part. Continue until all required Day Parts have been created.
Setting up Triggers
Ad Manager also allows the management of the sale of advertising opportunities in situations where an action on-site will start an Playlist of Ads. An example of this would be clicking a button or lifting the handle at a gas/petrol station.
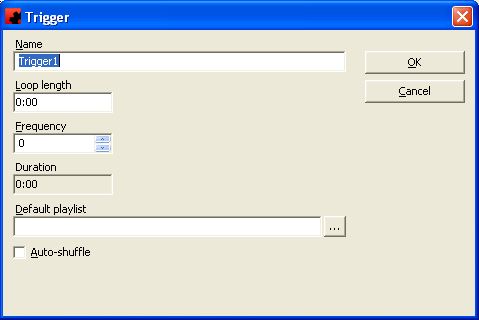
To add a new Trigger, click New button (). Enter the name of the Trigger to be created. Enter the maximum Loop length the Trigger is to have - this can be entered as the number of seconds, or as minutes:seconds. Enter the expected number of times this Trigger Playlist is expected to play for the day (an average number of plays per Player), as this will affect predicted Frequency numbers.
If desired, specify a Default playlist for this Trigger. This will only play if nothing is scheduled to play at the affected Players. To add a Default playlist, click the ellipsis () to see a list of Scala Content Manager playlists. Select the desired playlist and click OK.
To randomize the Playlist each time it cycles through the Reservations, click the Auto-shuffle checkbox.
Setting up Slots
The Slot is the end product of all the work done on the Slot Structure. This is where users define each advertising opportunity for Players that will have this Slot Structure assigned.
To add a Slot, click the New button ()
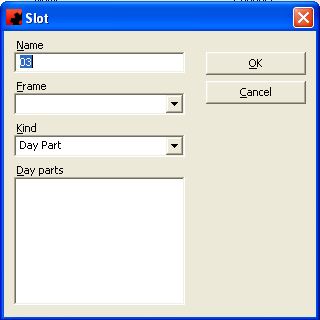
Enter the Name of the Slot that is for sale. This name will appear on reports to the client, so it should be descriptive enough to make sense as to what they are buying.
Select the Frame for which the Slot is being created, as well as the Kind of Slot that is being created - a Day Part Slot or a Trigger Slot.
If creating a Day Part Slot, select all of the Day Parts that build the Slot to be sold. For example, creating an "All Day" Slot in a scenario where there are multiple smaller Day Parts, each of these Day Parts would be selected. If there is only one Day Part (the "All Day" Day Part), select that Day Part. Once all the Day parts have selected that make up this Slot, click OK. Repeat the process for each Day Part Slot that will be sold.
If creating a Trigger Slot, select all of the Triggers that build the Slot to be sold. Once all the Triggers have been selected that make up this Slot, click OK. Repeat the process for each Trigger Slot that will be sold.
Assigning a Slot Structure to Players
To assign a Slot Structure to a Player, go to a list of Players. Select the Player(s) that will be assigned this Slot Structure, right click and select "Assign Slot Structure". Enter the date that this Slot Structure will take effect at these Players, and select the desired Slot structure. Click OK.
Note that if there is any Reservations scheduled to Players past this "Starting on" date, that have an old Slot Structure currently assigned, the Reservations will need to be modified as they will not play.
Changing a Slot Structure
To change a Slot Structure, best practice dictates creating a new one.


