Difference between revisions of "Posting How To"
(→Posting Routes) |
(→Printing Posting Cards) |
||
| Line 146: | Line 146: | ||
To run your posting cards or instructions, open the Reports window by clicking on the Reports button. Then go to Operational - Posting Cards and double-click on the Layout you wish to use. | To run your posting cards or instructions, open the Reports window by clicking on the Reports button. Then go to Operational - Posting Cards and double-click on the Layout you wish to use. | ||
| − | + | [[File:New_Posting_Card.JPG]] | |
Select Filter from the Options Page of the report. This will provide you with the ability to identify which posting tasks you want to print. | Select Filter from the Options Page of the report. This will provide you with the ability to identify which posting tasks you want to print. | ||
| − | + | [[File:New_Posting_Card_Filter.JPG]] | |
You can choose to see all tasks, or only those involving a Posting, Re-post or those involving a Take Down/Cover. You can also specify the Date(s) you want to print cards for. Ad Manager will only print cards for those Posting Tasks where the Due Date is within the date range specified. If no date range is entered under Due Date, every Posting Task in Ad Manager will be printed (subject to your other criteria). | You can choose to see all tasks, or only those involving a Posting, Re-post or those involving a Take Down/Cover. You can also specify the Date(s) you want to print cards for. Ad Manager will only print cards for those Posting Tasks where the Due Date is within the date range specified. If no date range is entered under Due Date, every Posting Task in Ad Manager will be printed (subject to your other criteria). | ||
| Line 161: | Line 161: | ||
Once you have printed your cards/instructions, Ad Manager will ask whether the cards/instructions have printed successfully. If they have, select "Yes" and Ad Manager will mark these cards as printed. When Ad Manager marks a card as being printed, it changes the Print Card item for the Posting Task to "No". Ad Manager will not print a card for the Posting Task again, even if you select the same criteria, unless you go to the Posting Task and update the Print Card item to "Yes". For more information on how to do this, click here. | Once you have printed your cards/instructions, Ad Manager will ask whether the cards/instructions have printed successfully. If they have, select "Yes" and Ad Manager will mark these cards as printed. When Ad Manager marks a card as being printed, it changes the Print Card item for the Posting Task to "No". Ad Manager will not print a card for the Posting Task again, even if you select the same criteria, unless you go to the Posting Task and update the Print Card item to "Yes". For more information on how to do this, click here. | ||
| − | |||
== Repost a Face == | == Repost a Face == | ||
Revision as of 09:26, 19 July 2013
How To Page for Posting.
Assigning a Photo to a Posting
Ad Manager allows users to add a photo of a completed posting when posting data are entered into Ad Manager.
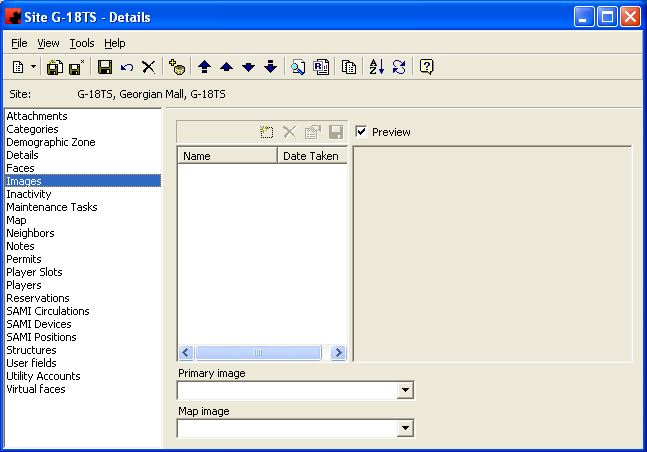
To add a photo, you need to add each posting one record at a time. While entering the Posting completion information, click on the Images Page.
To add a photo (BMP, JPG, EMF or GIF format) to the posting, click the New button (). Ad Manager will prompt you for a picture to associate with this completed posting. Find the desired picture on your computer, and click Open. Type a Name in that you wish to associate with this completed posting. This name may be used on reports and on the Internet through eAd Manager.
To use these images on your completion reports, specify a close-up image and an approach image by selecting them from their corresponding drop down lists.
Assigning Bill Posters
Manually Assigning Billposters
If you wish to assign a specific billposter to complete a posting task, display the list of Posting Tasks you wish to work from (either go to the Posting Task page for the appropriate Subcontract, or create a Finder that show all Posting Tasks that meet your criteria). Highlight the Posting Task(s) you wish to assign to a billposter. After you have highlighted the desired task(s), click the Update button () and click the check mark next to Billposter, and select the desired Billposter. This will allow you to filter are sort your posting cards by Billposter when printing them.
Automatically Assigning Billposters
If you have your Operations set up so that a Billposter always works the same Posting Route(s), Ad Manager can be set up to select the Billposter for you. To do this, find the desired Billposter and open the record by double clicking on them. From this screen you can add the Posting Route(s) for this Billposter by clicking on the New button () in the Posting routes box.
Once you have Billposters set up with their routes, you can display the list of Posting Tasks you wish to work from (either go to the Posting Task page for the appropriate Subcontract, or create a Finder that show all Posting Tasks that meet your criteria). Highlight the Posting Task(s) you wish to assign to a billposter. Go to the Tools menu and select Assign Billposter. Ad Manager will assign the appropriate Billposter to each task. If you have multiple Billposters assigned to the same route, Ad Manager will randomly distribute the Posting Task assignments to each Billposter.
Change a Posting Type
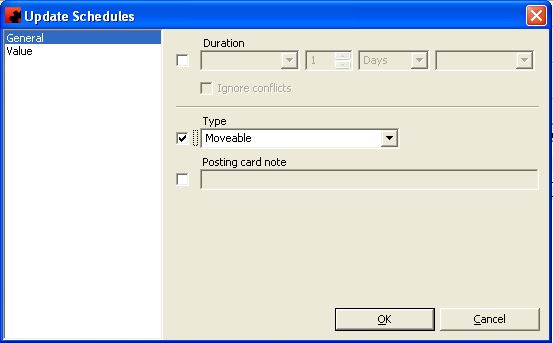
Ad Manager allows you to change the posting type of a Face at any time. Faces can be rescheduled as Pre-emptable, Moveable or Fixed.
To change the Posting Type, find the Subcontract where the Face you wish to change is assigned. Go to the Assigned Page and highlight the Face(s) to change. Click on the Tools menu and select Update or right click on a selected item and choose Update. Activate the posting type field by clicking in the checkbox next to it, and choose the posting type you wish to assign. Then click ok. If you wish to change the type from the Face, find the desired Face and click on the Posting Schedules Page. Highlight the item to change on the list, right click and choose Update. Activate the posting type field by clicking in the checkbox next to it, and choose the posting type you wish to assign. Then click ok.
Ad Manager will update the Posting Types accordingly.
Change or Remove Posting Information
Any posting information entered into Ad Manager can be corrected or removed if desired.
To make changes to posting information, you can either use the Find Tool (), or select the Face(s) from the Posting Tasks Page of the Subcontract.
Changing Information for One Face
To select the Face from the Posting Tasks Page of the Subcontract it is currently posted to, find the Subcontract and double-click the desired Face.
To use the Finder, select Posting Tasks in the Look For dropdown combo box. Using the search options locate the current Posting (posted, but not covered) for the desired Face and double-click on the posting task in the list.
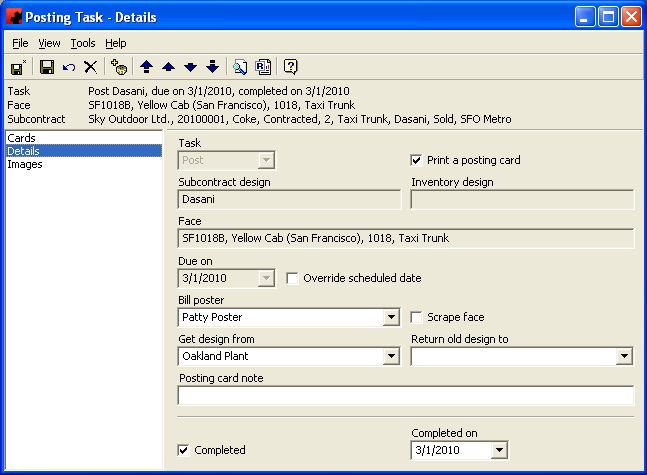
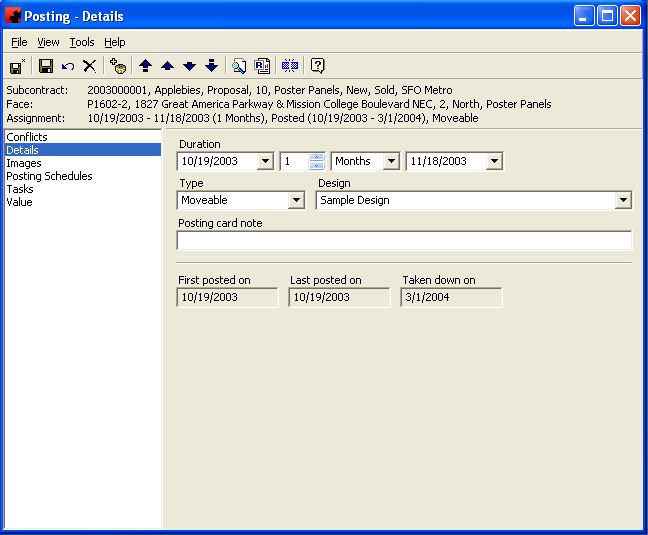
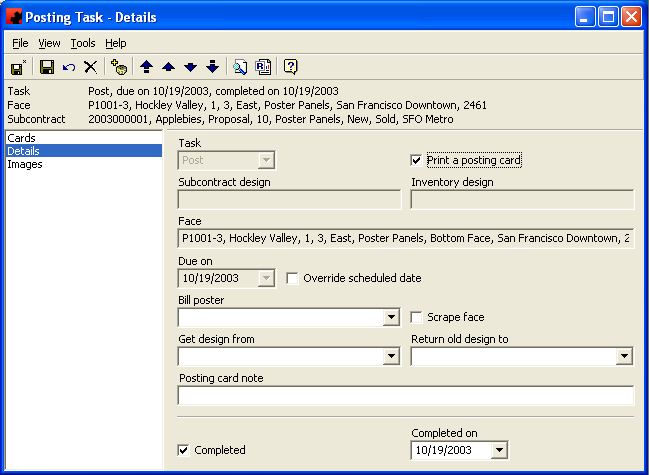
From this screen you can modify information as desired. If you wish to remove this posting, uncheck the completed box.
Changing Information for Multiple Faces
To select the Face(s) from the Posting Tasks Page of the Subcontract it is currently posted to, find the Subcontract and use CTRL+click or SHIFT+click to select the desired Face(s). Click on the Update button() to edit the posting information.
To use the Finder, select Posting Tasks in the Look For dropdown combo box. Using the search options locate the current Posting (posted, but not covered) for the desired Face(s), or select the Face(s) you wish to take down/cover from the list, using CTRL+click or SHIFT+click. Click on the Update button() to edit the posting information.
From this screen you can identify the information that you wish to change for all selected posting tasks. When finished, click OK.
Entering Postings with Incorrect Designs
There may be occasions where the design printed on a posting card/instruction is different than the design actually posted. In these situations, Ad Manager must be corrected to show the correct design.
If a Posting Card or Instructions sheet returns to the office with a note that a different design was used, this information needs to be entered into the postings. You can change the design posted either prior to, or following entry of the completion date for the Posting Task.
To change the assigned design in the system, you can either use the Find Tool (), or select the Face from the Assigned Page of the Subcontract.
To change the design from the Assigned Page of the Subcontract, find and double click the desired Face.
To use the Finder, select Postings in the Look For dropdown combo box. Using the search options locate the Face to be modified and double click it.
From this screen you can select the Design you want to show as posted to this Face. Click the Save () button to save your changes.
If you have not yet recorded the completion of the posting task, you can do so at this point by posting the Face(s).
Post Faces
Ad Manager allows you to select one Face to post or multiple Faces to post at the same time. If multiple Faces are selected then they will all be posted with the same information. To specify different information for different postings, select only the postings that have the same information (e.g. Billposter, Completion Date), record those postings, and then do the same for the next set of similar postings and repeat until all posting data are entered.
If you are entering posting information for a repost, the task will be listed as "Repost" on the list. If you are entering completion information for a Take Down/Cover, the Task listed will be "Take Down".
To enter a posting date use the Find Tool (), and select Posting Tasks in the Look For dropdown combo box, or go to the Posting Tasks Page of the appropriate Subcontract.
Entering One Posting Completion Record
To select the Face from the Posting Tasks Page of the Subcontract, find the Subcontract and double click the desired Face.
To use the Finder, select Posting Tasks in the Look For dropdown combo box. Using the search options locate the Face to be posted and double click it.
On this screen you can enter the desired information about this posting, including the fact the posting has been Completed, along with the completion date.
Entering Posting Completion Records by Face Number
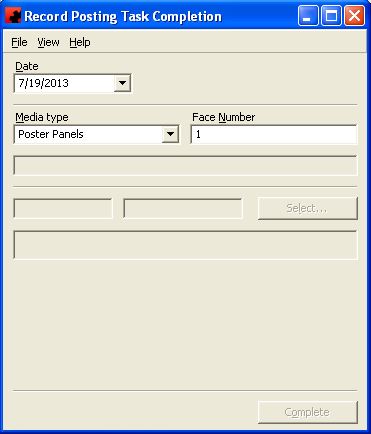
If you want to enter posting completion information on a Face by Face basis, you can do so from the Ad Manager Explorer window. Click on the Tools menu and select Record Postings. Ad Manager will prompt you to enter the media type and Face number to be posted. Enter the information and hit the Tab key on your keyboard. Ad Manager will show the posting task to be marked as completed. If this is the incorrect posting task for this Face, click the Select button and choose the correct one.
Once you have entered and corrected all the desired information, click the Complete button. Ad Manager will mark the item as completed, and you can enter the next Face. Click the "x" in the top right corner of the window to close the screen.
Entering Multiple Posting Completion Records at the Same Time
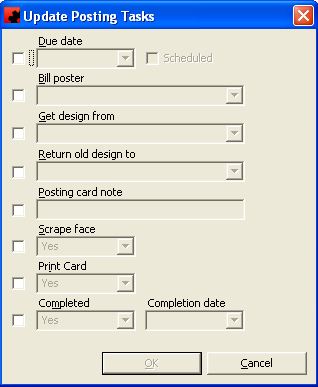
Using either the Posting Tasks Tab for the Subcontract or the search options from the Find Tool (), locate the Posting Task for the desired Faces, or select the Faces you wish to post from the list. This can be done using CTRL+click or SHIFT+click on the list to select the desired posting tasks. Once all the Faces to be posted with the same information are selected, click on the Update button (
) at the top of the screen.
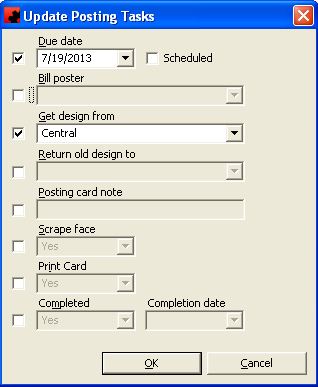
You will then be prompted to enter the information requested as follows:
From this screen, you click on the check box(es) adjacent to the item(s) you want to update. You will be able to identify the posting as being Completed (select "Yes") and the Completion (Posting) Date for this Face. If the Completion Date is left blank, then all highlighted records will be marked as posted on their scheduled Due Dates. You can also record other information as desired; the Bill Poster, whether the Face has been scraped, whether you want to reprint a card, which plant the design came from, and which plant the design was returned to. All selected posting tasks will be updated with this information.
To correct posting information, simply highlight the incorrect posting task, click on the Update button (), and change the desired information.
Posting Routes
This database contains information on routes. Routes are portions/sub areas of markets used for organizing bill posting. Bill posting cards or lists can be run by route, as well as various reports and lists printed sorted by route.
Routes are user-defined areas to assist billposters in finding the location and/or printing posting cards. Note that routes could be set up identical to areas.
Adding a New Route
To add a new Posting Route, click on the arrow beside the New icon () for a list of items you can add. Select OTHER, and then select Posting Route. The Posting Route Details Window will appear, and a new Posting Route can be entered.
Modifying a Route
To modify a Posting Route, simply click the database from the OTHER folder, then double click the desired item and make the change(s) necessary. Once you have finished, click the Save () button.
Deleting a Route
To delete a Posting Route, simply click the database from the OTHER folder, then highlight the item you wish to delete. Click the Delete icon (). Ad Manager will not allow you to delete a Posting Route if it is already in use.
Print Rotary Cards
Type topic text here.
Printing Posting Cards
Ad Manager allows you to issue instructions to your billposting crew or your subcontractor by issuing Posting Cards or Instructions. Posting Cards and Instructions are simply reports generated from within Ad Manager. As such, they can be customized like any other Ad Manager report to show the information you wish to provide, in the manner you wish to see it. For more information on customizing your own Posting Cards, click here.
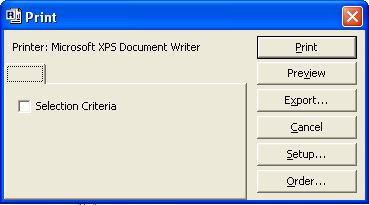
To run your posting cards or instructions, open the Reports window by clicking on the Reports button. Then go to Operational - Posting Cards and double-click on the Layout you wish to use.
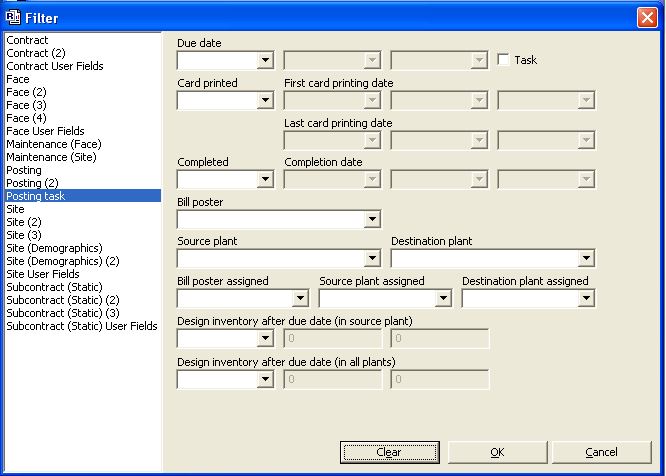
Select Filter from the Options Page of the report. This will provide you with the ability to identify which posting tasks you want to print.
You can choose to see all tasks, or only those involving a Posting, Re-post or those involving a Take Down/Cover. You can also specify the Date(s) you want to print cards for. Ad Manager will only print cards for those Posting Tasks where the Due Date is within the date range specified. If no date range is entered under Due Date, every Posting Task in Ad Manager will be printed (subject to your other criteria).
You can also choose to filter which Posting Tasks to include by selecting the desired items. For example, you may only wish to produce posting cards/instructions for Posting Tasks assigned to a certain Bill Poster, or select Posting Tasks where the Design is to originate from a particular source plant.
Once you have set all your desired criteria, click OK. You can also use the Order button to sort the cards/instructions as desired. For more information, see Sorting in Reports. At this point you can choose to preview, print or export your Posting Cards.
When printing Posting Cards or Instructions, any Posting Task (post, repost or take down/cover) with a Due Date within the identified range will print. If a Posting Card/Instruction that you were expecting did not print, check your Due Date and the criteria you set on the Filter.
Once you have printed your cards/instructions, Ad Manager will ask whether the cards/instructions have printed successfully. If they have, select "Yes" and Ad Manager will mark these cards as printed. When Ad Manager marks a card as being printed, it changes the Print Card item for the Posting Task to "No". Ad Manager will not print a card for the Posting Task again, even if you select the same criteria, unless you go to the Posting Task and update the Print Card item to "Yes". For more information on how to do this, click here.
Repost a Face
Ad Manager allows you to identify any Face that needs to be reposted. A repost in Ad Manager will allow you to issue a posting card for the same design; to post a different design, you must create a new posting assignment from the Assigned Page.
To schedule a repost in the system, you can either use the Find Tool (), or select the Face from the Assigned Page of the Subcontract.
To select the Face from the Assigned Page of the Subcontract it is currently posted to, find the Subcontract and right click the desired Face. Select New Task from the menu to enter the repost task information.
To use the Finder, select Postings in the Look For dropdown combo box. Using the search options locate the current Posting (posted, but not covered) for the desired Face, or select the Face you wish to repost from the list. Right click the posting that is to be reposted and click New Tasks to enter the repost task information.
Choose repost in the task pulldown menu. Enter the scheduled date for this Face to be reposted in the Due On field. Ad Manager will not print a Posting Card or Instruction for the repost until the new date is included in a date range for printing cards/instructions. For information on printing reposting cards, see Printing Posting Cards/Instructions.
If the repost has already happened, you can mark it as being Completed, along with the Completed On date. Otherwise completion information will be entered the same way as you would enter regular postings.
Rescheduling the Date to Print Cards
Certain situations may dictate a change in when posting cards are to be printed; late paper and inclement weather being two examples. Ad Manager allows you to change the Due Date for Posting cards quickly and easily.
Changing the Due Date for One Face
To select the Face from the Posting Tasks Page of the Subcontract, find the Subcontract and double click the desired Face.
To use the Finder, select Posting Tasks in the Look For dropdown combo box. Using the search options locate the Face to be posted and double click it.
To change the Due Date, click on "Override scheduled date" and enter the new date. Ad Manager will not print a Posting Card or Instruction for this Posting Task until the new date is included in a date range for printing cards/instructions.
Changing the Due Date for Multiple Faces
Using either the Posting Tasks Page for the Subcontract or the search options from the Find Tool (), locate the Posting Task for the desired Faces, or select the Faces you wish to post from the list. This can be done using CTRL+click or SHIFT+click on the list to select the desired posting tasks. Once all the Faces to be posted with the same information are selected, click on the Update button () at the top of the screen.
From this screen, you can change the Due Date by clicking in the box next to Due Date and entering the new date. Ad Manager will not print a Posting Card or Instruction for any of the selected Posting Tasks until the new date is included in a date range for printing cards/instructions.
Finding Faces to Post
To enter posting dates into Ad Manager the first step is to identify (find) the face(s) that require posting dates or to have their posting dates modified or removed. To create a list of faces to be posted, either individually or as a group click on the Find tool () and select the Postings menu item as shown below.
There are many selection criteria you can use to create a list of faces for posting data entry. Once you have selected Postings from the Find menu you will be displayed the following window:
This is an example of some of the criteria that can be used to create a list of locations for posting. For example in the above screen we have indicated that we only want to see locations that have not been posted. You can also add additional selection criteria as shown. Additional screens provide criteria options for more posting related criteria, face, site subcontract or contract criteria.
Fill out the required criteria in order to create a custom list to meet your needs. You can save this custom list in your Personnel Folder List (see Moving Around The Software).
Once you have entered the selection criteria click on the find tool () and a list of all the faces that met your criteria will be shown at the bottom of the screen as follows:
Now that you have a list you can enter posting data for any or all faces. For more information see Adding Posting Data. If you cannot find the face(s) you are looking for in this list your something in your selection criteria has eliminated the face from the list. Go back and modify the criteria if this happens.
Takedown or Cover Copy
The Take Down feature allows the user to identify any copy that is being removed, covered with blank copy, or scraped without new copy being put up. A Take Down/Cover is done to ensure the integrity of the Contract Performance information; Ad Manager will show no advertiser on the Face following a Take Down/Cover. A takedown/cover is not required as part of a repost or posting with scheduled copy.
To schedule a Take Down/Cover in the system, you can either use the Find Tool (), or select the Face from the Assigned Page of the Subcontract.
To select the Face from the Assigned Page of the Subcontract it is currently posted to, find the Subcontract and right click the desired Face and select Create Take Down task.
To use the Finder, select Postings in the Look For dropdown combo box. Using the search options locate the current Posting (posted, but not covered) for the desired Face, or select the Face you wish to take down/cover from the list. Right click the posting that is to be taken down/covered and select Create Take Down.
Ad Manager will create a new Take Down posting task for the current date. If you wish to edit the date for this Face to be Taken Down/Covered, double click the item and change the date in the Due On field. If there are no changes necessary for the task, simply close the window.
Ad Manager will not print a Posting Card or Instruction for the Take Down/Cover until the new date is included in a date range for printing cards/instructions. For information on printing Take Down/Cover cards, see Printing Posting Cards/Instructions.
If the Take Down/Cover has already happened, you can double click the posting task and mark it as being Completed, along with the Completed On date. Otherwise completion information will be entered the same way as you would enter regular postings.
