Difference between revisions of "Customizing a Report"
(Created page with "== Adding Your Own Reports == Ad Manager provides users with several standard reports that can be used in conjunction with daily operations. However, Ad Manager also provides ...") |
Latest revision as of 09:33, 5 January 2016
Contents |
Adding Your Own Reports
Ad Manager provides users with several standard reports that can be used in conjunction with daily operations. However, Ad Manager also provides users with the flexibility and power to create their own reports in the system. These reports can be customized and shared amongst all users, ensuring consistent reporting of information. To see all the reports in Ad Manager, click on the Reports button ().
This section provides a brief overview of the different parts of the custom reports. For more complete assistance, it is recommended you contact Market Information Services' staff for assistance.
System Reports
Ad Manager comes with several standard reports. System reports have a next to them. These reports cannot be deleted or altered. However, Ad Manager allows you to customize reports based on these templates.
Custom Reports
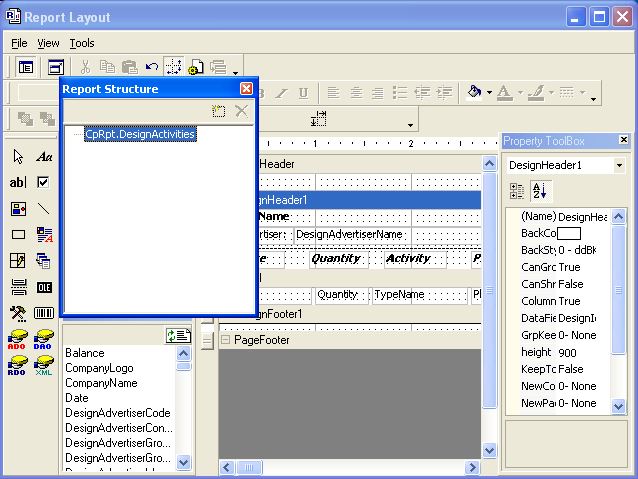
There are 2 different ways a report can be created in Ad Manager; you can Create a NEW report (with no previous detail on the report) or you can DUPLICATE an existing report (this will copy all the fields and formatting from the existing report into a new copy of the report). When you create a Custom Report, Ad Manager asks you for the name of the new report layout. This will be the name that is displayed in the listing of reports, so a descriptive name is recommended. After you have named the report, a screen similar to the one below will appear:
The Report Layout window has several components. The left most set of icons are the different controls that you can add to the report. To the right of the controls is an "Explorer" window and a "Fields" window. The Explorer window allows you to select fields on the report based on where they are located. The Fields window allows you to drag and drop Ad Manager fields onto the report. The center area of the Report Layout is the actual positioning and formatting of fields. Two other windows, the "Property Toolbox" and the "Report Structure" are also available. The Property Toolbox allows you to set information such as the font of a field. The Report Structure shows you which reports and subreports are used in this report.
Parts of a Layout
The actual Report Layout has 5 main components; a Page Header, a Group Header, the Detail, a Group Footer and a Page Footer. Information in the Page Header is displayed on the top of every page of this report. Ideally, the Page Header is used to display column titles. The Group Header is displayed whenever the information being used for grouping is changed. For example, if you are separating a list of faces by city, each city would be a group, and you may want the group header to display the city name. The Detail is where the actual information tends to be placed in Ad Manager reports. This will primarily be fields from Ad Manager that have been placed on the report. The Group Footer is displayed whenever the information being used for grouping changes. For example, if you are separating a list of faces by city, each city would be a group, and you may want the group footer to display the total number of faces in that city. Information in the Page Footer is displayed on the bottom of every page of this report.
Adding Information
If you want to add a field to a section of a Ad Manager report, scroll through the Fields Window and find the field you wish to display. Once you have found the desired field (you may need assistance from Market Information Services' staff via telephone or email support), simply drag the field onto the report. You can then position the field in the desired location and change the width (and height) of the field by clicking and dragging its edges. If you want to add some text to the report (e.g. a Column title), click on the Aa icon in the controls. You can then draw a box on the layout. This box will represent the position of your text. To change the text, make sure the box is selected and go to the Property Toolbox window and click in the CAPTION field. Whatever you type in this field will become the text displayed in that section of the report. To change the Font, click the ellipsis (...) next to Font in the Property Toolbox window and select the desired Font settings.
Adding User fields to a report
Ad Manager allows you to display user fields on reports as well. If, for example, you wanted to show all the Site user fields for each face, this can be easily accomplished.
Create a Subreport on the main Report for the Userfield object you wish to add. In the User Field Subreport, select the “FieldDefName” and “Value” fields (one at a time) from the Fields Toolbox, drag and place on the layout in the desired position.
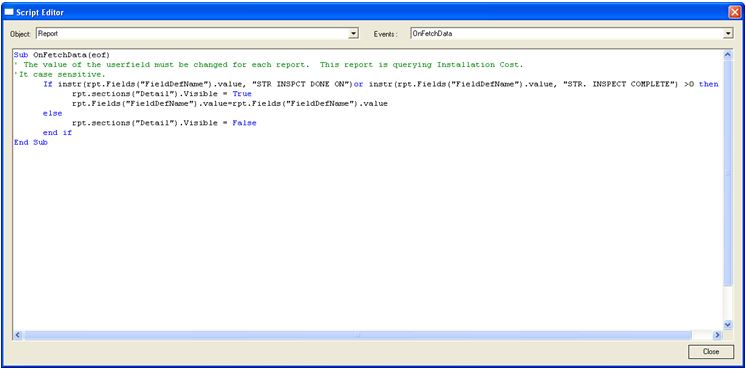
To add specific User fields, you must create a script in the Subreport. Ensure that the “FieldDefName” field and a “Value” field are on the Subreport layout prior to creating the script. Click on “View Script” ( ). Scripts are created using Visual Basic syntax.
In this screen, select “Report” as the Object and “OnFetchData” as the event.
If there is anything in the body of the window, delete and replace with the script.
It is imperative that the User Field name (in the example, Installation Date) be exactly the same name in Ad Manager. “Install Date”, “Installation” or “Date” would give no results.
Add the script to identify the User Field(s) to display in the OnFetchData event. Typically, the structure of the script will be:
Sub OnFetchData(eof)
   ' The value of the userfield must be changed for each report.  This report is querying Installation Cost. It is case sensitive.
   If instr(rpt.Fields("FieldDefName").value, "Installation Cost")>0 then
     rpt.sections("Detail").Visible = True
     rpt.Fields("FieldDefName").value=rpt.Fields("FieldDefName").value
   else
     rpt.sections("Detail").Visible = False
   end if
End Sub
When you have finished entering the script into the window, click “Close”.
To add more than one of the Userfields, you would use an “or” statement. In this example the 2 Userfields we wish to display are Installation Cost and Installation Date :
Sub OnFetchData(eof)
  ' The value of the userfield must be changed for each report.  This report is querying Installation Cost. It is case sensitive.
  If instr(rpt.Fields("FieldDefName").value, "Installation Cost") or instr(rpt.Fields("FieldDefName").value, "Installation Date")>0 then
    rpt.sections("Detail").Visible = True
    rpt.Fields("FieldDefName").value=rpt.Fields("FieldDefName").value
  else
    rpt.sections("Detail").Visible = False
  end if
End Sub
Now that we have finished customizing our report, we can go to the "File" menu and select "Save". At this point we can preview our report by going "File-Print".
This process of creating a report is the same, regardless of the type of report we are creating. By following the basic concepts of creating this report you should be able to create most of the day-to-day reports needed. If additional assistance is still required, please contact Dot2Dot support for assistance.
Deleting Information
To remove a field or a text box from the report, simply select the appropriate item. Once selected, hit the DELETE key on your keyboard. Ad Manager will then remove that field from the report. Remember, if you remove a field, check to see if there was a corresponding text label that also needs to be deleted.
Changing Information
If you wish to change the size, position or content of a field, select the field you wish to change. Once selected, you can move the field around the report, and resize it as appropriate. To change the size or font, go to the Property Toolbox window and click the ellipsis (...) next to Font. If you wish to change the content of the field, you can click on DataField in the Property Toolbox and select a new field of information to display.

