Difference between revisions of "SmartLink"
Lisa.mcrae (Talk | contribs) (→Initial Setup) |
Lisa.mcrae (Talk | contribs) (→Subcontract Specific Lighting) |
||
| (16 intermediate revisions by one user not shown) | |||
| Line 1: | Line 1: | ||
| − | + | This extension module communicates directly with OutdoorLink's SmartLink system, allowing you to manage the lighting on each panel based on AdManager posting schedule dates, specifically the Completed On date for the Posting Task and the Ends On date for the Posting. You can set it up so that the lights are on only when there is an active posting on the face in which case your daily publish will automatically turn off the lights if the active posting has expired and the next scheduled posting, if any, has not yet been installed. You can define different light schedules with 1, 2 or no lighting and each face with SmartLink lighting controls can be set to use a specific light schedule. Futhermore, you can easily assign special lighting needs for a campaign by overriding the light schedule for the subcontract. | |
==Initial Setup== | ==Initial Setup== | ||
| + | |||
| + | ===Options=== | ||
Go to Tools-Options-SmartLink. | Go to Tools-Options-SmartLink. | ||
| Line 8: | Line 10: | ||
| − | In the Connection | + | In the Connection section, provide the information that allows you to connect to the SmartLink system. Enter your license key provided by OutdoorLink, along with the specified User id and password. You can test your connection by clicking the Test button to ensure the information has been successfully entered. |
| − | In the Default Light Schedule | + | In the Default Light Schedule section, define your most commonly used light schedule that you wish to apply to faces in Ad Manager. This default light schedule will take effect if you have specified the SmartLink details for the Face, but have not supplied a specific light schedule for the Face. |
| − | In the Expired Posting Policy | + | In the Expired Posting Policy section, if the checkbox is ticked then Ad Manager will turn off the lights if the active posting at the face is expired. |
| − | Once you have entered the appropriate information, click OK to save. | + | Once you have entered the appropriate information, click OK to save the options. |
| + | |||
| + | ===Enable SmartLink Publishing for Faces=== | ||
| + | |||
| + | In addition to the SmartLink connection credential, you must also provide SmartLink information for each AdManager face. Each OutdoorLink light control is uniquely identified by its Plant, Structure, and Panel and this information must be added to the corresponding AdManager face. Open the detail view for the face and click on the SmartLink tab. Tick the checkbox labelled SmartLink controlled, enter the Plant, Structure, and Panel information, and save your changes. The Light schedule combo box is used to assign a schedule to the face as discussed below. | ||
| + | |||
| + | Please note that if the OutdoorLink information is not entered correctly, Ad Manager will not be able to send the lighting schedule command to the lighting controller. | ||
| + | |||
| + | [[File:FaceSmartLinkTab.png]] | ||
==Creating Light Schedules== | ==Creating Light Schedules== | ||
| − | + | In the main AdManager window, open the SmartLink Folder in the Tree View and select All LightSchedules. In the List view, right click and choose New. | |
| − | + | In the Light Schedule - Details view, specify details for the schedule. Give the schedule a meaningful name and code. Use the Schedule type combo box to choose whether the schedule has no lights (Always Off), one period or two periods of lighting. Specify the on and off times for the period(s) of lighting or choose to use sunset/sunrise as configured in SmartLink. Finally, click Save to create the schedule. | |
[[File:SmartLinkNewSchedule.png]] | [[File:SmartLinkNewSchedule.png]] | ||
| Line 30: | Line 40: | ||
===Single Face=== | ===Single Face=== | ||
| − | To update a single face with a lighting schedule, | + | To update a single face with a lighting schedule, open the Face detail view and go to the SmartLink tab. The face must be SmartLink controlled as described above in Initial Setup. Choose the desired lightschedule for the face from the Light schedule combo box. If you leave the Light schedule blank, the Default schedule defined in Tools-Options will be used. |
| − | + | ||
| − | + | ||
| − | + | ||
| − | + | ||
| − | + | ||
===Multiple Faces at a Time=== | ===Multiple Faces at a Time=== | ||
| − | If you wish to update multiple faces at a time, highlight | + | If you wish to update multiple faces at a time, in a list of faces highlight a selection of faces, right click and choose Update Light Schedule. Tick the check box beside Light Schedule to enable the combo box where you can choose the light schedule for the faces. Click OK to update the faces. If you leave the combo box blank, the Default schedule defined in Tools-Options will be used for the faces. |
| − | [[File:SmartLinkUpdateLightSchedule. | + | [[File:SmartLinkUpdateLightSchedule.png]] |
| + | ==Subcontract Specific Lighting== | ||
| − | + | Ad Manager allows you to specify lighting overrides for a campaign, if desired. You can choose: | |
| + | *a specific light schedule for all postings in the campaign | ||
| + | *an Expiry policy for the campaign | ||
| + | If you wish to use this feature, go to the Subcontract - Detail and click on the SmartLink tab. | ||
| − | + | To apply a specific light schedule for the subcontract, select the desired light in the Light schedule combo box. This light schedule will be used for all postings in the subcontract, overriding the schedule that is set at the Face or the Default schedule defined in Tools Options. | |
| − | + | For the expiry policy you can choose to use the system policy set in Tools Options, or you can set a custom policy for the subcontract. For the custom policy, use the check box to specify if the lights should be turned off when a posting has expired. | |
| − | + | Click Save after you have made any changes to the subcontract. | |
| + | [[File:SmartLinkSubcontract.png]] | ||
| − | + | NOTE: If you wish to update the light schedule for multiple Subcontracts, highlight the Subcontracts in a List View, right click and select Update Light Schedule. Click the Light Schedule check box, choose the desired light schedule in the combo box, then click OK. | |
| − | + | ==Publishing Light Schedules to SmartLink== | |
| + | === Force Option === | ||
| − | + | Ad Manager tracks, for each face, the last light schedule that was published to SmartLink. When publishing, normally Ad Manager will only send a command to SmartLink if the light schedule needs to be changed. This is done to reduce the amount of data that SmartLink sends out to the lighting control units. The "Force" option tells Ad Manager to just send the light schedule without comparing. This is useful if the Ad Manager cache is not in sync with the light schedule that is being used at the panel, e.g. you use the SmartLink website to change the light schedule. | |
| − | + | === Manual Publishing === | |
[[File:SmartLinkPublishingOptions.png]] | [[File:SmartLinkPublishingOptions.png]] | ||
| − | + | When you publish manually, the above dialog allows you to choose the Force option. When you click OK, a progress dialog opens showing publishing details and results for each face. On completion a summary of the process lets you know how many succeeded, failed, did not need updating, and require attention because they are expired. Additionally, the results are output to a log file. Check your AppData folder for Dot2Dot\SmartLink Add-in\Logs\SmartLinkPublisher_db-yyyy-mm-dd.log, where db is the name of your database. | |
| − | + | ||
| − | + | ||
| − | + | ||
| − | + | ||
| − | + | ||
| − | + | ||
| − | + | '''All Faces:''' If you wish to send light schedules for all SmartLink controlled Faces, use Tools-SmartLink-Publish Schedules to SmartLink from the main Ad Manager page. | |
| − | Face(s): You can publish the | + | '''Selected Face(s):''' You can publish the light schedule for a single face or a selection of faces. On the Face - Details page, use Tools-Publish Schedule to SmartLink. If you are viewing a list of faces, select one or more faces, right-click on the selection and choose Publish Schedule to SmartLink from the context menu. |
| − | Subcontract: You can publish the lightschedule for the contracted faces of a subcontract. | + | '''Subcontract:''' You can publish the lightschedule for the contracted faces of a subcontract. On the Subcontract - Details page, choose Tools-Publish Schedule to SmartLink. If viewing a list of subcontracts, select one, right-click on the selected subcontract and choose Publish Schedule to SmartLink from the context menu. |
=== Scheduled Publishing === | === Scheduled Publishing === | ||
A scheduled task can be configured to run daily to update light schedules after your day's postings have been entered into Ad Manager as completed. A configuration xml file is used to specify publishing options. | A scheduled task can be configured to run daily to update light schedules after your day's postings have been entered into Ad Manager as completed. A configuration xml file is used to specify publishing options. | ||
Latest revision as of 11:12, 25 October 2016
This extension module communicates directly with OutdoorLink's SmartLink system, allowing you to manage the lighting on each panel based on AdManager posting schedule dates, specifically the Completed On date for the Posting Task and the Ends On date for the Posting. You can set it up so that the lights are on only when there is an active posting on the face in which case your daily publish will automatically turn off the lights if the active posting has expired and the next scheduled posting, if any, has not yet been installed. You can define different light schedules with 1, 2 or no lighting and each face with SmartLink lighting controls can be set to use a specific light schedule. Futhermore, you can easily assign special lighting needs for a campaign by overriding the light schedule for the subcontract.
Contents |
Initial Setup
Options
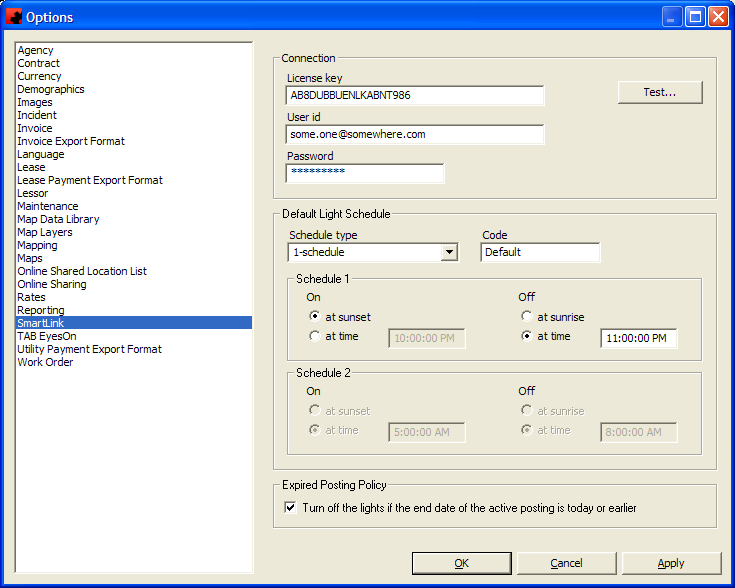
Go to Tools-Options-SmartLink.
In the Connection section, provide the information that allows you to connect to the SmartLink system. Enter your license key provided by OutdoorLink, along with the specified User id and password. You can test your connection by clicking the Test button to ensure the information has been successfully entered.
In the Default Light Schedule section, define your most commonly used light schedule that you wish to apply to faces in Ad Manager. This default light schedule will take effect if you have specified the SmartLink details for the Face, but have not supplied a specific light schedule for the Face.
In the Expired Posting Policy section, if the checkbox is ticked then Ad Manager will turn off the lights if the active posting at the face is expired.
Once you have entered the appropriate information, click OK to save the options.
Enable SmartLink Publishing for Faces
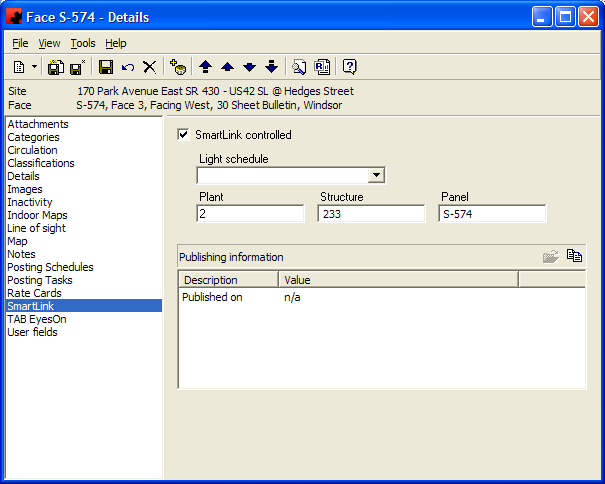
In addition to the SmartLink connection credential, you must also provide SmartLink information for each AdManager face. Each OutdoorLink light control is uniquely identified by its Plant, Structure, and Panel and this information must be added to the corresponding AdManager face. Open the detail view for the face and click on the SmartLink tab. Tick the checkbox labelled SmartLink controlled, enter the Plant, Structure, and Panel information, and save your changes. The Light schedule combo box is used to assign a schedule to the face as discussed below.
Please note that if the OutdoorLink information is not entered correctly, Ad Manager will not be able to send the lighting schedule command to the lighting controller.
Creating Light Schedules
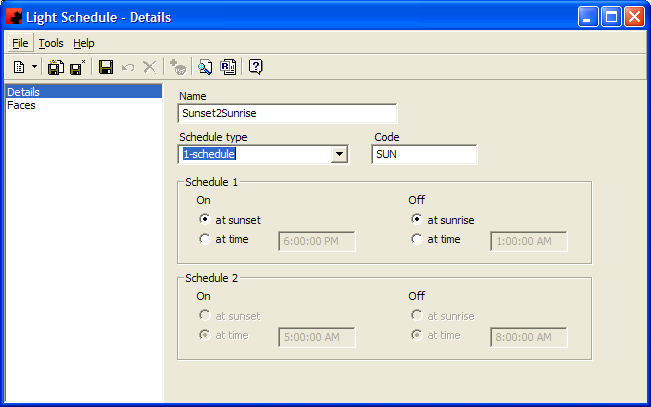
In the main AdManager window, open the SmartLink Folder in the Tree View and select All LightSchedules. In the List view, right click and choose New.
In the Light Schedule - Details view, specify details for the schedule. Give the schedule a meaningful name and code. Use the Schedule type combo box to choose whether the schedule has no lights (Always Off), one period or two periods of lighting. Specify the on and off times for the period(s) of lighting or choose to use sunset/sunrise as configured in SmartLink. Finally, click Save to create the schedule.
Assigning Light Schedules to Faces
When assigning a light schedule to a Face, you can either do this one face at a time, or multiple faces at a time.
Single Face
To update a single face with a lighting schedule, open the Face detail view and go to the SmartLink tab. The face must be SmartLink controlled as described above in Initial Setup. Choose the desired lightschedule for the face from the Light schedule combo box. If you leave the Light schedule blank, the Default schedule defined in Tools-Options will be used.
Multiple Faces at a Time
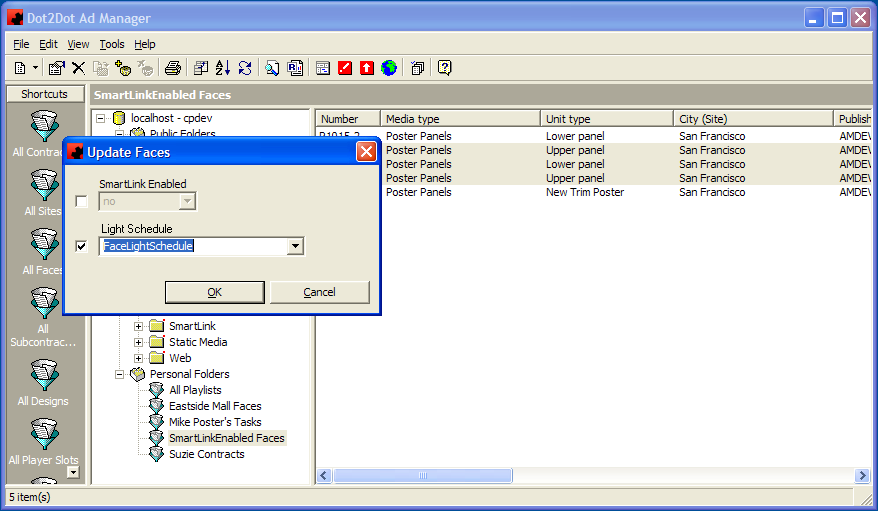
If you wish to update multiple faces at a time, in a list of faces highlight a selection of faces, right click and choose Update Light Schedule. Tick the check box beside Light Schedule to enable the combo box where you can choose the light schedule for the faces. Click OK to update the faces. If you leave the combo box blank, the Default schedule defined in Tools-Options will be used for the faces.
Subcontract Specific Lighting
Ad Manager allows you to specify lighting overrides for a campaign, if desired. You can choose:
- a specific light schedule for all postings in the campaign
- an Expiry policy for the campaign
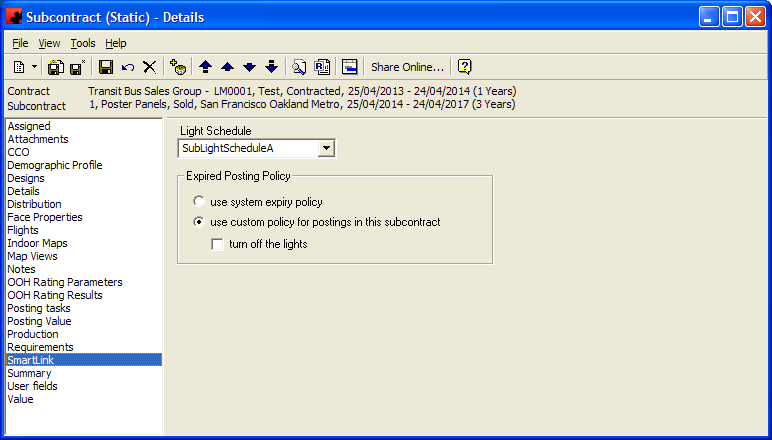
If you wish to use this feature, go to the Subcontract - Detail and click on the SmartLink tab.
To apply a specific light schedule for the subcontract, select the desired light in the Light schedule combo box. This light schedule will be used for all postings in the subcontract, overriding the schedule that is set at the Face or the Default schedule defined in Tools Options.
For the expiry policy you can choose to use the system policy set in Tools Options, or you can set a custom policy for the subcontract. For the custom policy, use the check box to specify if the lights should be turned off when a posting has expired.
Click Save after you have made any changes to the subcontract.
NOTE: If you wish to update the light schedule for multiple Subcontracts, highlight the Subcontracts in a List View, right click and select Update Light Schedule. Click the Light Schedule check box, choose the desired light schedule in the combo box, then click OK.
Publishing Light Schedules to SmartLink
Force Option
Ad Manager tracks, for each face, the last light schedule that was published to SmartLink. When publishing, normally Ad Manager will only send a command to SmartLink if the light schedule needs to be changed. This is done to reduce the amount of data that SmartLink sends out to the lighting control units. The "Force" option tells Ad Manager to just send the light schedule without comparing. This is useful if the Ad Manager cache is not in sync with the light schedule that is being used at the panel, e.g. you use the SmartLink website to change the light schedule.
Manual Publishing
When you publish manually, the above dialog allows you to choose the Force option. When you click OK, a progress dialog opens showing publishing details and results for each face. On completion a summary of the process lets you know how many succeeded, failed, did not need updating, and require attention because they are expired. Additionally, the results are output to a log file. Check your AppData folder for Dot2Dot\SmartLink Add-in\Logs\SmartLinkPublisher_db-yyyy-mm-dd.log, where db is the name of your database.
All Faces: If you wish to send light schedules for all SmartLink controlled Faces, use Tools-SmartLink-Publish Schedules to SmartLink from the main Ad Manager page.
Selected Face(s): You can publish the light schedule for a single face or a selection of faces. On the Face - Details page, use Tools-Publish Schedule to SmartLink. If you are viewing a list of faces, select one or more faces, right-click on the selection and choose Publish Schedule to SmartLink from the context menu.
Subcontract: You can publish the lightschedule for the contracted faces of a subcontract. On the Subcontract - Details page, choose Tools-Publish Schedule to SmartLink. If viewing a list of subcontracts, select one, right-click on the selected subcontract and choose Publish Schedule to SmartLink from the context menu.
Scheduled Publishing
A scheduled task can be configured to run daily to update light schedules after your day's postings have been entered into Ad Manager as completed. A configuration xml file is used to specify publishing options.
