Difference between revisions of "TAB OOH Ratings Module"
Pat.wilkin (Talk | contribs) (→TAB Set up) |
Pat.wilkin (Talk | contribs) (→TAB Set up) |
||
| (24 intermediate revisions by one user not shown) | |||
| Line 2: | Line 2: | ||
In order to use the TAB OOH Ratings module, it must first be installed on each computer that will be using it (please note that Ad Manager must also be installed on these machines). | In order to use the TAB OOH Ratings module, it must first be installed on each computer that will be using it (please note that Ad Manager must also be installed on these machines). | ||
| − | Next, on one of the computers which has the module installed, log into Ad Manager, and go to Tools-Options | + | Next, on one of the computers which has the module installed, log into Ad Manager, and go to Tools-Options in the main explorer window and select TAB EyesOn. On the following screen, enter the company's TAB supplied userid and password, and click <Test>. Ad Manager will notify users if the connection test was successful. If not, check the TAB userid and password to ensure that it has been entered correctly. |
[[File:TAB Options.PNG]] | [[File:TAB Options.PNG]] | ||
| − | Once successfully connected to the TAB server, click <Copy> to retrieve the background databases from the TAB server. | + | Once successfully connected to the TAB server, click <Copy> to retrieve the background databases from the TAB server. Ad Manager will notify users if the information was copied successfully. |
Click OK when done. | Click OK when done. | ||
| + | |||
| + | NOTE: Companies must contact TAB in order to obtain their web services log-in to be able to use the module. There may be an additional cost incurred from TAB to obtain this. | ||
| + | |||
| + | NOTE: Each time TAB notifies that there are updates to the Demographic and/or Market Information, users must click <Copy> to retrieve the latest data. | ||
NOTE: If the module was installed in your company '''PRIOR''' to release 5.7.2, contact Dot2Dot for directions and SQL scripts that will need to be executed BEFORE upgrading to this release. | NOTE: If the module was installed in your company '''PRIOR''' to release 5.7.2, contact Dot2Dot for directions and SQL scripts that will need to be executed BEFORE upgrading to this release. | ||
=Face Setup= | =Face Setup= | ||
| − | =Face | + | |
| − | =Subcontract Generator= | + | In order to run a TAB OOH Ratings query, users will need to enter the TAB Id number on each Face of their inventory in the data. |
| + | |||
| + | To do this, double click to open the Face, and select the TAB EyesON page. | ||
| + | |||
| + | [[File:Face Set Up.jpg]] | ||
| + | |||
| + | Enter the number and save the record. | ||
| + | |||
| + | =Face OOH Ratings Generator= | ||
| + | |||
| + | The TAB OOH Ratings Module can be run to generate information for a selection of Faces. It is run when on a listing of Faces (Finder of Faces, Basket of Faces, etc). | ||
| + | |||
| + | Select the Faces in the list on which to run the Module. | ||
| + | |||
| + | [[File:Face selection with Tool showing.jpg]] | ||
| + | |||
| + | Click Tools in the Menu items and choose either:- | ||
| + | |||
| + | "Calculate OOH Ratings for All" - choose this to run the Module against the entire list of Faces. | ||
| + | |||
| + | "Calculage OOH Ratings for Selection" - choose this to run the Module against only those Faces in the list that have been selected. | ||
| + | |||
| + | |||
| + | In the Calculate OOH Ratings window select the Market, Demographic, Category, Sex(s) (as appropriate to your query). Enter the No. of Weeks and the Total Cost per Panel to be included in the calculations. | ||
| + | |||
| + | [[File:Calculate OOH Ratings Set up for Faces.jpg]] | ||
| + | |||
| + | When all information has been entered, click <Process Plan>. Ad Manager will retrieve the information from the TAB cloud and display the results. | ||
| + | |||
| + | [[File:Calculate OOH Ratings Results for Faces.jpg]] | ||
| + | |||
| + | The results list can be customized to add/remove columns of data as desired. To do this, right click on the list and choose "Customize Current View" | ||
| + | |||
| + | [[File:Calculate OOH Ratings Customize Current View.jpg]] | ||
| + | |||
| + | To copy the data to be opened in other software such as Word or Excel, click <Copy to Clipboard>. Paste and edit as required for presentations, etc. | ||
| + | |||
| + | [[File:Copy to Clipboard Paste to Excel.jpg]] | ||
| + | |||
| + | =Subcontract OOH Ratings Generator= | ||
| + | In order to run the OOH Module against a Subcontract (Static), Faces must be assigned to it, and Posting Value must be entered in order to obtain specific cost results. | ||
| + | |||
| + | [[File:Subcontract with Faces assigned Value.jpg]] | ||
| + | |||
| + | ===Entering OOH Ratings Paramaters=== | ||
| + | |||
| + | Click on the OOH Rating Parameters page to set up the criteria for the rating. | ||
| + | |||
| + | Select the Market from the dropdown list. | ||
| + | |||
| + | To add the Demographics criteria, click the "New" button and in the following window enter Demographic, Category and Sex(s) criteria by selecting from the dropdown list in each field. When completed, click <Add>, and then <Done>. Note that users may enter more than one Demographic criteria, as required. | ||
| + | |||
| + | [[File:Add Demographics to Plan set up.jpg]] | ||
| + | |||
| + | When all Demographic Parameters have been added, click the Save button in the toolbar. | ||
| + | |||
| + | Click <Process Plan> to generate the OOH Ratings. Ad Manager will retrieve the data from the TAB cloud and display the results. | ||
| + | |||
| + | [[File:Subcontract Process Plan Resuts.jpg]] | ||
| + | |||
| + | ===Viewing OOH Ratings by Posting=== | ||
| + | |||
| + | To view the OOH Ratings by Posting, click on the OOH Rating Results page. | ||
| + | |||
| + | In the Summary pane, select the Demographic criteria to be viewed. The bottom pane will display the detail by Posting (Face). | ||
| + | |||
| + | [[File:Subcontract OOH Rating Results page.jpg]] | ||
| + | |||
| + | To copy the data to be opened in other software such as Word or Excel, select the Postings, right click and choose "Copy". Paste and edit as required for presentations, etc. | ||
| + | |||
| + | [[File:Subcontract OOH Results in Excel.jpg]] | ||
Latest revision as of 08:09, 6 November 2014
Contents |
TAB Set up
In order to use the TAB OOH Ratings module, it must first be installed on each computer that will be using it (please note that Ad Manager must also be installed on these machines).
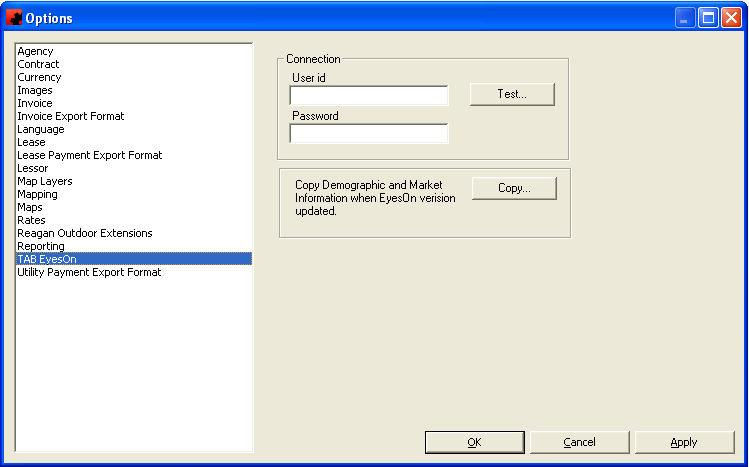
Next, on one of the computers which has the module installed, log into Ad Manager, and go to Tools-Options in the main explorer window and select TAB EyesOn. On the following screen, enter the company's TAB supplied userid and password, and click <Test>. Ad Manager will notify users if the connection test was successful. If not, check the TAB userid and password to ensure that it has been entered correctly.
Once successfully connected to the TAB server, click <Copy> to retrieve the background databases from the TAB server. Ad Manager will notify users if the information was copied successfully.
Click OK when done.
NOTE: Companies must contact TAB in order to obtain their web services log-in to be able to use the module. There may be an additional cost incurred from TAB to obtain this.
NOTE: Each time TAB notifies that there are updates to the Demographic and/or Market Information, users must click <Copy> to retrieve the latest data.
NOTE: If the module was installed in your company PRIOR to release 5.7.2, contact Dot2Dot for directions and SQL scripts that will need to be executed BEFORE upgrading to this release.
Face Setup
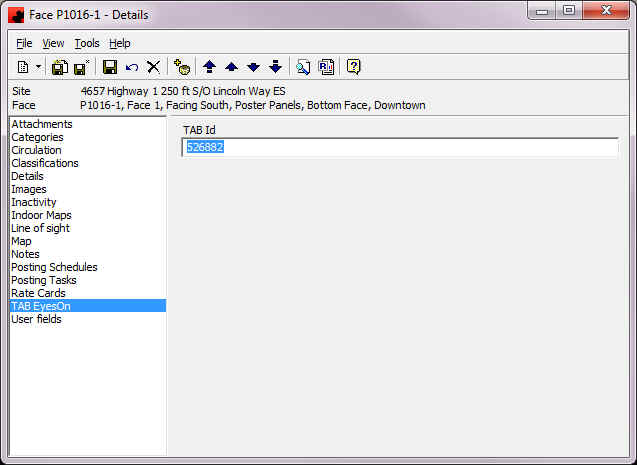
In order to run a TAB OOH Ratings query, users will need to enter the TAB Id number on each Face of their inventory in the data.
To do this, double click to open the Face, and select the TAB EyesON page.
Enter the number and save the record.
Face OOH Ratings Generator
The TAB OOH Ratings Module can be run to generate information for a selection of Faces. It is run when on a listing of Faces (Finder of Faces, Basket of Faces, etc).
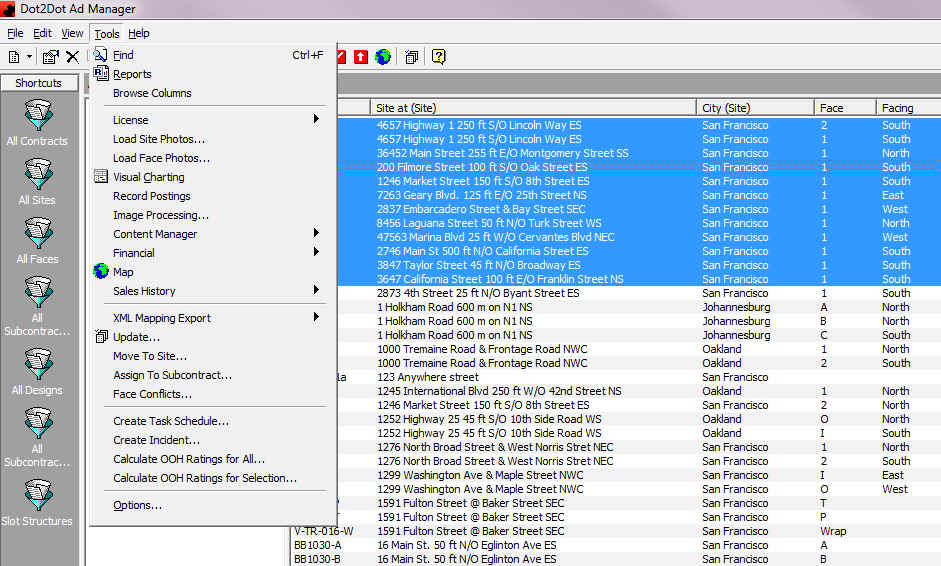
Select the Faces in the list on which to run the Module.
Click Tools in the Menu items and choose either:-
"Calculate OOH Ratings for All" - choose this to run the Module against the entire list of Faces.
"Calculage OOH Ratings for Selection" - choose this to run the Module against only those Faces in the list that have been selected.
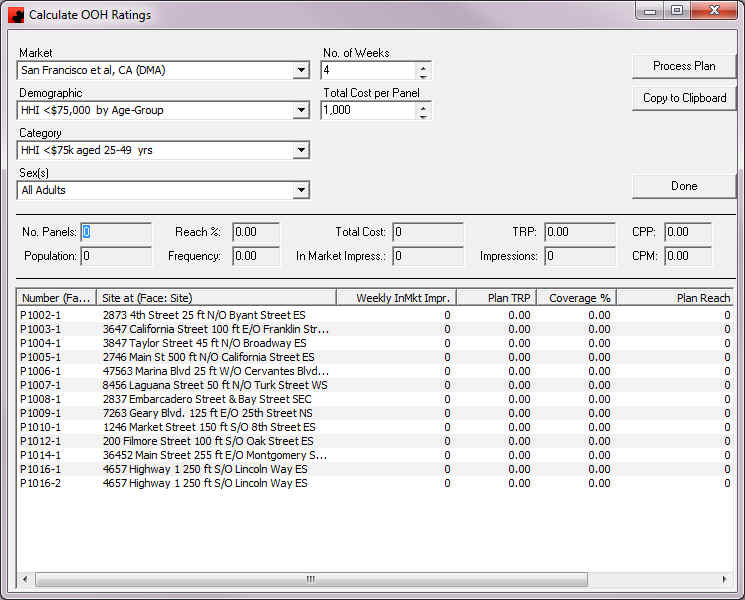
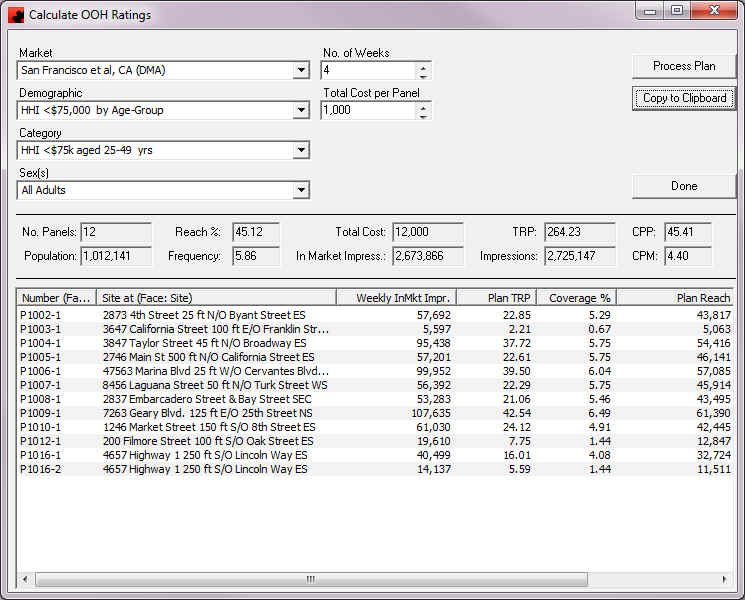
In the Calculate OOH Ratings window select the Market, Demographic, Category, Sex(s) (as appropriate to your query). Enter the No. of Weeks and the Total Cost per Panel to be included in the calculations.
When all information has been entered, click <Process Plan>. Ad Manager will retrieve the information from the TAB cloud and display the results.
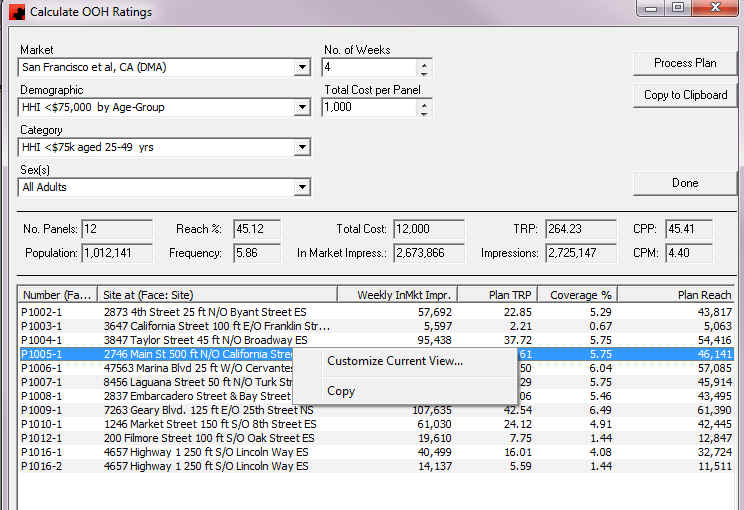
The results list can be customized to add/remove columns of data as desired. To do this, right click on the list and choose "Customize Current View"
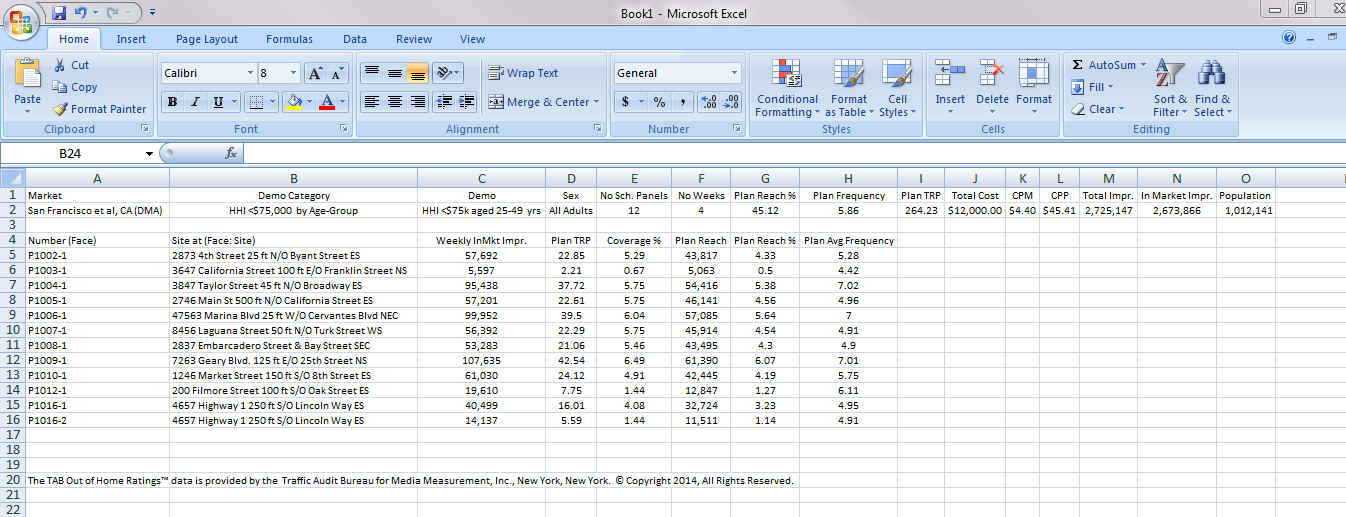
To copy the data to be opened in other software such as Word or Excel, click <Copy to Clipboard>. Paste and edit as required for presentations, etc.
Subcontract OOH Ratings Generator
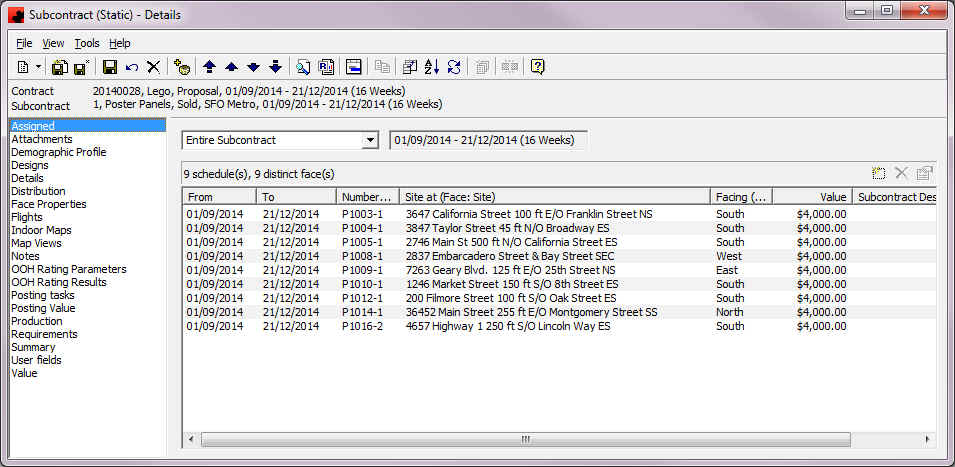
In order to run the OOH Module against a Subcontract (Static), Faces must be assigned to it, and Posting Value must be entered in order to obtain specific cost results.
Entering OOH Ratings Paramaters
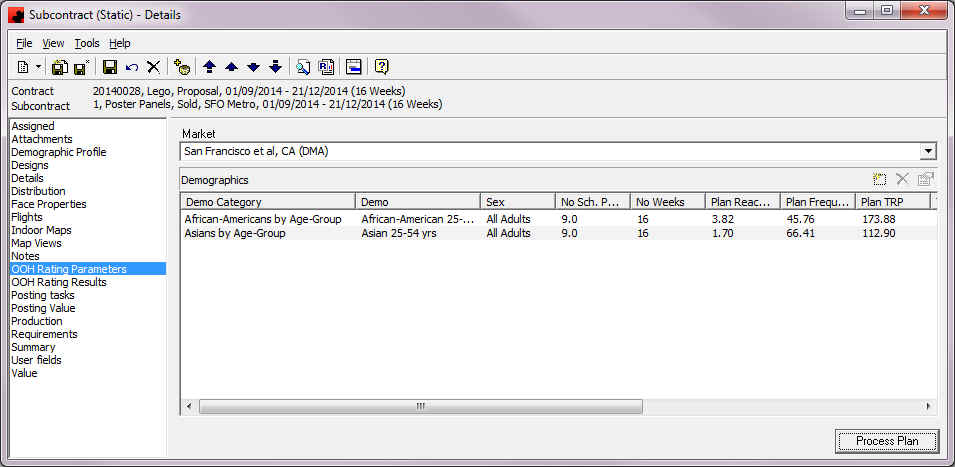
Click on the OOH Rating Parameters page to set up the criteria for the rating.
Select the Market from the dropdown list.
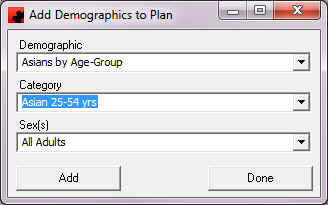
To add the Demographics criteria, click the "New" button and in the following window enter Demographic, Category and Sex(s) criteria by selecting from the dropdown list in each field. When completed, click <Add>, and then <Done>. Note that users may enter more than one Demographic criteria, as required.
When all Demographic Parameters have been added, click the Save button in the toolbar.
Click <Process Plan> to generate the OOH Ratings. Ad Manager will retrieve the data from the TAB cloud and display the results.
Viewing OOH Ratings by Posting
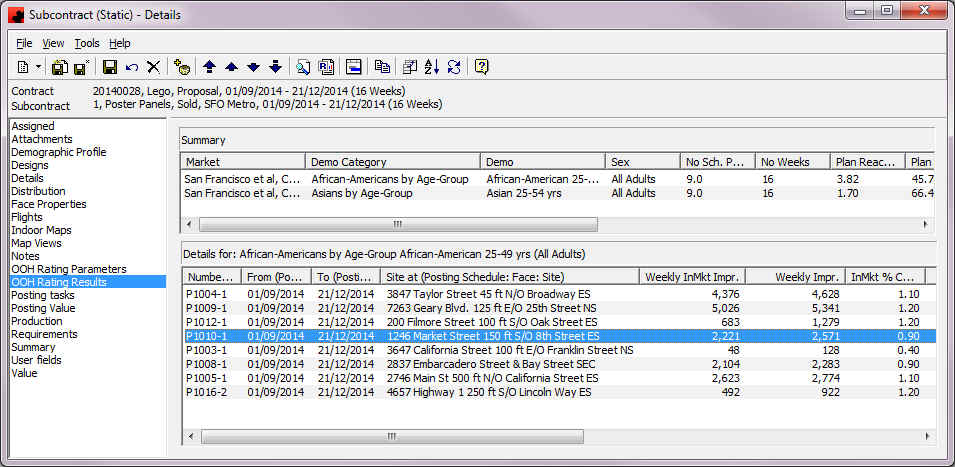
To view the OOH Ratings by Posting, click on the OOH Rating Results page.
In the Summary pane, select the Demographic criteria to be viewed. The bottom pane will display the detail by Posting (Face).
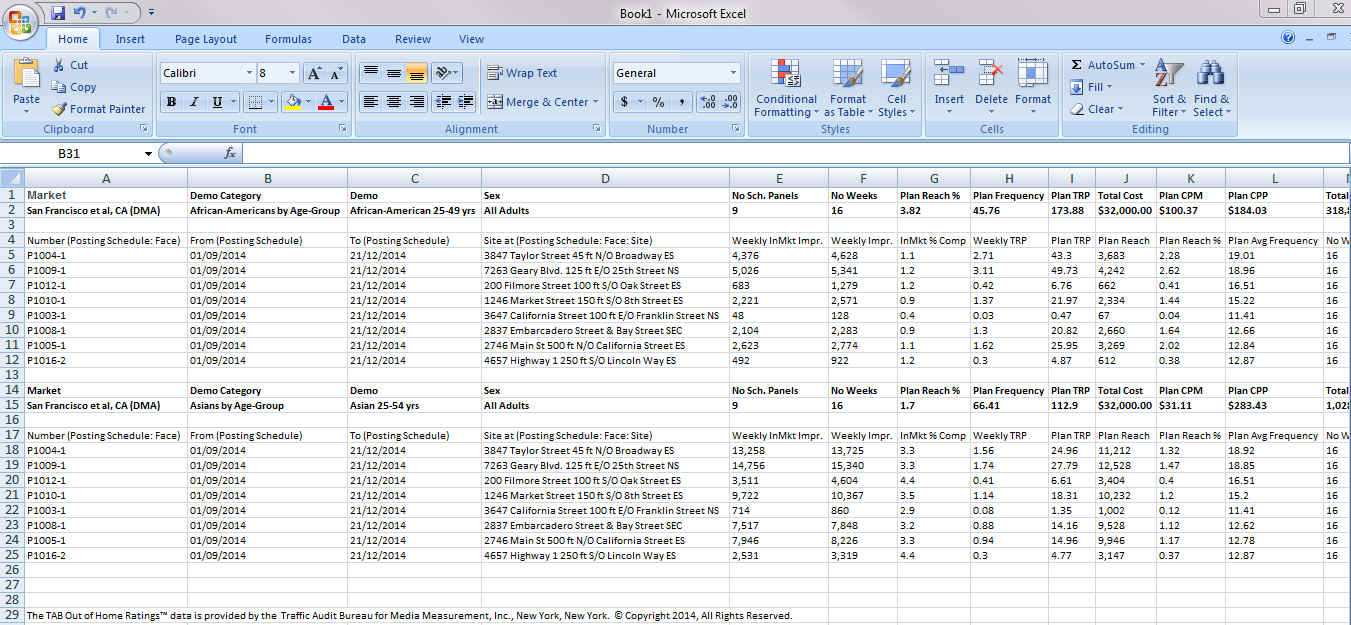
To copy the data to be opened in other software such as Word or Excel, select the Postings, right click and choose "Copy". Paste and edit as required for presentations, etc.
