Difference between revisions of "Sales History"
m (→To use the Sales History module) |
m (→Using a Scheduled Service to Record a Snapshot) |
||
| (6 intermediate revisions by one user not shown) | |||
| Line 1: | Line 1: | ||
| − | == | + | =Sales History Module= |
| + | The Sales History module tracks changes made to Contracts and Invoices in Ad Manager. Users can record a snapshot of the details of contracts and invoices at a certain time and then compare them to another time. The Sales History module allows you to see what has changed between these dates, and to see the history of changes made to a contract or invoice. | ||
| + | |||
| + | =Recording a snapshot= | ||
| + | |||
| + | In order to use this report, periodic snapshots of the data need to be taken. To take a snapshot, | ||
| + | # Go to Tools-Sales History | ||
| + | # Click Capture | ||
| + | |||
| + | This will grab the values for all invoice and contract values and store them with the date the snapshot was taken. This allows you to compare differences between two periods. | ||
| + | |||
| + | =Using a Scheduled Service to Record a Snapshot= | ||
| + | |||
| + | Users can set up a scheduled service in the Windows Task Scheduler to record a snapshot at specified intervals. This allows you to be able to do daily or weekly comparisons if desired. In order to run this as a scheduled task, you will need to create a "SalesHist.cfg" file. | ||
| + | |||
| + | To create the SalesHist.cfg file, go to the Program Files (or Program Files (x86)) directory and go to Dot2Dot\Ad Manager\ and run "CpSHist.exe". When you do this, the following screen will appear: | ||
| + | |||
| + | [[File:SalesHist cfg1.PNG]] | ||
| + | |||
| + | Highlight and copy the information below "Configuration XML:" - you only need the section that starts with <CpSHist> and ends with </CpSHist>. | ||
| + | |||
| + | Open Notepad and paste the information. Next, edit the information so that your server, database, userid and password, as well as your desired destination for the log file are in the file and save it as SalesHist.cfg. If you use windows authentication to log in, leave the userid and password blank. | ||
| + | |||
| + | [[File:SalesHist cfg2.PNG]] | ||
| + | |||
| + | '''Please ensure that the user selected can successfully log into Ad Manager with that username and password on that machine, or the utility may not run.''' | ||
| + | |||
| + | Once this is done, open Task scheduler and set it up to run. The command line should read CpSHist.exe [the location of your cfg file]. For example, if you were to place the SalesHist.cfg file in "C:\temp", then the command line would read '''"C:\Program Files\Dot2Dot\Ad Manager\CpSHist.exe" "c:\temp\SalesHist.cfg"''' | ||
| + | |||
| + | =Usage= | ||
# Go to Tools-Sales History | # Go to Tools-Sales History | ||
| Line 15: | Line 44: | ||
# Open Excel and click Edit-Paste | # Open Excel and click Edit-Paste | ||
| − | + | = Using the Finder = | |
# Go to Tools-Find | # Go to Tools-Find | ||
# Select Contract Versions or Invoice Versions as appropriate | # Select Contract Versions or Invoice Versions as appropriate | ||
| Line 22: | Line 51: | ||
# Double click on the item you wish to review. | # Double click on the item you wish to review. | ||
| − | + | = Reviewing a particular Contract or Invoice = | |
# Go to the Contract/Invoice you wish to review | # Go to the Contract/Invoice you wish to review | ||
# Go to the Versions tab | # Go to the Versions tab | ||
# A listing of all versions of this Contract/Invoice will be listed. | # A listing of all versions of this Contract/Invoice will be listed. | ||
# Double click the appropriate item to see the details of that version of the Contract/Invoice or customize the view to see the columns of information you wish to review | # Double click the appropriate item to see the details of that version of the Contract/Invoice or customize the view to see the columns of information you wish to review | ||
Latest revision as of 09:35, 20 April 2017
Contents |
Sales History Module
The Sales History module tracks changes made to Contracts and Invoices in Ad Manager. Users can record a snapshot of the details of contracts and invoices at a certain time and then compare them to another time. The Sales History module allows you to see what has changed between these dates, and to see the history of changes made to a contract or invoice.
Recording a snapshot
In order to use this report, periodic snapshots of the data need to be taken. To take a snapshot,
- Go to Tools-Sales History
- Click Capture
This will grab the values for all invoice and contract values and store them with the date the snapshot was taken. This allows you to compare differences between two periods.
Using a Scheduled Service to Record a Snapshot
Users can set up a scheduled service in the Windows Task Scheduler to record a snapshot at specified intervals. This allows you to be able to do daily or weekly comparisons if desired. In order to run this as a scheduled task, you will need to create a "SalesHist.cfg" file.
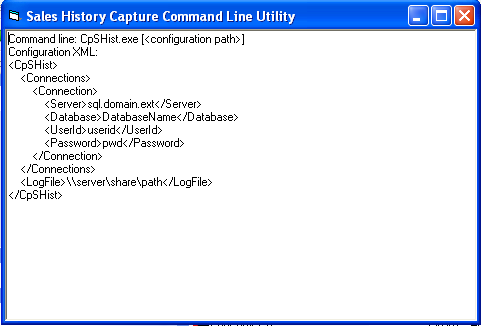
To create the SalesHist.cfg file, go to the Program Files (or Program Files (x86)) directory and go to Dot2Dot\Ad Manager\ and run "CpSHist.exe". When you do this, the following screen will appear:
Highlight and copy the information below "Configuration XML:" - you only need the section that starts with <CpSHist> and ends with </CpSHist>.
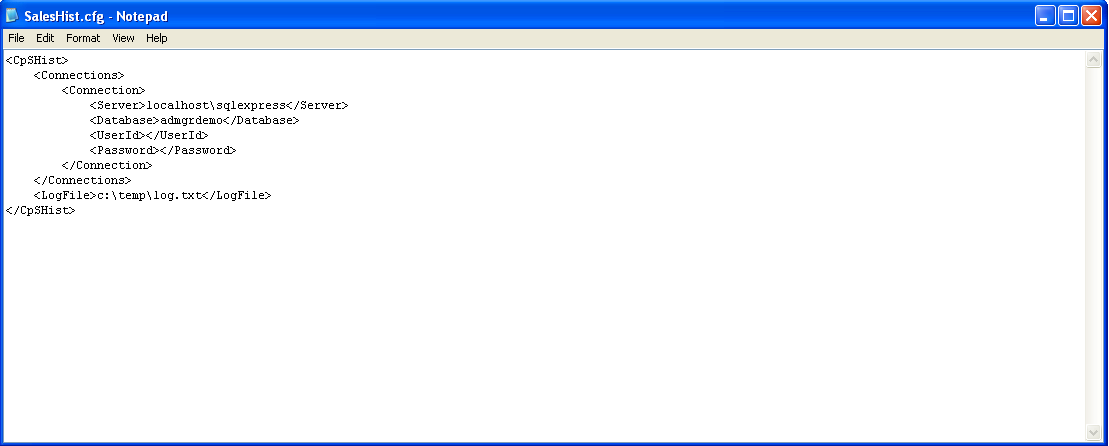
Open Notepad and paste the information. Next, edit the information so that your server, database, userid and password, as well as your desired destination for the log file are in the file and save it as SalesHist.cfg. If you use windows authentication to log in, leave the userid and password blank.
Please ensure that the user selected can successfully log into Ad Manager with that username and password on that machine, or the utility may not run.
Once this is done, open Task scheduler and set it up to run. The command line should read CpSHist.exe [the location of your cfg file]. For example, if you were to place the SalesHist.cfg file in "C:\temp", then the command line would read "C:\Program Files\Dot2Dot\Ad Manager\CpSHist.exe" "c:\temp\SalesHist.cfg"
Usage
- Go to Tools-Sales History
- To view monies related to contracts, click Contract Summary. To view monies related to invoices, click Invoice Summary.
- Go to View-Options to set the data up in the desired format
- To see what monies were in Ad Manager as of a certain date, select the date of interest (e.g. 6/1/2014).
- Use the Filter to identify the criteria you wish to use to create this report (e.g. filtering by a certain sales person)
- To subtotal monies on certain criteria, select Group by and identify what items you wish to group by (e.g. by Sales office, then by status)
- Select the start date, interval and number of intervals to report on (e.g. 7/1/2014, duration - 1 month(s), number -12
- Click OK.
- The report will show a number of lines, each identifying the monies associated with the grouping for that time frame. To see a listing of contract or invoice versions that create a particular line, double click that line for additional detail.
- To see detail about a particular contract or invoice version, double click the desired contract/invoice version. This will identify the time period this version of the contract/invoice existed, along with the relevant details.
- If you wish to select different columns of information to add to this report, go to View-Columns
- If you wish to copy the data to Excel, highlight all lines you wish to export (to export all lines, go to View-Select All) and go to File-Copy to Clipboard
- Open Excel and click Edit-Paste
Using the Finder
- Go to Tools-Find
- Select Contract Versions or Invoice Versions as appropriate
- Using the finder screen, identify the filtering criteria you wish to use. For example, if you wish to see all invoices that were changed in the current week, select Current week in the Till field
- Click Tools-Find
- Double click on the item you wish to review.
Reviewing a particular Contract or Invoice
- Go to the Contract/Invoice you wish to review
- Go to the Versions tab
- A listing of all versions of this Contract/Invoice will be listed.
- Double click the appropriate item to see the details of that version of the Contract/Invoice or customize the view to see the columns of information you wish to review

