Difference between revisions of "Location How To"
(→Move a Face to a Different Site) |
(→Navigating Sites and Faces) |
||
| Line 506: | Line 506: | ||
=== Navigating Through Faces or Sites === | === Navigating Through Faces or Sites === | ||
| − | If you are trying to view information for several different Faces or Sites, Ad Manager allows you to do this with ease. If you wish to go to the next Face or Site, select the Next icon(). If you wish to go to the previous Face or Site, select the Previous icon (). Ad Manager will then go to the next (or previous) item, based on the sort order you have selected in the List Window. To go to the top of the list, use the First icon () and to go to the last item on the list, use the Last icon () | + | If you are trying to view information for several different Faces or Sites, Ad Manager allows you to do this with ease. If you wish to go to the next Face or Site, select the Next icon([[File:New_next_button.JPG]]). If you wish to go to the previous Face or Site, select the Previous icon ([[File:New_previous_button.JPG]]). Ad Manager will then go to the next (or previous) item, based on the sort order you have selected in the List Window. To go to the top of the list, use the First icon ([[File:New_top_of_file.JPG]]) and to go to the last item on the list, use the Last icon ([[File:New_bottom_of_file_button.JPG]]) |
| Line 523: | Line 523: | ||
To do this, go to the Faces page, and double click the desired Face to view. | To do this, go to the Faces page, and double click the desired Face to view. | ||
| − | |||
== Retiring a Face == | == Retiring a Face == | ||
Revision as of 08:24, 19 July 2013
How To Page for Location.
Add Neighbours
Ad Manager allows users to identify any stores that are in close proximity to each Site. This is done by adding stores to the Neighbors page. When scheduling, Ad Manager can find only those Faces that are on Sites close to particular stores (this is done through the Subcontract Template Page, Other Required Face Properties).
Adding a Neighbor
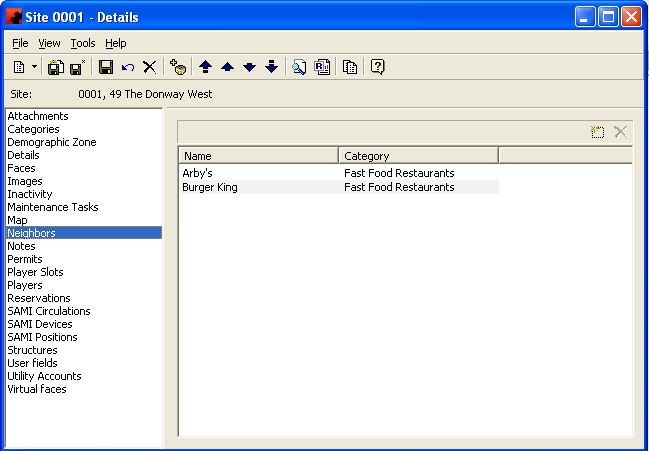
To add a Neighbor, go to the appropriate Site, and click on the Neighbors Page. From here you can click on the New Button () . A window will appear where you can select a Neighbor from the list, or click <New...> to enter a store not already on the list. You can add multiple Neighbors to each Site.
Deleting a Neighbor
If you need to delete a Neighbor from the Site, go to the appropriate Site, and click on the Neighbors Page. From here you can highlight the appropriate Neighbor and click on the Delete button (). This will remove the Neighbor from the Site, but will not delete the Neighbor from any other Sites.
Add Utility Accounts to a Site
Ad Manager allows you to enter multiple Utility Accounts into the system. This allows you to track the status of existing and previously used Utility Accounts.
Adding a Utility Account
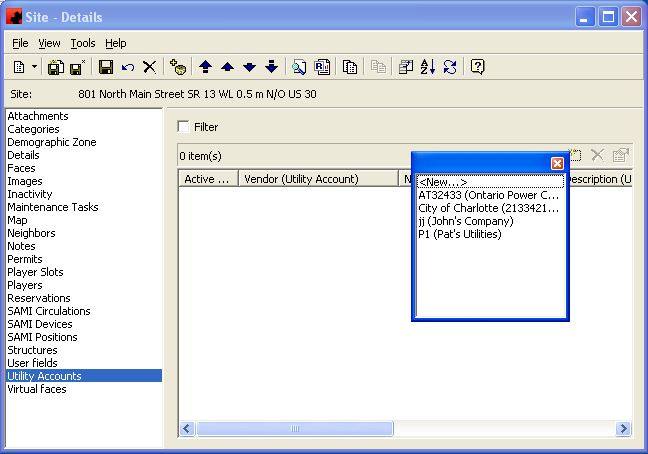
To add an existing Utility Account to a Site, go to the appropriate Site, and click on the Utility Accounts Page. From here you can click on the New Button (). Select the appropriate Utility Account from the list, or select <NEW> to create a new Utility Account and associate it to the Site at the same time.
For details on creating a new Utility Account in Ad Manager, click here.
Editing a Utility Account
If you need to change some information about a Utility Account, go to the appropriate Site, and click on the Utility Accounts Page. From here you can highlight the appropriate Utility Account, double click it or click on the Properties button (). The Utility Account - Details window will appear where you can enter in the appropriate information.
Deleting a Utility Account
If you need to delete a Utility Account from the list, go to the appropriate Site, and click on the Utility Accounts Page. From here you can highlight the appropriate Utility Account and click on the Delete button () on this Page.
For details on deleting a Utility Account from Ad Manager, click here.
Adding a Face
In Ad Manager you can add a Face by going to the Site Details window and selecting the Faces page. To Add a new Face, click the New Button (). This will open the Face window. Alternately, you can add a Face from the New icon (
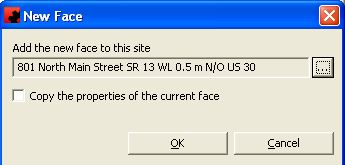
) from any window, click on the arrow to the right of the New icon, and select Face. The following screen will appear:
From this screen you can select the Site that this Face will belong to by clicking on the ellipsis (). To add a new Face to a New Site, select "New..." from the menu. This will open a blank Site - Details window for you to enter information from scratch. If you wish to create the new Face on an existing Site, pick "Select..." from the menu. This will allow you to filter for the desired Site to add the new Face to.
When adding a new Face from a existing Face window, click on the New button ().
If you wish to copy the information from the Face already displayed, and only change a couple of information items, click the "Copy the properties of the current Face" button. If you wish to add a new Face without any information entered, do not click this button.
On the Face window, enter in the appropriate information for each field and click on the Save icon (). If you wish to save this Face and add another, click on the Save and New icon(
). If you wish to save this Face and close the window, click on the Save and Close icon (
).
Details Page
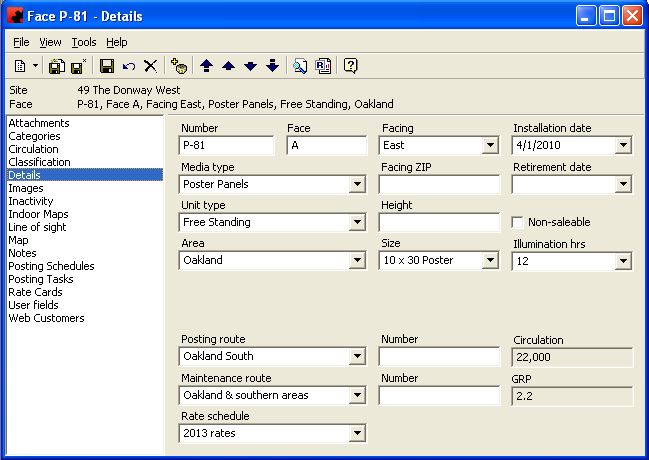
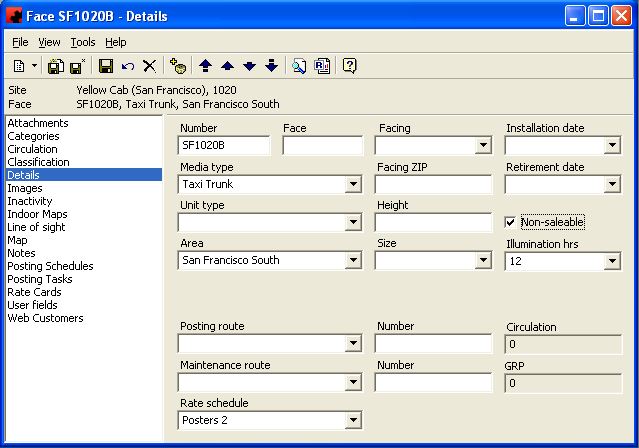
In the Face window, enter in the appropriate information related to this particular Face. For more information on each item, see the Face Details Page screen.
Categories Page
The Categories page allows you to specify the positive and negative characteristics of this Face. Ad Manager allows you to target or avoid Faces based on these categories during the scheduling process. If you wish to add conditions or restrictions for a Site, add the condition(s) and/or restriction(s) from the Site Categories Page. Any conditions or restrictions on a Face that have been inherited from the Site are marked with a "Yes".
For information on adding conditions and restrictions to a Site or a Face, see Adding Location Conditions.
Line of Sight Page
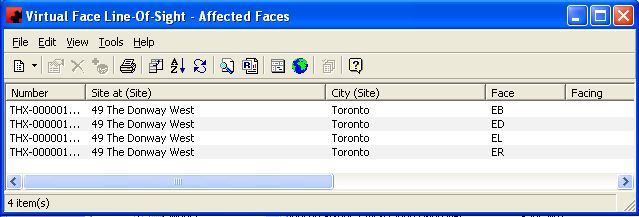
The Line of Sight page allows you to identify any other Faces that you do not want to post competing or conflicting copy on. Typically, this is a listing of all Faces that can be seen at the same time you are viewing this Face.
For information on adding Faces to the line of sight, see Adding Line of Sight.
Inactivity Page
The Inactivity page allows you to enter any date ranges where the Face will be inactive. Ad Manager will consider this Face inactive during the date range specified. To enter inactive dates for a Site, add the inactivity from the Site Details window.
For information on how to add inactivity to a Site or a Face, see Making a Face or Site Inactive.
Circulation Page
The Circulation Page allows you to maintain a history of circulation data for each Face. Ad Manager will determine the circulation to use for each Subcontract based on the Subcontract's dates and the "As Of" date for the circulation.
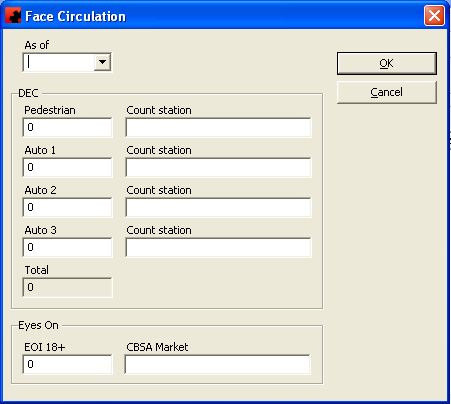
To add the circulation for a Face, go to the Circulation Page and click the New () button. Select the date the circulation is to be used from in the "As Of" field. Enter the auto counts from each road section that is used to determine the circulation in separate fields, as Ad Manager will combine them to provide the total circulation. If you have a count station ID for where the count was taken from, this can be entered in the corresponding Count Station field. You can also enter in any pedestrian count information you may have.
Images Page
The Images page allows you to add any photographs, video or Surround View images specifically related to the Face. These can later be used in client presentations and Photo Sheets. You must have the Multimedia module to access this page.
For information on how to add multimedia for a Face, see Adding Images.
Attachments Page
The Attachments page allows you to attach any documents or files to a Face. These can be files of type XLS, DOC, PDF, etc. about the Face. You must have the Multimedia module to access this page.
For information on how to attach documents to a Face, see Add an Attachment.
Notes Page
The Notes page allows you to store information specific to the Face. Information entered into the Posting Card Notes field will appear on a posting card every time a card is printed for that Face. The Notes section allows you to store notes that are not printed on any reports.
Classification Page
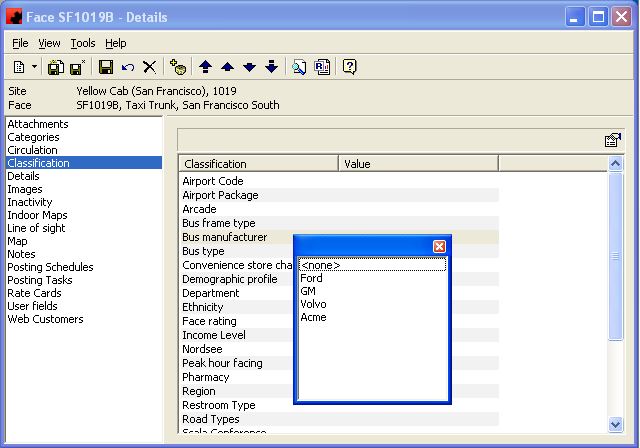
Ad Manager allows you to maintain a listing of non-advertiser or category factors that can be targeted while charting (e.g. board rating, income level, ethnicity). Each Face can be assigned a desired value, which can be searched for when undertaking the market scheduling. To add the values for the classifications, click on the Classification Page, highlight the classification you wish to enter information for, click on the value field and select the desired value.
For information on adding classifications, see Custom Classification Factors.
User fields Page
The User fields page allows you to create and maintain your own fields of information. You can store and use additional information not contained elsewhere in Ad Manager about every Face in your inventory.
Creating a User field
To create a new User field, click the New button. Ad Manager will then prompt you for the name of the User field. Once this is saved, the new User field will appear. To enter data relating to the User field, click on the User field you wish to add information for, then double click in the Value field and begin typing. To save your data entry, hit the Enter key on your keyboard.
For more information on User fields see Adding User fields.
Posting Schedules Page
Ad Manager allows you to see the past and future activity on a Face through the Posting Schedules Page. For more information on Posting History, see View Face History.
Posting Tasks Page
The Posting Tasks Page allows you to enter posting related information (including Billposter assignments and completion information) for any campaign assigned to the Face.
Adding a Site by Duplicating a Site
In addition to adding Sites by entering information from scratch, Ad Manager allows you to duplicate an existing Site to create a brand new one. When a site is duplicated, the same number of Faces are created on the new Site as on the old one.
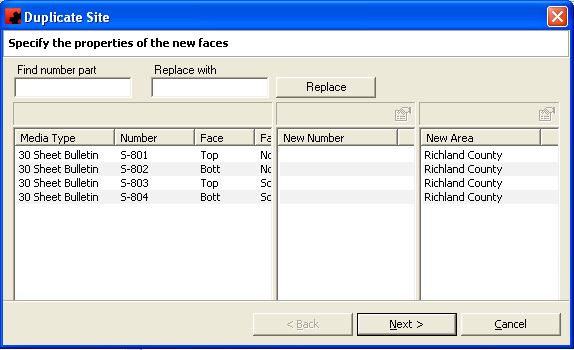
To create a new Site through duplication, go to the Site you wish to copy from, go to the Tools menu, and select Duplicate. Alternately, you can highlight any Site from a Filter or from the Ad Manager Explorer window, and right click on it to select Duplicate.
This screen will show you all the new Faces that will be created for the New Site. Ad Manager will add the same number of Faces as were on the Site being duplicated, along with the Media Type, Face, Facing, and Unit Type information. For each Face you must enter a new Number (middle box) and new Area (right box) if needed.
To enter the Number for the new Face, double click in the middle box in the appropriate position on the list. Ad Manager allows you to type in a number for the new Face. To enter the Area for the new Face, double click in the right box in the appropriate position on the list. Ad Manager allows you to type in an area for the new Face.
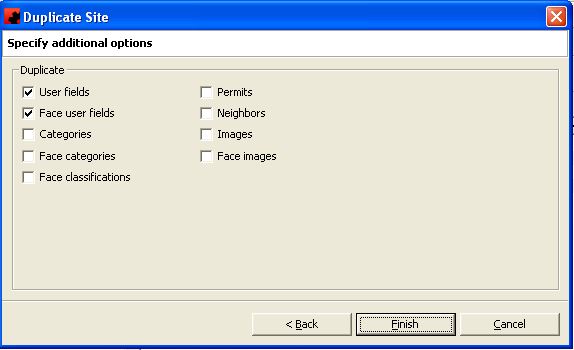
Click on NEXT once you have finished entering the new Face numbers and Areas. The next screen, gives you the option to duplicate other Site and Face criteria (User Fields, Categories, Classifications, Permits, Neighbors, Images). Simply place a checkmark next to desired option, and remove the checkmark from the options you do not want to duplicate. To remove a checkmark click in the check box of the option you do not wish to duplicate.
Once you have finished entering the new information, click FINISH. Ad Manager will create a new site (you may need to edit the Site description, and enter the City information) along with the specified number of Faces.
Adding a Site
To add a Site into Ad Manager, click the New icon from the Site window () and a new Site window will appear. Alternately, click on the arrow next to the new icon (
) from any window and select Site. The new Site window will appear. Add the appropriate information in for each field and click on the Save icon (
). If you wish to save this Site and add another, click on the Save and New icon(
).
Details Page
In the Site window, enter in the appropriate information related to this particular Site. For more information on each item, see the Site Details Page .
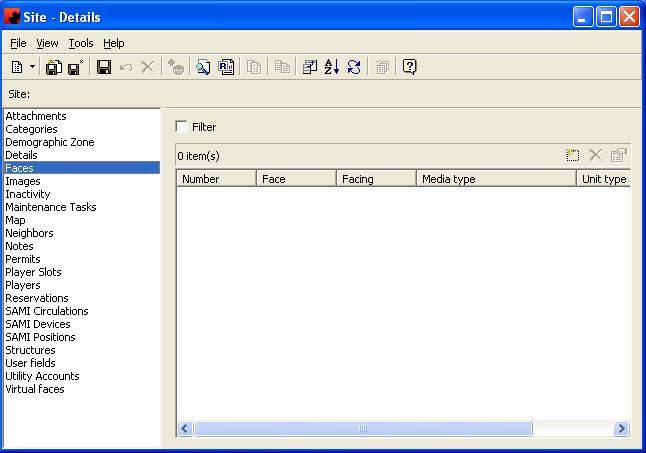
Faces Page
The Faces page provides information on each Face associated with this Site.
To assign Faces to a Site, you can either go to the Faces page, or add the Face later. If you wish to add a Face at this time, select the New button () and the Face Details window will appear.
For information on adding Faces to a Site, see Adding a Face to a Site.
Categories Page
The Categories page allows you to specify the positive and negative characteristics of all the Faces at the Site. Ad Manager allows you to target or avoid Faces based on these categories during the scheduling process. If you wish to add conditions or restrictions for a Face, and not all Faces at the Site, add the condition(s) and/or restriction(s) from the Face Details window. For information on adding conditions and restrictions to a Site or a Face, see Entering Location Conditions and Restrictions.
Permits Page
The Permits page provides information on each permit (e.g. Electrical Permits, City permits, State permits, etc.) associated with this Site.
For information on how to add permits to a Site, see Add Permits.
Neighbors Page
The Neighbors page allows you to identify any stores that are in close proximity to this Site. When scheduling, Ad Manager can find only those Faces that are on Sites close to particular stores (this is done through the Subcontract Template Page, Other Required Face Properties).
For information on how to add Neighbors to a Site, see Add Neighbors.
Inactivity Page
The Inactivity page allows you to enter any date ranges where the Site will be inactive. Ad Manager will consider any Faces on this Site inactive during the date range specified. To enter inactive dates for a Face, add the inactivity from the Face Details window.
For information on how to add inactivity to a Site or a Face, see Making a Site Inactive.
Images Page
The Images page allows you to add any photographs, video or Surround View images for the Site. These can later be used in client presentations. You must have the Multimedia module to access this page.
For information on how to add images for a Site, see Add Images.
Attachments Page
The Attachments page allows you to attach any documents or files to a Site. These can be files of type XLS, DOC, PDF, etc. and could be anything from a signed permit to a written note about the Site. You must have the Multimedia module to access this page.
For information on how to attach documents to a Site, see Add an Attachment.
Virtual Faces
Virtual Faces allows you to use a Face in your inventory as several different media types. For example, you can use a bulletin in your inventory as 1 bulletin Face or 2 poster Faces. However, you need to track how it is sold in a given time frame so you know what is still available to sell and schedule. For example, if you have sold one poster Face for a given time frame, then the other poster Face would be available during that time frame, while the bulletin would not be.
For more information on adding Virtual Faces, see Adding a Virtual Face.
Utility Accounts Page
The Utility Accounts page allows you to track your utilities for this Site, including meter readings. If you have the Financial module, you can also track and export your utility payments.
For more information on adding Utility Accounts, see Add Utility Accounts.
Notes Page
The Notes page allows you to add any notes you may want to keep for this Site. These notes relate to the entire Site, and do not print on posting cards or instructions.
To add notes, simply click on the Notes page and start typing the information you want to add for this Site. When finished, click the Save button ().
User Fields Page
The User Fields page allows you to create and maintain your own fields of information. You can store and use additional information not contained elsewhere in Ad Manager about every Site in your inventory.
Creating a User Field
To create a new User Field, click the New button (). Ad Manager will then prompt you for the name of the User Field. Once this is saved, the new User Field will appear. To enter data relating to the User field, highlight the User Field you wish to add information for, then double click in the Value field and begin typing. To save your data entry, hit the Enter key on your keyboard.
For more information on User Fields see Adding User Fields.
Map Page
The Map page allows you to place the Site on a map and later view where the Site is located. You can zoom in or out and see whatever detail is desired when reviewing your Sites.
For information on how to place a Site on the map, see Geocoding Sites. For more information on how to use the mapping tools, see Moving Around the Map.
Adding a Virtual Face
Ad Manager allows users to create Virtual Faces. Sometimes there are situations where you may wish to sell one or more Faces as a different media type. For example, if you have two standard poster Faces side by side, you may want to sell them as a single bulletin Face. To do this, you must ensure that you do not accidentally schedule either of the two poster Faces to other showings during the same time frame. Similarly, you cannot schedule the Virtual Face if any of the affected Faces are scheduled during that time frame. Ad Manager handles this through the use of Virtual Faces.
Adding a Virtual Face
To add a Virtual Face, go to the Site and create all Faces, physical and virtual as you normally would. Once this is completed, you can identify the relationships between Faces.
Adding Relationships Between Faces
After you have added all the necessary Faces, a little planning is needed before establishing the relationships. You must determine how each Face affects the others on the Site. For a detailed explanation on how to determine the relationship between your physical and Virtual Faces, see Planning Your Virtual Faces.
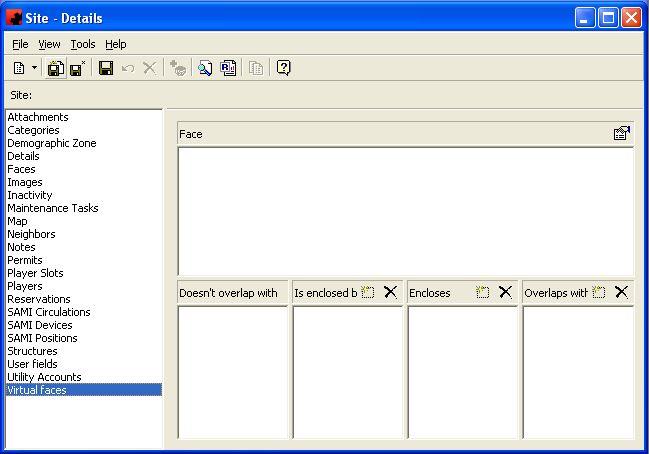
Once you have determined how each Face relates to the others, go to the Virtual Faces page in the Site Details window.
In the top half of the screen select one of the Faces. Using the table you have created that identifies the relationship between the Faces (see Planning Your Virtual Faces), drag the appropriate Faces from the "Doesn't overlap with" box at the bottom of the screen into the "Is enclosed by", "Encloses" or "Overlaps With" windows. If there is no relationship between the selected Face and a listed Face, do not drag the listed Face into any window. This will imply the Faces are independant of each other (Doesn't overlap with).
Once you have established all the relationships required for the first Face, select another Face at the top of the screen and repeat the process for that Face. As you enter these relationships, new relationships between Faces may automatically appear in the windows. These will be based on information you have previously entered.
Follow this procedure until all relationships between Faces have been established.
Removing Affected Faces
If you no longer wish to identify a Face as being affected by the Virtual Face's scheduling, go to the Virtual Faces page of the Virtual Face. In the top of the screen select one of the Faces you wish to remove a relationship for. Highlight the Face you no longer wish to associate with the Virtual Face, and click the appropriate Delete button (). This will not remove the Face from inventory, it will just remove any impact scheduling has between the Virtual Face and the Face being removed.
Adding Factors for a Face
Ad Manager allows users to create their own Custom Classification Factors and assign values to each Face. These factors can be used during the charting process to provide clients with campaigns that meet their needs.
To add a Value for a classification factor, go to the desired Face and go to the Classification Page. Double click the factor you wish to provide a value for and a list of accepted values will appear. Click on the value you wish to associate with this Face. If a value does not appear, you must go back and add it from the "Other - All Custom Classifications" database.
If you wish to change the value already selected for a Face, double click the factor, and the list will appear for you to select the new value.
Adding Line of Sight
Line of Sight allows you to identify any other Faces where their scheduled copy must be considered before scheduling to a particular Face. The scheduling for these Faces is reviewed by the system to determine if any of these Faces have competitive or conflicting advertisers scheduled during that time frame.
Manually Adding a Line of Sight Conflict
To add a Line of Sight conflict, go to the Line of Sight page of the Face. To Add a new Face to the list, click the New Button (). From here you can select the Face that is in Line of Sight with the current Face.
To do this, enter the criteria that will help you find a list of locations and select Find Now. A listing of all Faces that meet this criteria will appear. Select a location that is in Line of Sight. Proceed to do this for each Face you want in Line of Sight until all desired Faces have been added.
Automatic Generating of Line of Sight Conflicts
Ad Manager also provides users with the ability to automatically generate Line of Sight conditions for Faces assigned to a Site.
To automatically generate Line of Sight conflict definitions for a Site, go to the Ad Manager Explorer window and click on "All Sites", or click on the Find () Tool and filter to obtain a list of Sites. Highlight the Sites to generate Line of Sight conflicts for by clicking, CTRL+clicking or SHIFT+clicking each Site. Note that Ad Manager will not generate Line of Sight conflicts BETWEEN these Sites; it will only generate Line of Sight conflicts for Faces WITHIN each Site.
Once you have highlighted the Sites, click on Tools - Generate Line of Sight. Ad Manager will prompt you to identify how you wish to find line of sight conflicts, by direction facing, by the configuration of any Virtual Faces (or by both) or by generating line of sight conditions for all Faces on the same Site. Once you have selected the desired option(s), click OK for Ad Manager to create these Line of Sight definitions.
Deleting a Line of Sight Conflict
To delete a Line of Sight conflict, go to the Line of Sight page of the Face. To Delete a Face from the list, highlight it and click the Delete Button ().
Adding Location Conditions
Each Face and each Site can have both positive and negative characteristics associated with them. Some Faces or Sites may be ideal for certain advertisers or products, and this information is valuable when trying to target a showing for a particular advertiser. Similarly, a Face or Site may not be appropriate for a particular advertiser or product, and you would want the system to notify you if this were the case when scheduling.
A Face or Site may also have a certain demographic or strategic location characteristic. The Face or Site may be located in a certain neighborhood, near a certain institution, or facing a particular direction that can be desirable for an advertiser. These items should be added under Classification Factors.
Ad Manager allows you to identify both positive and negative attributes.
Adding a Positive Attribute
If the characteristic you are adding applies to all Faces at the Site, open the Site window. If the characteristic only applies to a particular Face, open the appropriate Face window.
Go to the Categories page, and in the Conditions box, click the New Button (). This will allow you to select the Group, Advertiser or condition you wish to add as a Positive attribute for this Face or structure.
Adding a Negative Attribute
If the characteristic you are adding applies to all Faces at the Site, open the Site window. If the characteristic only applies to a particular Face, open the appropriate Face window.
Go to the Categories page, and in the Restrictions box, click the New Button (). This will allow you to select the Group, Advertiser or condition you wish to add as a Negative attribute for this Face or structure.
Deleting a Positive Attribute
If the characteristic you are deleting applies to all Faces at the Site, open the Site window. If the characteristic only applies to a particular Face, open the appropriate Face window.
Go to the Categories page, and in the Conditions box, click the Delete Button (). This will allow you to select the Group, Advertiser or condition you wish to delete as a Positive attribute for this Face or structure.
Deleting a Negative Attribute
If the characteristic you are deleting applies to all Faces at the Site, open the Site window. If the characteristic only applies to a particular Face, open the appropriate Face window.
Go to the Categories page, and in the Restrictions box, click the Delete Button (). This will allow you to select the Group, Advertiser or condition you wish to delete as a Negative attribute for this Face or structure.
Adding Permits
Ad Manager allows you to enter multiple permits into the system. This allows you to track the status of existing and pending permits, as well as report on when permits are coming up for renewal.
Adding a Permit
To add an existing permit to a Site, go to the appropriate Site, and click on the Permits page. From here you can click on the New Button (). From the filter screen, you can locate the desired permit by specifying information pertaining to your permit, such as a Permit number or a Permit description. Then click OK. A list of permits fitting your filtering criteria will appear. Select the appropriate permit by highlighting it and clicking on the OK button.
To add a new permit into Ad Manager, go to the main Ad Manager window and click on the New () button. Select Other, and Permit. The Permit - Details page will appear, where you can enter in the appropriate information. Then go to the Sites page of the Permit - Details window, and click on the New Button (
) to associate your permit with a Site, or group of Sites.
Editing a Permit
If you need to change some information about a permit, go to the appropriate Site, and click on the Permits page. From here you can highlight the appropriate permit, double click it or click on the Properties button (). The Permit - Details window will appear where you can enter in the appropriate information.
Deleting a Permit
If you need to delete a permit from the list, go to the appropriate Site, and click on the Permits page. From here you can highlight the appropriate permit and click on the Delete button (). To delete a permit from Ad Manager, go to Other - All Permits in the main Ad Manager window. Highlight the desired permit and click on the Delete button (
). Please note, that you must remove the permit from all associated Sites before you can delete it.
Adding Traffic Circulation Data
Ad Manager allows users to enter circulation data into the system. Users can enter circulation information for up to 3 separate auto counts and 1 pedestrian count.
Contracts use the circulation information to determine delivered to date values. Make sure that if you add a new circulation in, that the effective (As of) date is set to the desired date to avoid under-delivering on Contracts.
Adding Traffic Circulation Data
Select the Face that you wish to change traffic circulation for. Once the Face is selected, click on the Circulation Page. From this screen you can select the New () button to enter the traffic circulation.
Select the date you want the circulations to take effect, and enter the circulation data into Ad Manager. Note that the auto circulation can be broken down for up to 3 different road segments, and count station information can be recorded for each. Ad Manager will automatically calculate the total of all auto and pedestrian counts. Once you have finished entering the count information, hit OK.
Adding User Fields
Ad Manager provides the ability to create your own fields to store information. As with all other fields in Ad Manager, User fields can be filtered and searched on using the Find Tool ().
To add a unique User field go the User fields Page and click on the New icon ().
Enter the name you wish to use for the field; once you are finished entering the name select the OK button. To enter a value for this new field simply double click to the right of the field name under the Value name, type in the desired information, and hit enter.
Making a Face Non-Saleable
If you have a Face in your inventory that you want to track, but you should not be posting copy at (e.g. a directory Face, a lease privilege Face), you can mark it as Non-saleable. When charting, this Face will not be considered as available at any time. If you try to schedule it, Ad Manager will warn you that it is a Non-saleable Face.
Making a Face Non-saleable
Go to the appropriate Face, and click on the Details page. Click on the Non-saleable check box to place a check mark in it and click the Save button ().
Making a Face Saleable
If a Face is currently marked as Non-saleable, but you want to make it saleable again, go to the appropriate Face, and click on the Details page. Click on the Non-Saleable check box to remove the check mark from it and click the Save button ().
Making a Face or Site Inactive
Ad Manager allows you to make a Face or a Site unavailable for scheduling for a period of time. Furthermore, the software also allows you to track a history of inactivity at the Face or Site, and the reasons why it was unavailable.
When a Face is marked as inactive, Ad Manager will not make the Face available for scheduling during the specified time frame. If you try and schedule the Face, the software will warn you that it is inactive during that period. Any Contracts that are charted that are not to be posted during that time frame will still be able to use the appropriate Face or Site.
Making the Site or Face Inactive
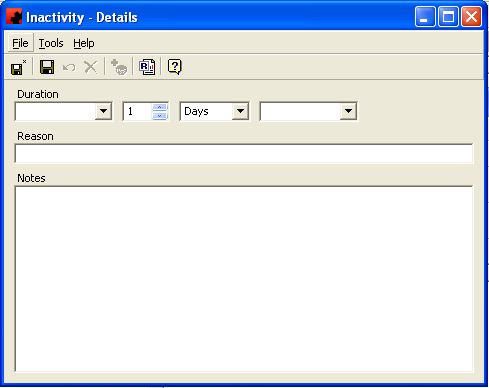
Open the appropriate Face or Site that will be affected during the inactivity. From here, click on the Inactivity page, and select the New () button. A new window will appear where you can enter the dates of inactivity and the reason for the inactivity.
Once you have entered an Inactivity Date, you should run the Conflicts Tool to see if there is any scheduling during the inactive period, by going to Tools - Face Conflicts if you are adding an inactivity period to a Face, or Tools - Site Conflicts if you are adding an inactivity period to a Site. This scheduling must be removed. If it is not removed, Subcontracts already scheduled with this Face will continue to show the Face as being scheduled. Ad Manager will also print Posting Cards or Instructions for this Face if it remains scheduled on Subcontracts during the inactive period.
Changing the Dates of Inactivity
If the dates the Face or Site is inactive needs to be changed, go to the appropriate Site or Face, and click on the Inactivity page. Highlight the inactive period you wish to modify, and either double click the item, or select the Properties button (]]). A window will appear where you can change the dates, or the description of, the inactive period.
Deleting an Inactive Time Frame
If, for some reason, a planned inactivity time frame is postponed indefinitely, you can delete the inactive time frame from the list. Go to the appropriate Site or Face, and click on the Inactivity page. Highlight the inactive period you wish to delete, and click the Delete button ().
Modify a Face or Site
To edit information for a Face or a Site, find the Site and double click it to display the Details window.
If you wish to change information, click on the appropriate page, and make the change in the appropriate field. Once you have finished making your changes, click on the Save icon (). This will save the changes you have made.
If you do not wish to save changes you have made, simply close the Details window and, when asked by Ad Manager if you wish to save the changes, select "No".
Move a Face to a Different Site
If a Face (or multiple Faces) move to another Site that already exists in Ad Manager, or if you erroneously entered a Face to the wrong Site, you can use the "Move to Site" function to assign it to the correct Site.
From the Ad Manager Explorer window or from the Find () Tool, select the Face(s) to move by clicking CTRL+clicking or SHIFT+clicking on them. Go to the Tools menu and select "Move to Site". Ad Manager will prompt you to enter in the Site details or, if you do not have them, you can select the More button to create a Filter that will enable you to find the appropriate Site. Click on the Site to add the Faces to, and click OK.
Ad Manager will then move the Face(s) to the appropriate Site.
Sometimes it is necessary to view several different Faces or Sites, or view Face detail for a Site or even Site detail for a Face. Ad Manager has made it easy to navigate through Faces and Sites.
If you are trying to view information for several different Faces or Sites, Ad Manager allows you to do this with ease. If you wish to go to the next Face or Site, select the Next icon(). If you wish to go to the previous Face or Site, select the Previous icon (
). Ad Manager will then go to the next (or previous) item, based on the sort order you have selected in the List Window. To go to the top of the list, use the First icon (
) and to go to the last item on the list, use the Last icon (
)
Showing the Related Site
When you are reviewing information for a Face and wish to find out Site related details, it is necessary to go to the Site Details screen for the Face.
To do this, select VIEW from the menu bar, then GO TO SITE. This will take you to the appropriate Site.
Showing the Related Face
When you are reviewing information for a Site and wish to find out Face related details, it is necessary to go to the Face Details screen for the Site.
To do this, go to the Faces page, and double click the desired Face to view.
Retiring a Face
When a Face is to be permanently removed from inventory you need to record this information in Ad Manager. This will prevent accidental scheduling of this Face on Contracts when it is no longer available.
To enter the Retirement date in Ad Manager, go to the appropriate Face and click on the Retirement Date box on the Details page. Select the date that this Face will be retiring.
Once you have entered a Retirement Date, you should run the Conflicts Tool to see if there is any scheduling beyond the retirement date, by going to Tools - Face Conflicts . This scheduling must be removed. If it is not removed, Subcontracts already scheduled with this Face will continue to show the Face as being scheduled. Ad Manager will also print Posting Cards or Instructions for this Face if it remains scheduled on Subcontracts past the retirement date.
For charting not yet undertaken, this Face will not appear as available for any Subcontracts after this date. Any attempt to specifically assign this Face to a Subcontract will result in a warning.
Updating Information on Multiple Faces
Ad Manager provides the ability to update information for multiple items (Faces, Sites, Contracts, Subcontracts, Designs, Advertisers, etc.) quickly and easily. For example, if there are several Faces that need to be changed to illuminated, this can be done through the Update window one time, instead of having to change each Face individually.
In the Ad Manager Explorer window or in a Filter, highlight all the Faces you wish to update with the same information. You can highlight multiple Faces by holding either the SHIFT key down (for all items in a range) or the CTRL key down (for specific items) while clicking with the mouse. Once all the desired items have been selected, go to TOOLS-UPDATE.
The screen that will appear allows users to set values for fields related to the items selected. By entering a value into one of these fields, Ad Manager will change each of the selected items to have that value in that field. To select a field, you must first activate it by putting a checkmark next to the field name. If you do not wish to update a field, make sure you "uncheck" the checkbox prior to running the tool.
Please Note: If you activate a field and leave it blank, the current values will be deleted and left blank for all selected items.
To run the tool, simply click OK.
Updating Information on Multiple Sites
Ad Manager provides the ability to update information for multiple items (Faces, Sites, Contracts, Subcontracts, Designs, Advertisers, etc.) quickly and easily. For example, if there are several Sites that need to be changed to the correct City, this can be done through the Update window one time, instead of having to change each Site individually.
In the Ad Manager Explorer window or in a Filter, highlight all the Sites you wish to update with the same information. You can highlight multiple Sites by holding either the SHIFT key down (for all items in a range) or the CTRL key down (for specific items) while clicking with the mouse. Once all the desired items have been selected, go to TOOLS-UPDATE.
The screen that will appear allows users to set values for fields related to the items selected. By entering a value into one of these fields, Ad Manager will change each of the selected items to have that value in that field. To select a field, you must first activate it by putting a checkmark next to the field name. If you do not wish to update a field, make sure you "uncheck" the checkbox prior to running the tool.
Please Note: If you activate a field and leave it blank, the current values will be deleted and left blank for all selected items.
To run the tool, simply click OK.
Using a Virtual Face
When scheduling, Ad Manager will allow you to select a Virtual Face if it is available in the inventory.
If all physical Faces that constitute the Virtual Face are available during the time frame being scheduled, the Virtual Face will show as being available. If any one of the physical Faces that constitute the Virtual Face are not available during the time frame being scheduled, then the Virtual Face will not be available.
If a Virtual Face is scheduled during a time frame, all physical Faces that comprise the Virtual Face will not be available during that time frame.
View a Site or Face
Ad Manager location data is broken down into Site and Face information. Each contains different items of information that provide you with a complete picture of that location.
To View a Site
To view a Site, you can call up a listing of Sites in the List Window by selecting the desired filter or basket from the Shortcut Bar, or by selecting the desired item from the Folder List. A list of Sites that meet the specified criteria will appear in the List Window. Double click on the desired Site to see the Site Details window.
To View a Face
There are two ways you can view a Face. To view a Face, you can call up a listing of Faces in the List Window by selecting the desired filter or basket from the Shortcut Bar, or by selecting the desired item from the Folder List. A list of Faces that meet the specified criteria will appear in the List Window. Double Click on the desired Face to see the Face Details window.
The second way of seeing Face information is to select the desired Face from the Site. To select a Face associated with a Site, click on the Faces page and a listing of all Faces associated with that Site will appear. Double click the desired Face to see the Face Details window.
To move between Sites and Faces, see Navigating Sites and Faces.
View a Face History
If you want to view the scheduling and posting history for a particular Face, open the Face Window and go to the desired Face.
From here, select the Posting Schedules Page, and the Face history will appear. Information is provided on all schedulings and postings that have been entered.
If the information being displayed is not in the desired viewing format, each column can be resized, added or removed or used to sort.
The Filter check box allows you to filter the listing of Posting Schedules to show only those that meet a certain criteria. When selected, a filter screen will appear, allowing you to choose to see schedules related to a particular Contract, Subcontract, Advertiser, etc. or a particular Contract type such as contracted, proposal, etc. When a filter is active, a check mark will appear in the Filter box. To clear the filter and see all records, click on the Filter, then the Clear button on the Filter screen, followed by the OK button.
For more information on the Posting Schedules Page of the Face, see Posting Schedules Page.
