Difference between revisions of "Media (Digital 2)"
Pat.wilkin (Talk | contribs) (→Right Click) |
(→Media Items) |
||
| (21 intermediate revisions by 2 users not shown) | |||
| Line 1: | Line 1: | ||
Media is the term used to identify the advertising assets that play on Digital Players. They are identified in Ad Manager's Digital 2 module as either a single Media Item or a Media Set of multiple Media Items. They are added to scheduled Reservations and published to the Players along with scheduling criteria. | Media is the term used to identify the advertising assets that play on Digital Players. They are identified in Ad Manager's Digital 2 module as either a single Media Item or a Media Set of multiple Media Items. They are added to scheduled Reservations and published to the Players along with scheduling criteria. | ||
| − | + | == Media Items == | |
Media Items can be viewed in a number of ways:- | Media Items can be viewed in a number of ways:- | ||
| − | 1. From a Finder of All Media Items - this will display a list of all Media Items currently in the Ad Manager database that meet the search criteria entered in the Finder. | + | 1. From a Finder of All Media Items - this will display a list of all Media Items currently in the Ad Manager database that meet the search criteria entered in the Finder. |
| − | + | [[File:Media Items Finder.JPG]] | |
| − | + | 2. From the Media Items page of a Contract - this will display a list of all Media Items for the entire Contract that have been associated with its Reservations. | |
| + | [[File:Contract Media Item.JPG]] | ||
| − | + | 3. From the Media Items page of a Subcontract (Digital) - this will display a list of all Media Items for that particular Subcontract (Digital) that have been associated with its Reservations. | |
| + | [[File:Subcontract Media Item.JPG]] | ||
| + | 4. From the Media Items page of a Reservation. - this will display those Media Items that are associated with that particular Reservation. | ||
| + | [[File:Reservation Media Items.JPG]] | ||
| − | |||
| − | == Details == | + | To view the information about a particular Media Item, double-click the selected Media Item in a list; right-click while on the selected Media Item in the list and choose Properties; or click the Properties button (when available on a Page) when a Media Item is selected. |
| − | The Details Page of a Media Item displays some default information about the Item that is contained in Content Manager as well as fields to associate it with an Advertiser as well as a Brand. As well, users can also see a thumbnail of the Media Item, if available. | + | |
| + | === Details === | ||
| + | The Details Page of a Media Item displays some default information about the Item that is contained in Content Manager as well as fields to associate it with an Advertiser as well as a Brand. As well, users can also see a thumbnail of the Media Item, if available. | ||
| + | |||
| + | [[File:Media Item.JPG]] | ||
Content Manager - This field itentifies the Content Manager that contains the Media Item | Content Manager - This field itentifies the Content Manager that contains the Media Item | ||
| Line 32: | Line 39: | ||
Brand - This field associates the Media Item with a particular Brand of the Advertiser. Select from the pick list or add a new one as required. | Brand - This field associates the Media Item with a particular Brand of the Advertiser. Select from the pick list or add a new one as required. | ||
| − | == Approvals == | + | Valid From - This date from Content Manager identifies the earliest date this media item can play, whether it is scheduled or not. |
| − | The Approvals Page of a Media Item displays a list all Landlord Approvals that have been entered into the data for this Media Item. | + | |
| + | Valid To - This date from Content Manager identifies the latest date this media item can play, whether it is scheduled or not. | ||
| + | |||
| + | === Approvals === | ||
| + | The Approvals Page of a Media Item displays a list all [[Landlords|Landlord]] Approvals that have been entered into the data for this Media Item. | ||
| + | |||
| + | [[File:Approvals.JPG]] | ||
| + | |||
As with other lists in Ad Manager, the view can be customized and ordered as desired. | As with other lists in Ad Manager, the view can be customized and ordered as desired. | ||
The fuctions available through the buttons immediately above the pane are: | The fuctions available through the buttons immediately above the pane are: | ||
| − | [[File:New_add_button.JPG]] - To add a new Landlord Approval, select the New button. In the following screen select the Landlord name from the pick list and save the record. Note that users cannot add nor edit the Media Item field nor Approved on field. These are system generated fields. | + | [[File:New_add_button.JPG]] - To add a new Landlord Approval, select the New button. In the following screen select the Landlord name from the pick list and save the record. Note that users cannot add nor edit the Media Item field nor Approved on field. These are system generated fields. |
[[File:New_delete_button.JPG]] - To remove a Landlord Approval, select it in the list and click the delete button. Ad Manager will ask for confirmation of the deletion. Click <Yes> to remove the Approval or click <No> to cancel the deletion. | [[File:New_delete_button.JPG]] - To remove a Landlord Approval, select it in the list and click the delete button. Ad Manager will ask for confirmation of the deletion. Click <Yes> to remove the Approval or click <No> to cancel the deletion. | ||
| Line 44: | Line 58: | ||
[[File:New_properties_button.JPG]] - To modify the Landlord information for a particular Approval, select it in the list and click the Edit button. Alternatively, users can double click the item in the list to open the Edit function. Note that only the Landlord name can be modified by the user. | [[File:New_properties_button.JPG]] - To modify the Landlord information for a particular Approval, select it in the list and click the Edit button. Alternatively, users can double click the item in the list to open the Edit function. Note that only the Landlord name can be modified by the user. | ||
| − | To filter the list of Landlord Approvals, in order to see a subset list, click the Filter checkbox at the top of the pane | + | To filter the list of Landlord Approvals, in order to see a subset list, click the Filter checkbox at the top of the pane. |
| − | In the following window enter the criteria for the desired Approval(s), and click <OK> | + | In the following window enter the criteria for the desired Approval(s), and click <OK>. Ad Manager will display those Approvals that match the criteria entered. |
When the Filter is active, a check mark will appear in the filter box. To clear the filter and see all records, click in the checkbox, and in the following window click <Clear>, followed by the <OK> button. | When the Filter is active, a check mark will appear in the filter box. To clear the filter and see all records, click in the checkbox, and in the following window click <Clear>, followed by the <OK> button. | ||
| − | == Media Sets == | + | === Media Sets === |
| − | The Media Sets Page displays a list of all Media Sets that contain this particular Media Item. | + | The Media Sets Page displays a list of all Media Sets that contain this particular Media Item. |
As with other lists in Ad Manager, the view can be customized and ordered as desired. | As with other lists in Ad Manager, the view can be customized and ordered as desired. | ||
| + | |||
| + | [[File:Media Set.JPG]] | ||
Users cannot create nor delete Media Sets from this Page, However, information about a Media Set can be viewed and modified. | Users cannot create nor delete Media Sets from this Page, However, information about a Media Set can be viewed and modified. | ||
| − | [[File:New_properties_button.JPG]] - To view and/or modify the information for a particular Media Set, select it in the list and click the Properties button. Alternatively, users can double click the item in the list to open the Edit function. | + | [[File:New_properties_button.JPG]] - To view and/or modify the information for a particular Media Set, select it in the list and click the Properties button. Alternatively, users can double click the item in the list to open the Edit function. |
To filter the list of Media Sets, in order to see a subset list, click the Filter checkbox at the top of the pane. (need filter screen shot). | To filter the list of Media Sets, in order to see a subset list, click the Filter checkbox at the top of the pane. (need filter screen shot). | ||
| − | In the following window enter the criteria for the desired Media Set(s), and click <OK> | + | In the following window enter the criteria for the desired Media Set(s), and click <OK>. Ad Manager will display those Media Sets that match the criteria entered. |
When the Filter is active, a check mark will appear in the filter box. To clear the filter and see all records, click in the checkbox, and in the following window click <Clear>, followed by the <OK> button. | When the Filter is active, a check mark will appear in the filter box. To clear the filter and see all records, click in the checkbox, and in the following window click <Clear>, followed by the <OK> button. | ||
| − | == Playback Counts == | + | === Playback Counts === |
| − | The Media Item Playback Counts Page displays information as to how many times this particular Media Item played on the Players to which it was scheduled. | + | The Media Item Playback Counts Page displays information as to how many times this particular Media Item played on the Players to which it was scheduled. |
| + | |||
| + | [[File:Playback Counts.JPG]] | ||
The page provides details about the Dates it played, Times played per Screen, Number of Screens, etc. | The page provides details about the Dates it played, Times played per Screen, Number of Screens, etc. | ||
| Line 68: | Line 86: | ||
[File:New_delete_button.JPG]] -To delete the item(s), select in the list and click the delete button in the top right of the pane. | [File:New_delete_button.JPG]] -To delete the item(s), select in the list and click the delete button in the top right of the pane. | ||
| − | To filter the list of Playback counts to see a subset list, click the Filter checkbox at the top of the screen. | + | To filter the list of Playback counts to see a subset list, click the Filter checkbox at the top of the screen. |
| − | In the following window enter the criteria for the desired Playback Count(s), and click <OK> | + | In the following window enter the criteria for the desired Playback Count(s), and click <OK> . Ad Manager will display those Playback Counts that match the criteria entered. |
To enter filter criteria based on Reservation and/or Media Item criteria, click the appropriate box and enter the criteria as necessary. | To enter filter criteria based on Reservation and/or Media Item criteria, click the appropriate box and enter the criteria as necessary. | ||
When the Filter is active, a check mark will appear in the filter box. To clear the filter and see all records, click the checkbox, and in the following window click <Clear>, followed by the <OK> button. | When the Filter is active, a check mark will appear in the filter box. To clear the filter and see all records, click the checkbox, and in the following window click <Clear>, followed by the <OK> button. | ||
| − | == Playback Summary == | + | === Playback Summary === |
The Media Item Playback Summary Page displays a summary of the Playback Counts to date for this particular Reservation. | The Media Item Playback Summary Page displays a summary of the Playback Counts to date for this particular Reservation. | ||
| − | + | [[File:Playback Summary.JPG]] | |
| + | |||
Users cannot add, delete nor modify the information displayed on this page. It is populated by information received from the connection to Content Manager and calculations are applied by Ad Manager. | Users cannot add, delete nor modify the information displayed on this page. It is populated by information received from the connection to Content Manager and calculations are applied by Ad Manager. | ||
| − | == Required Approvals == | + | === Required Approvals === |
The Required Approvals Page of a Media Item displays a list of Landlord Approvals required and their Due by and Approved on Dates. (need screen shot) | The Required Approvals Page of a Media Item displays a list of Landlord Approvals required and their Due by and Approved on Dates. (need screen shot) | ||
| Line 85: | Line 104: | ||
[[File:New_properties_button.JPG]] - To edit an Approval, select it and click the Edit button. Alternatively, users can double click the item to open the Edit function. (need screen shot) Check the box beside "Approved" as appropriate. NOTE: Ad Manager automatically sets the approval date as the date that the box has been checked. As well, the Due by date is populated as the first start date of the Reservation to which the Media Item has been scheduled. | [[File:New_properties_button.JPG]] - To edit an Approval, select it and click the Edit button. Alternatively, users can double click the item to open the Edit function. (need screen shot) Check the box beside "Approved" as appropriate. NOTE: Ad Manager automatically sets the approval date as the date that the box has been checked. As well, the Due by date is populated as the first start date of the Reservation to which the Media Item has been scheduled. | ||
| − | == Reservations == | + | === Reservations === |
| − | The Reservations Page of a Media Item displays all Reservations to which the Item has been scheduled either individually or as part of a Media Set. | + | The Reservations Page of a Media Item displays all Reservations to which the Item has been scheduled either individually or as part of a Media Set. |
As with other lists in Ad Manager, the view can be customized and ordered as desired. | As with other lists in Ad Manager, the view can be customized and ordered as desired. | ||
Users cannot add nor delete Reservations that are displayed on the page. However, a Reservation can be viewed and modified, if required. | Users cannot add nor delete Reservations that are displayed on the page. However, a Reservation can be viewed and modified, if required. | ||
| − | [[File:New_properties_button.JPG]] - To view and/or modify the information about a particular Reservation, select it in the list and click the Properties button. Alternatively, users can double click the item in the list to open the Reservation for editing or viewing purposes. | + | [[File:New_properties_button.JPG]] - To view and/or modify the information about a particular Reservation, select it in the list and click the Properties button. Alternatively, users can double click the item in the list to open the Reservation for editing or viewing purposes. |
| + | |||
| + | To filter the list of Reservations in order to see a subset list, click the Filter checkbox at the top of the pane. | ||
| − | |||
In the following window enter the criteria for the desired Reservationl(s), and click <OK> (need screen shot). Ad Manager will display those Reservations that match the criteria entered. | In the following window enter the criteria for the desired Reservationl(s), and click <OK> (need screen shot). Ad Manager will display those Reservations that match the criteria entered. | ||
When the Filter is active, a check mark will appear in the filter box. To clear the filter and see all records, click in the checkbox, and in the following window click <Clear>, followed by the <OK> button. | When the Filter is active, a check mark will appear in the filter box. To clear the filter and see all records, click in the checkbox, and in the following window click <Clear>, followed by the <OK> button. | ||
| − | == Segments (Filler) == | + | === Segments (Filler) === |
The Segments (Filler) Page of a Media Item displays those Loop Segments on which the Media Item has been added as Filler for padding of the Segment. (need screen shot) | The Segments (Filler) Page of a Media Item displays those Loop Segments on which the Media Item has been added as Filler for padding of the Segment. (need screen shot) | ||
As with other lists in Ad Manager, the view can be customized and ordered as desired. | As with other lists in Ad Manager, the view can be customized and ordered as desired. | ||
| Line 106: | Line 126: | ||
To filter the list of Segments in order to see a subset list, click the Filter checkbox at the top of the pane. (need filter screen shot). | To filter the list of Segments in order to see a subset list, click the Filter checkbox at the top of the pane. (need filter screen shot). | ||
| − | In the following window enter the criteria for the desired Segment(s), and click <OK> | + | In the following window enter the criteria for the desired Segment(s), and click <OK> . Ad Manager will display those Segments that match the criteria entered. |
When the Filter is active, a check mark will appear in the filter box. To clear the filter and see all records, click in the checkbox, and in the following window click <Clear>, followed by the <OK> button. | When the Filter is active, a check mark will appear in the filter box. To clear the filter and see all records, click in the checkbox, and in the following window click <Clear>, followed by the <OK> button. | ||
| Line 114: | Line 134: | ||
Update - The Update tool is used to modify one or more properties for the selected Media Item(s). (Need screen shot) NOTE: When using this tool it is important that the data being updated is common to ALL selected Media Items. | Update - The Update tool is used to modify one or more properties for the selected Media Item(s). (Need screen shot) NOTE: When using this tool it is important that the data being updated is common to ALL selected Media Items. | ||
| − | Click the checkbox beside the data to be updated, enter the new details and click <OK>. To update Content Manager information such as the Thumbnail | + | Click the checkbox beside the data to be updated, enter the new details and click <OK>. To update Content Manager information such as the Thumbnail and length of the Media Item(s), click the checkbox beside the data to be updated, Ad Manager will update the field(s) on all selected Media Items. |
Create Media Set - To create a Media Set of Media Items, select in the list and choose Create Media Set. Ad Manager will add these Media Items to a new Media Set and display the ones selected in the Items pane of that Media Set. (need screen shot). For further information on Media Sets, click here. | Create Media Set - To create a Media Set of Media Items, select in the list and choose Create Media Set. Ad Manager will add these Media Items to a new Media Set and display the ones selected in the Items pane of that Media Set. (need screen shot). For further information on Media Sets, click here. | ||
| Line 123: | Line 143: | ||
Go To - The Go To feature allows users to open and view details of the related object that was selected from the "Go To" list. (need screen shot) Note that this feature can only be used with single Media Items. If more than one Media Item is selected, the feature is not available to the user. | Go To - The Go To feature allows users to open and view details of the related object that was selected from the "Go To" list. (need screen shot) Note that this feature can only be used with single Media Items. If more than one Media Item is selected, the feature is not available to the user. | ||
| + | |||
| + | == Media Sets == | ||
| + | |||
| + | Media Sets are a collection of Media Items, which can contain images, video and scripts or combinations of the same. They can be viewed in a number of ways:- | ||
| + | |||
| + | 1. From a Finder of All Media Sets - this will display a list of all Media Sets currently in the Ad Manager database that meet the search criteria entered in the Finder. (need screen shot) | ||
| + | |||
| + | 2. From the Ads page of a Reservation. - this will display those Media Sets that are associated with that particular Reservation. (need screen shot) | ||
| + | |||
| + | 3. From the Media Sets page of a Media Item - this will display those Media Sets to which the Media Item belongs. (need screen shot) | ||
| + | |||
| + | They can be created in a number of ways:- | ||
| + | |||
| + | 1. By using the Create Media Set Tool when on a list of selected Media Items. | ||
| + | |||
| + | 2. By right clicking and choosing "New" when on a list of All Media Sets. | ||
| + | |||
| + | 3. By clicking the File Menu item>New>Other>Media Set (need screen shot) | ||
| + | |||
| + | To view the information about a particular Media Set, double-click the selected Media Set in a list; right-click while on the selected Media Set in the list and choose Properties; or click the Properties button (when available on a Page) when a Media Set is selected. (need screen shot) | ||
| + | |||
| + | === Details === | ||
| + | The Details Page of a Media Set contains such information as the Name of the Set, the Advertiser associated with the Set and the Media Items contained in the Set. | ||
| + | |||
| + | Name - Enter the name for this particular Media Set in this field. Note that is a required field and Ad Manager will not allow the Media Set to be saved without something entered here. | ||
| + | |||
| + | Description - This is a further description of the Media Set for ease of identification. | ||
| + | |||
| + | Advertiser - Select the Advertiser for the Media Set from the dropdown list. If the name is not present in the list, users can create a new Advertiser as required. | ||
| + | |||
| + | Brand - Select the particular Brand for the Media Set from the dropdown list. If the name of the Brand is not present in the list, users can create a new one as required. | ||
| + | |||
| + | Items - The Items pane displays all Media Items that are part of this Media Set as well as details about their length, and scheduling information. These can be images, videos and/or scala script files. | ||
Latest revision as of 13:37, 31 January 2018
Media is the term used to identify the advertising assets that play on Digital Players. They are identified in Ad Manager's Digital 2 module as either a single Media Item or a Media Set of multiple Media Items. They are added to scheduled Reservations and published to the Players along with scheduling criteria.
Contents |
Media Items
Media Items can be viewed in a number of ways:-
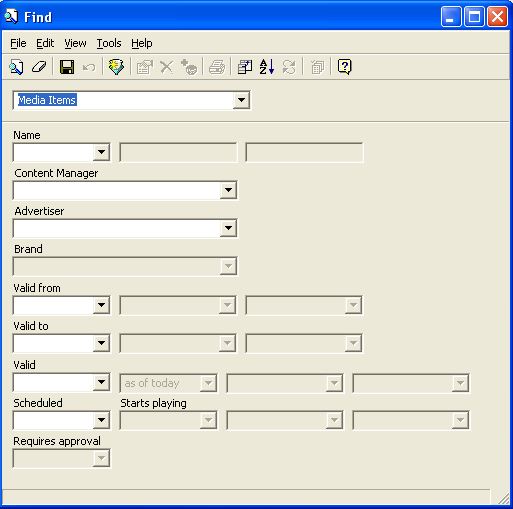
1. From a Finder of All Media Items - this will display a list of all Media Items currently in the Ad Manager database that meet the search criteria entered in the Finder.
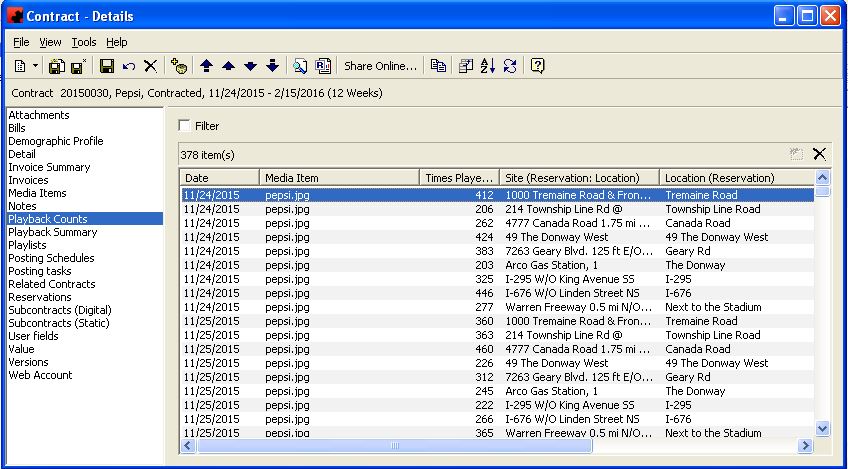
2. From the Media Items page of a Contract - this will display a list of all Media Items for the entire Contract that have been associated with its Reservations.
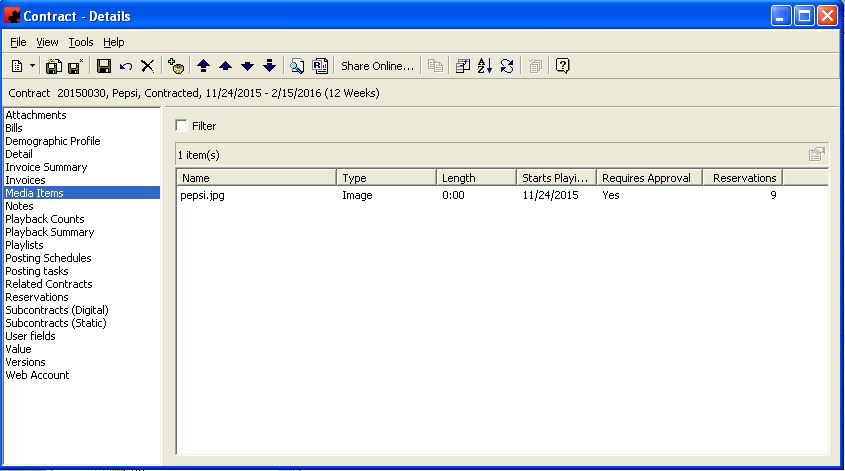
3. From the Media Items page of a Subcontract (Digital) - this will display a list of all Media Items for that particular Subcontract (Digital) that have been associated with its Reservations.
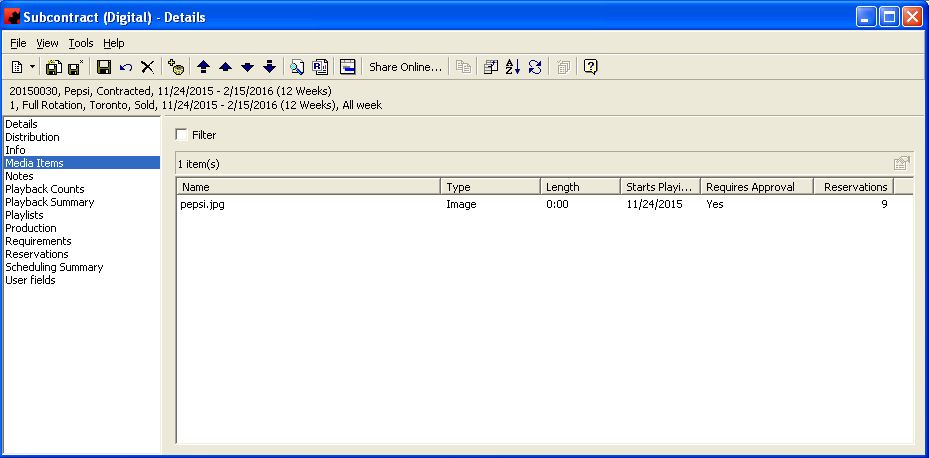
4. From the Media Items page of a Reservation. - this will display those Media Items that are associated with that particular Reservation.
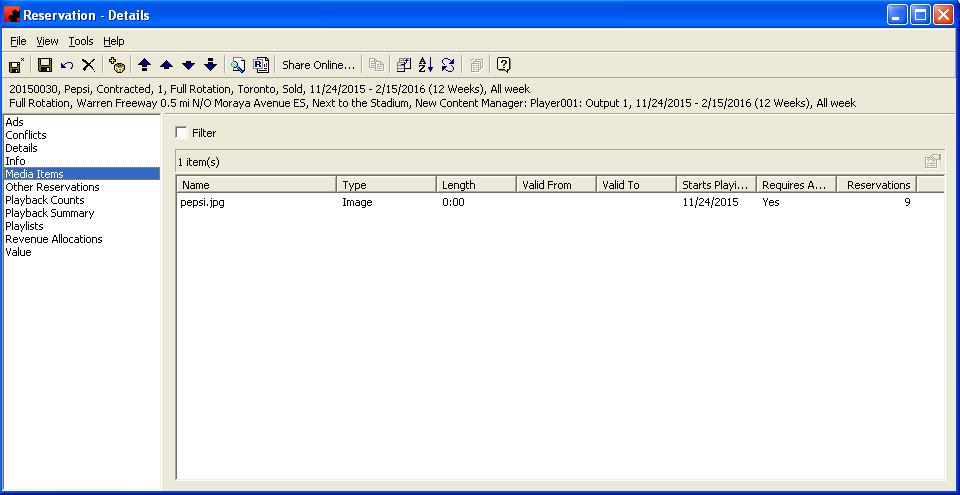
To view the information about a particular Media Item, double-click the selected Media Item in a list; right-click while on the selected Media Item in the list and choose Properties; or click the Properties button (when available on a Page) when a Media Item is selected.
Details
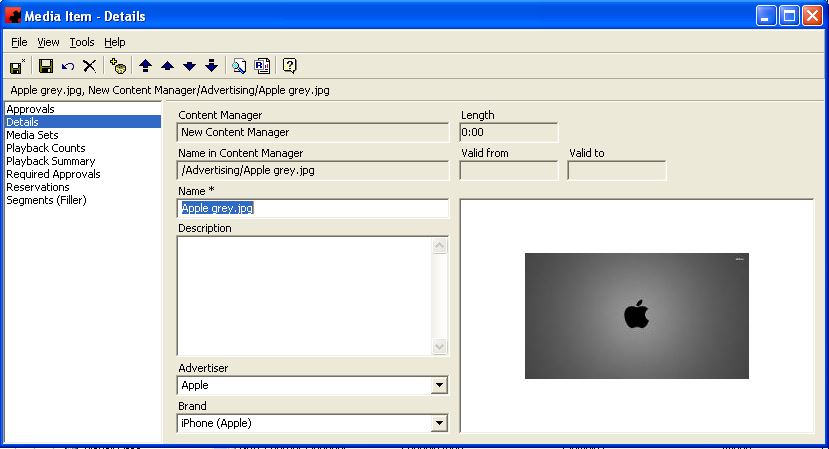
The Details Page of a Media Item displays some default information about the Item that is contained in Content Manager as well as fields to associate it with an Advertiser as well as a Brand. As well, users can also see a thumbnail of the Media Item, if available.
Content Manager - This field itentifies the Content Manager that contains the Media Item
Length - This field identifies the length of the media item in Content Manager. NOTE: If the Media Item is a static image there will be no time associated with it.
Name in Content Manager - This field identifies the name that the Media Item has been given when uploaded to Content Manager.
Name* - This is the Ad Manager name for the Media Item. Note that when Media Items are imported from Content Manager they are given the same same. Users can modify this name if required. However, it is strongly recommended that users name the Media Item the same in Ad Manager and Content Manager for ease of identification.
Description - This field can be used to further describe the Media Item.
Advertiser - This field associates the Media Item with a particular Advertiser. Select from the pick list or add a new one as required.
Brand - This field associates the Media Item with a particular Brand of the Advertiser. Select from the pick list or add a new one as required.
Valid From - This date from Content Manager identifies the earliest date this media item can play, whether it is scheduled or not.
Valid To - This date from Content Manager identifies the latest date this media item can play, whether it is scheduled or not.
Approvals
The Approvals Page of a Media Item displays a list all Landlord Approvals that have been entered into the data for this Media Item.
As with other lists in Ad Manager, the view can be customized and ordered as desired.
The fuctions available through the buttons immediately above the pane are:
- To add a new Landlord Approval, select the New button. In the following screen select the Landlord name from the pick list and save the record. Note that users cannot add nor edit the Media Item field nor Approved on field. These are system generated fields.
- To remove a Landlord Approval, select it in the list and click the delete button. Ad Manager will ask for confirmation of the deletion. Click <Yes> to remove the Approval or click <No> to cancel the deletion.
- To modify the Landlord information for a particular Approval, select it in the list and click the Edit button. Alternatively, users can double click the item in the list to open the Edit function. Note that only the Landlord name can be modified by the user.
To filter the list of Landlord Approvals, in order to see a subset list, click the Filter checkbox at the top of the pane. In the following window enter the criteria for the desired Approval(s), and click <OK>. Ad Manager will display those Approvals that match the criteria entered. When the Filter is active, a check mark will appear in the filter box. To clear the filter and see all records, click in the checkbox, and in the following window click <Clear>, followed by the <OK> button.
Media Sets
The Media Sets Page displays a list of all Media Sets that contain this particular Media Item. As with other lists in Ad Manager, the view can be customized and ordered as desired.
Users cannot create nor delete Media Sets from this Page, However, information about a Media Set can be viewed and modified.
- To view and/or modify the information for a particular Media Set, select it in the list and click the Properties button. Alternatively, users can double click the item in the list to open the Edit function.
To filter the list of Media Sets, in order to see a subset list, click the Filter checkbox at the top of the pane. (need filter screen shot). In the following window enter the criteria for the desired Media Set(s), and click <OK>. Ad Manager will display those Media Sets that match the criteria entered. When the Filter is active, a check mark will appear in the filter box. To clear the filter and see all records, click in the checkbox, and in the following window click <Clear>, followed by the <OK> button.
Playback Counts
The Media Item Playback Counts Page displays information as to how many times this particular Media Item played on the Players to which it was scheduled.
The page provides details about the Dates it played, Times played per Screen, Number of Screens, etc. As with any list, the view can be customized to add/remove columns of data and the list can be ordered as desired. Users cannot add nor modify an item on this page as it is populated from the connection to Content Manager. However, users may delete any item(s) from this list as desired.
[File:New_delete_button.JPG]] -To delete the item(s), select in the list and click the delete button in the top right of the pane.
To filter the list of Playback counts to see a subset list, click the Filter checkbox at the top of the screen. In the following window enter the criteria for the desired Playback Count(s), and click <OK> . Ad Manager will display those Playback Counts that match the criteria entered. To enter filter criteria based on Reservation and/or Media Item criteria, click the appropriate box and enter the criteria as necessary. When the Filter is active, a check mark will appear in the filter box. To clear the filter and see all records, click the checkbox, and in the following window click <Clear>, followed by the <OK> button.
Playback Summary
The Media Item Playback Summary Page displays a summary of the Playback Counts to date for this particular Reservation.
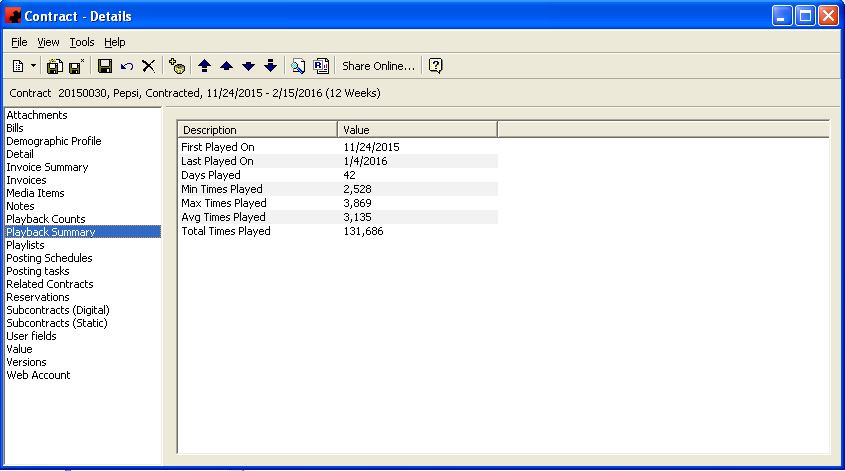
Users cannot add, delete nor modify the information displayed on this page. It is populated by information received from the connection to Content Manager and calculations are applied by Ad Manager.
Required Approvals
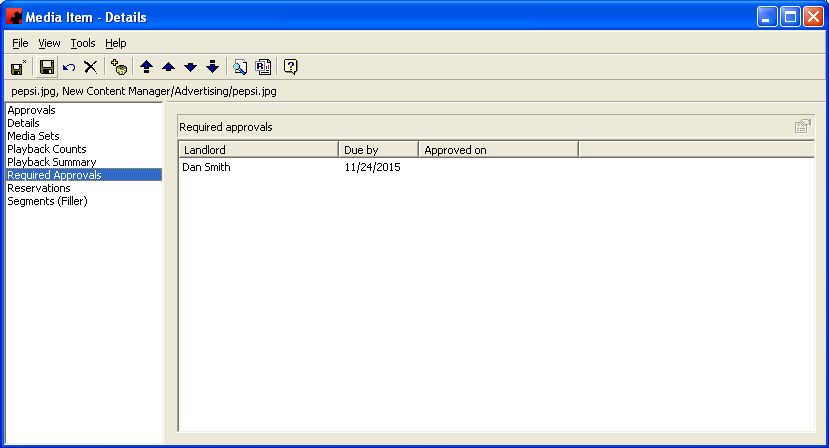
The Required Approvals Page of a Media Item displays a list of Landlord Approvals required and their Due by and Approved on Dates. (need screen shot)
Users cannot add nor delete any Approval that is displayed on the page. However, the Approval can be modified as to whether it happened.
- To edit an Approval, select it and click the Edit button. Alternatively, users can double click the item to open the Edit function. (need screen shot) Check the box beside "Approved" as appropriate. NOTE: Ad Manager automatically sets the approval date as the date that the box has been checked. As well, the Due by date is populated as the first start date of the Reservation to which the Media Item has been scheduled.
Reservations
The Reservations Page of a Media Item displays all Reservations to which the Item has been scheduled either individually or as part of a Media Set. As with other lists in Ad Manager, the view can be customized and ordered as desired.
Users cannot add nor delete Reservations that are displayed on the page. However, a Reservation can be viewed and modified, if required.
- To view and/or modify the information about a particular Reservation, select it in the list and click the Properties button. Alternatively, users can double click the item in the list to open the Reservation for editing or viewing purposes.
To filter the list of Reservations in order to see a subset list, click the Filter checkbox at the top of the pane.
In the following window enter the criteria for the desired Reservationl(s), and click <OK> (need screen shot). Ad Manager will display those Reservations that match the criteria entered. When the Filter is active, a check mark will appear in the filter box. To clear the filter and see all records, click in the checkbox, and in the following window click <Clear>, followed by the <OK> button.
Segments (Filler)
The Segments (Filler) Page of a Media Item displays those Loop Segments on which the Media Item has been added as Filler for padding of the Segment. (need screen shot) As with other lists in Ad Manager, the view can be customized and ordered as desired.
Users cannot and nor delete any Segment that is displayed on the page. However, the Segment can be viewed and modified, if required.
- To view and/or modify the information about a particular Segment, select it in the list and click the Properties button. Alternatively, users can double click the item in the list to open the Segment for editing or viewing purposes. (need screen shot)
To filter the list of Segments in order to see a subset list, click the Filter checkbox at the top of the pane. (need filter screen shot). In the following window enter the criteria for the desired Segment(s), and click <OK> . Ad Manager will display those Segments that match the criteria entered. When the Filter is active, a check mark will appear in the filter box. To clear the filter and see all records, click in the checkbox, and in the following window click <Clear>, followed by the <OK> button.
Right Click
Right clicking on the list of Media Items will display this menu. (Need screen shot) From here users can do such activities as create Media Sets, record approvals, republish the Media Items to Content Manager, and alter the Advertiser/Brand information as well as information from Content Manager using the Update option.
Update - The Update tool is used to modify one or more properties for the selected Media Item(s). (Need screen shot) NOTE: When using this tool it is important that the data being updated is common to ALL selected Media Items. Click the checkbox beside the data to be updated, enter the new details and click <OK>. To update Content Manager information such as the Thumbnail and length of the Media Item(s), click the checkbox beside the data to be updated, Ad Manager will update the field(s) on all selected Media Items.
Create Media Set - To create a Media Set of Media Items, select in the list and choose Create Media Set. Ad Manager will add these Media Items to a new Media Set and display the ones selected in the Items pane of that Media Set. (need screen shot). For further information on Media Sets, click here.
Record Approval - To record Landlord Approvals on the Media Item(s), select in the list and choose Record Approval. (need screen shot) Select the Landlord name from the list and click <OK> Ad Mananger will update the Approvals Page of the selected Media Item(s) with the Landlord information as well as today's date and time.
Republish - This tool is used to republish previously published Media Items(s). Select the Media Items(s) to be republished, right click and choose Republish from the list. Ad Manager will mark the selected Media Item(s) to be republished to Content Manager.
Go To - The Go To feature allows users to open and view details of the related object that was selected from the "Go To" list. (need screen shot) Note that this feature can only be used with single Media Items. If more than one Media Item is selected, the feature is not available to the user.
Media Sets
Media Sets are a collection of Media Items, which can contain images, video and scripts or combinations of the same. They can be viewed in a number of ways:-
1. From a Finder of All Media Sets - this will display a list of all Media Sets currently in the Ad Manager database that meet the search criteria entered in the Finder. (need screen shot)
2. From the Ads page of a Reservation. - this will display those Media Sets that are associated with that particular Reservation. (need screen shot)
3. From the Media Sets page of a Media Item - this will display those Media Sets to which the Media Item belongs. (need screen shot)
They can be created in a number of ways:-
1. By using the Create Media Set Tool when on a list of selected Media Items.
2. By right clicking and choosing "New" when on a list of All Media Sets.
3. By clicking the File Menu item>New>Other>Media Set (need screen shot)
To view the information about a particular Media Set, double-click the selected Media Set in a list; right-click while on the selected Media Set in the list and choose Properties; or click the Properties button (when available on a Page) when a Media Set is selected. (need screen shot)
Details
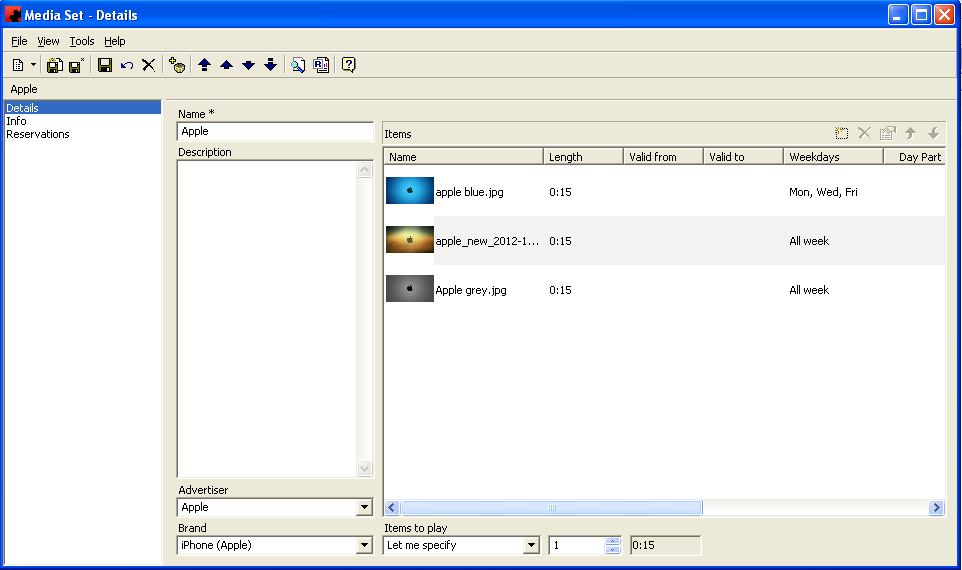
The Details Page of a Media Set contains such information as the Name of the Set, the Advertiser associated with the Set and the Media Items contained in the Set.
Name - Enter the name for this particular Media Set in this field. Note that is a required field and Ad Manager will not allow the Media Set to be saved without something entered here.
Description - This is a further description of the Media Set for ease of identification.
Advertiser - Select the Advertiser for the Media Set from the dropdown list. If the name is not present in the list, users can create a new Advertiser as required.
Brand - Select the particular Brand for the Media Set from the dropdown list. If the name of the Brand is not present in the list, users can create a new one as required.
Items - The Items pane displays all Media Items that are part of this Media Set as well as details about their length, and scheduling information. These can be images, videos and/or scala script files.
